
Most christmas door decorations for school 2026 roundups show you a pretty door and skip the part where twenty-seven kids walk past it every morning without ripping the paper. We spent a few weekends digging through Michaels, Dollar Tree, and Amazon — plus some very good teacher-Instagram rabbit holes — to pull together 29 ideas that actually survive December, from about $6 in construction paper to $240 in garlands and wooden signs. You’ll find paper gingerbread facades, chunky knit gnomes, nutcracker guards, upside-down deer, and a whole lot of Grinch.
Budget and splurge versions sit side by side, so you can see exactly where the money changes the look. In 2026 the energy has shifted toward kraft paper, cardboard, and things kids can help make — less glitter, more texture. And stay until the end — we break down the most common mistakes that can ruin these looks. 📌 Save this to Pinterest for later — you’ll want to revisit these ideas.
1. Chunky Knit Gnome With a Gold Bow and Berry Cluster
Size is the whole game with a yarn door hanger. Anything under 18 inches wide vanishes at the end of a hallway, so aim for 20 to 24 inches across and hang the center of the face roughly 58 to 60 inches off the floor — adult eye level, not kid eye level. Use super bulky weight-6 yarn and a 9mm hook so the stitches stay fat and readable from ten feet away. Lighter weights look stringy no matter how cute the hat is.
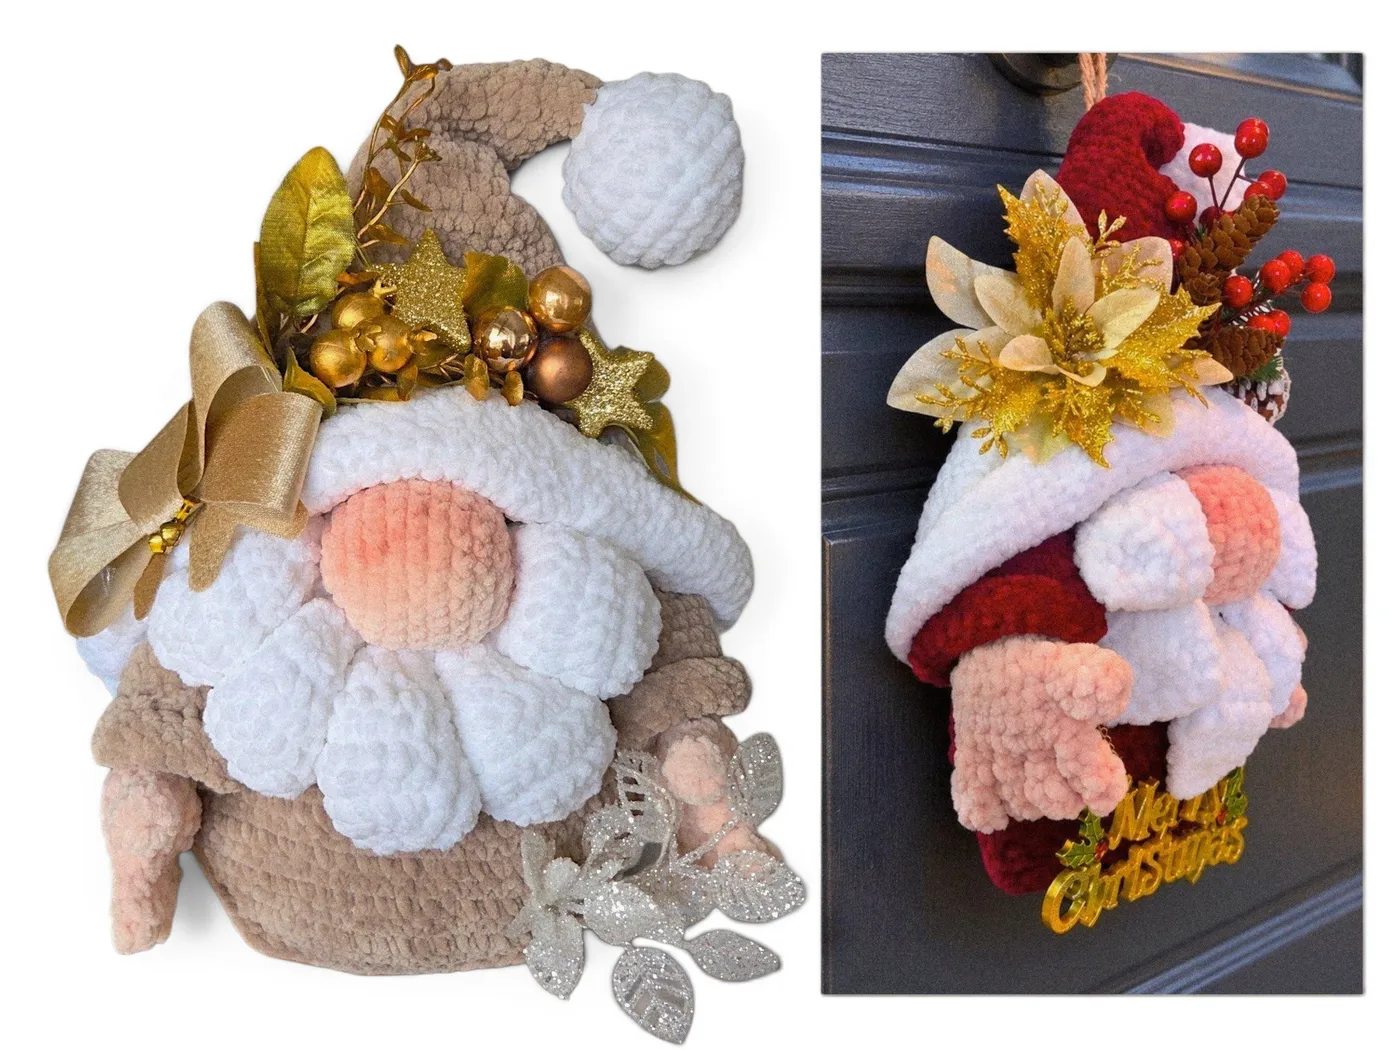
Strip the berries, glittered leaves, pinecones, gold bow, and that little Merry Christmas sign off this gnome and you’re left with a fuzzy white blob. The cluster is doing the heavy lifting. Notice how the extras gather on one side of the beard instead of ringing the whole face — that asymmetry is what makes it read as styled rather than assembled. Pick one corner, pile five or six pieces there, and leave the rest bare.
2. Life-Size Paper Nutcracker With Named Star Escorts
- Measure your door and cut kraft paper for the face — roughly 24 by 30 inches, centered.
- Layer black paper for the tall hat and a curled mustache, then add a red fabric scrap as the uniform below.
- Cut two cardboard trees and staple warm white string lights up each one.
- Cut small yellow stars, write one student name on each, and stagger them down both sides.
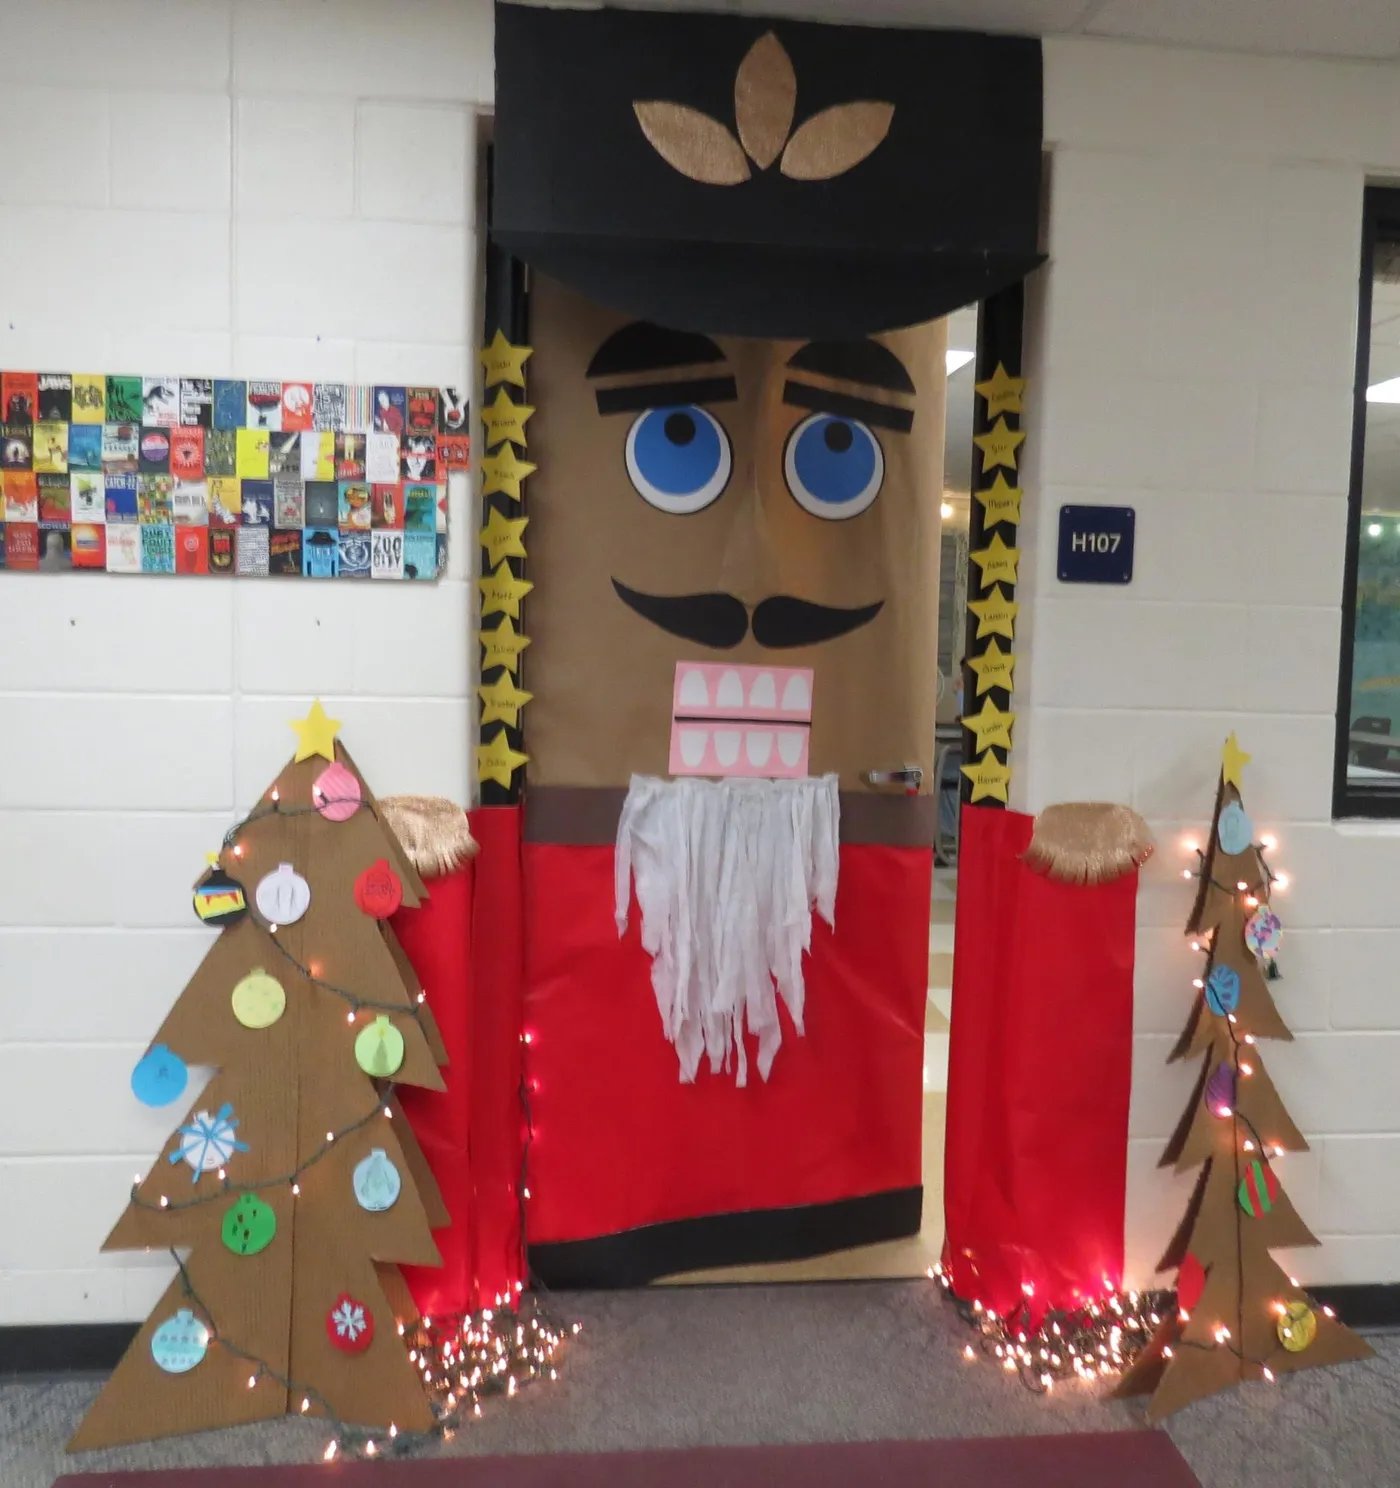
About three hours of hands-on work and $25 in materials, most of it already sitting in the supply closet.
Symmetry plus one rebel detail. The two lit trees frame the door like stage curtains, which makes a flat paper face feel like a character standing in a doorway. The named stars running down each side turn a decoration into a roll call — every kid scans for their own name before they even take their coat off. Take the stars away and it’s a nice nutcracker. Keep them and it’s their nutcracker.
3. Deep Blue Snowman Door With Layered Snowdrifts
The formula here is roughly 70 percent deep blue, 20 percent white paper, 10 percent personality — the orange carrot nose, the blue knit hat and scarf, the black coal smile. Deep blue does the work of a night sky, so every white snowflake pops without any extra effort. Swap the base to charcoal and the same snowflakes read modern and moody. Swap it to kraft brown and suddenly it’s a cabin scene. Hold the 70/20/10 and it works either way.
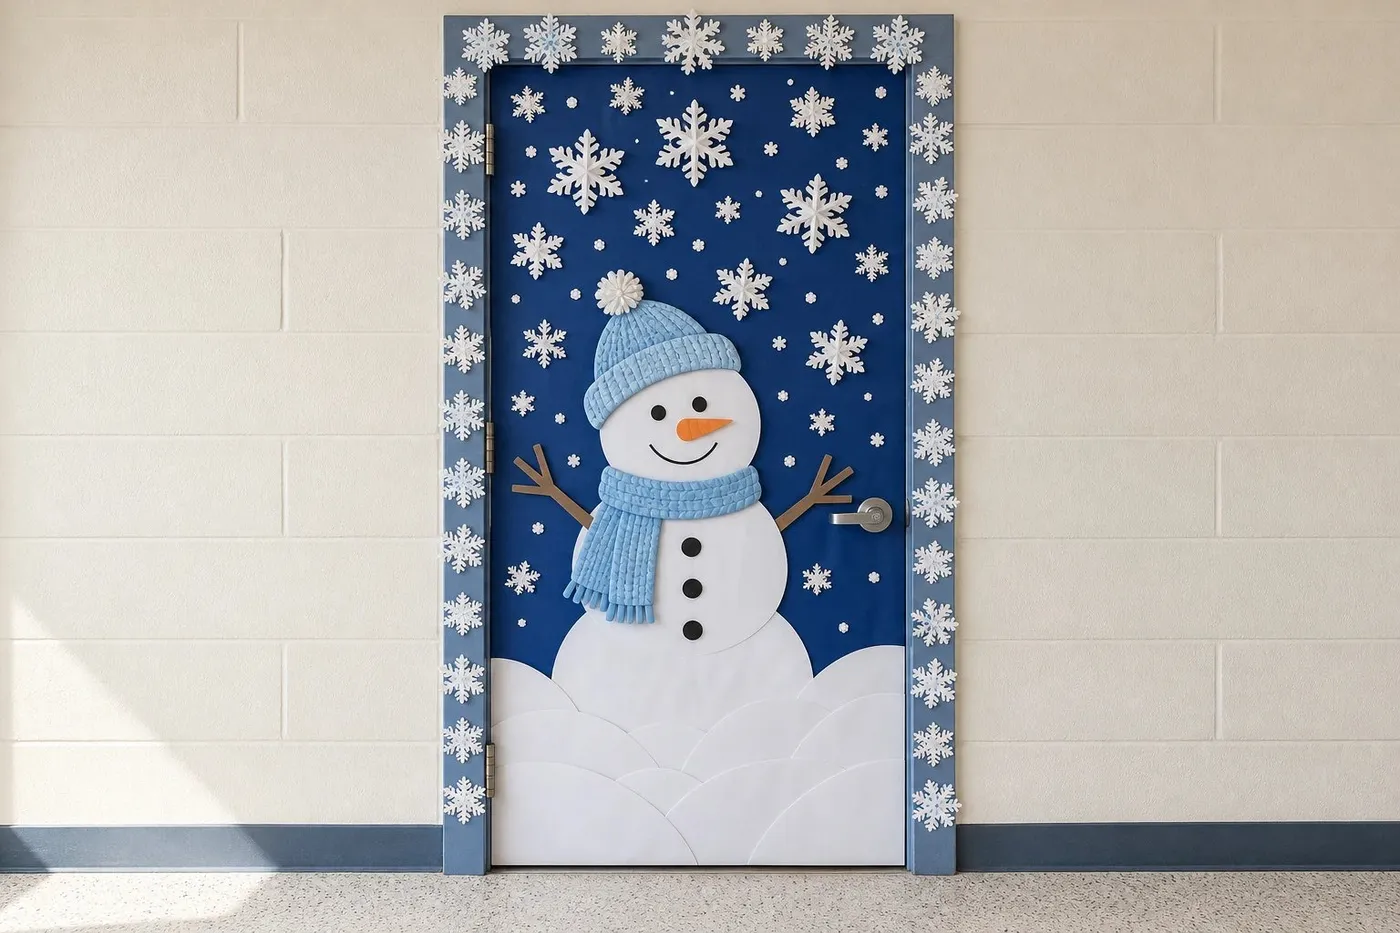
Cut snowflakes in three sizes — about 4, 8, and 14 inches — and place the biggest ones low and the small ones high, the way real snowfall photographs. Printer paper curls at the edges within a week; cardstock or 65-lb cover stock stays flat through December. Tape each one with a rolled loop of masking tape rather than double-sided tape, which pulls paint off the first time the door slams.
4. Gingerbread House Door With Giant Paper Lollipops
The oversized paper lollipops are the entire joke, and they only work because of scale. Each one runs roughly the height of a kindergartener, candy-cane striped in red and white, planted along the bottom third of the door with curved paper ground swirled around their bases. Small candy cutouts would have been wallpaper. Giant ones turn the door into a storefront. If you’re going to go big on exactly one thing, go big on the candy.
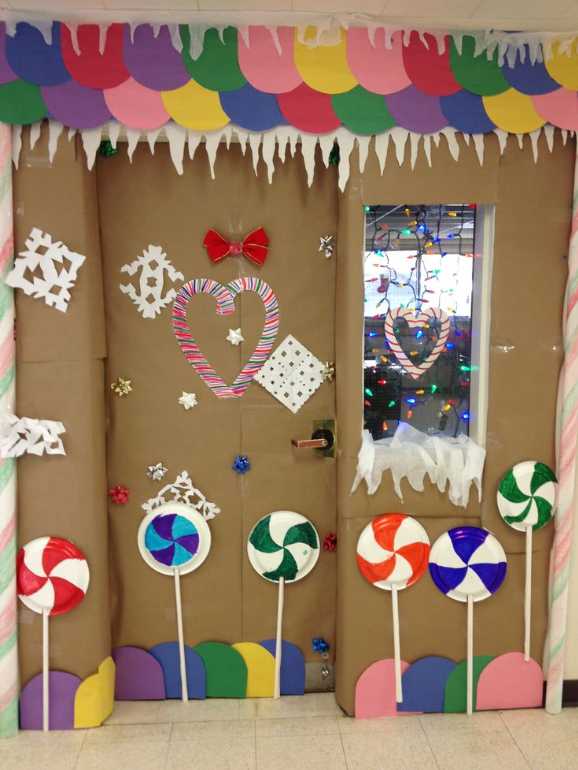
Two honest warnings before you commit. A classroom door opens dozens of times a day, and lollipops taped only at the top will flap and tear within a week — use adhesive putty at three points plus a strip of painter’s tape behind each one. And if your door has a glass vision panel, keep it clear. Most districts require that window stay unobstructed, string lights included.
5. Santa and Two Snowmen on a White Panel Door
This layout wants a standard 36-by-80-inch door and at least a foot of clear wall on each side. The characters run about 30 inches tall, which leaves a comfortable gap above the tallest hat and keeps everything inside the visual frame of the door. On a double door, shrink each figure to roughly 22 inches or it will feel crowded. Doors narrower than 32 inches work better with just Santa and one snowman.
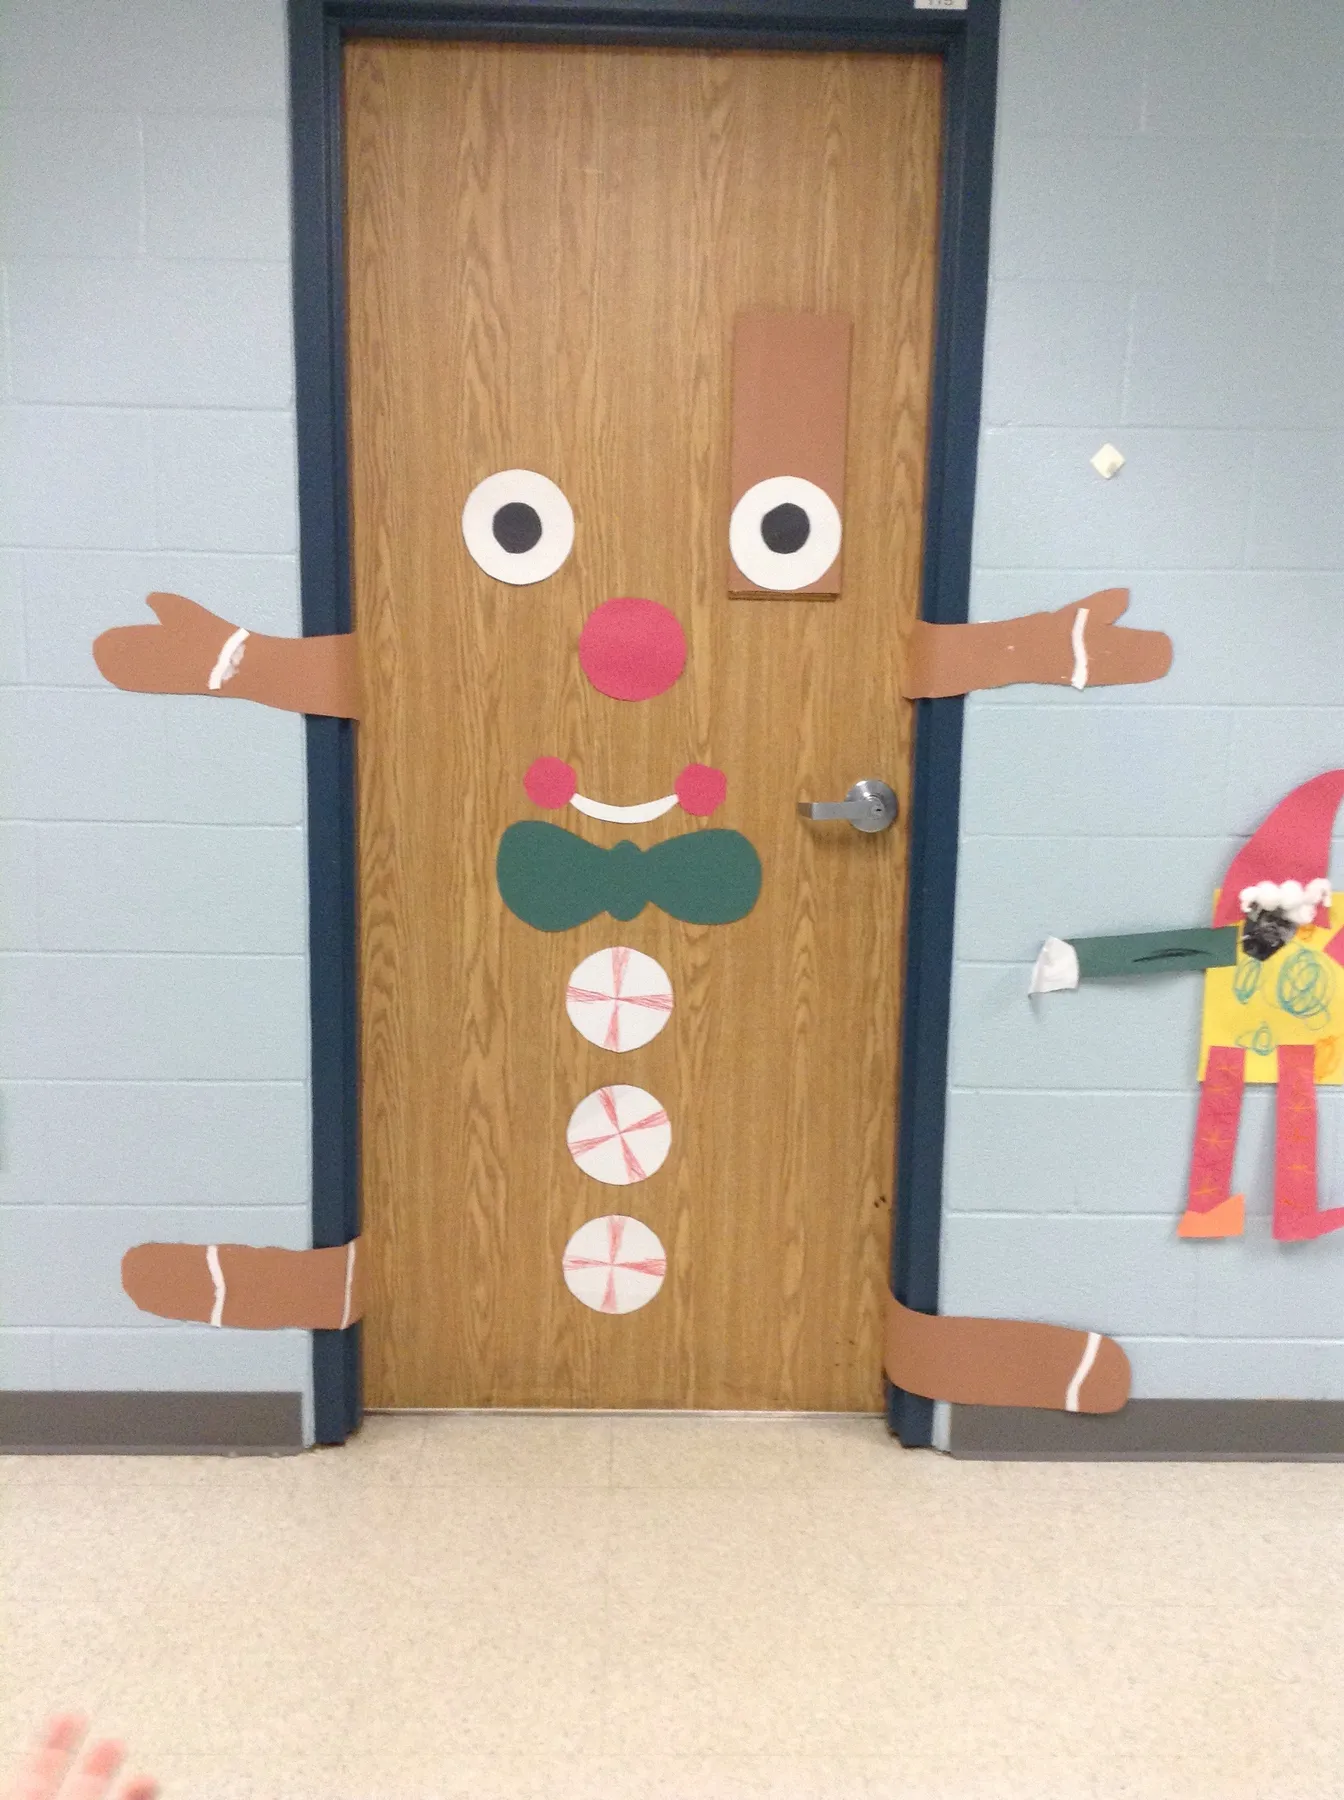
That green garland draped over the top corners is doing more than trimming — it hides the seam where the door frame meets the wall, which is where school doors look their most institutional. Wrap it loosely so it sags about four inches at each corner instead of pulling tight. Tight looks artificial; a little droop looks like someone actually decorated.
6. Paper String Lights Over Cotton Snow
The whole thing is construction paper, cotton batting, and a marker — maybe $12 if you’re starting from zero. Cut light bulbs from colored paper in two-inch ovals, glue them to a black paper cord, and string three rows across the top third of the door. A bag of cotton batting runs about $5 and covers the bottom half. This is the scrappy cousin of Idea #4‘s gingerbread storefront — same candy-bright palette, a fraction of the labor.
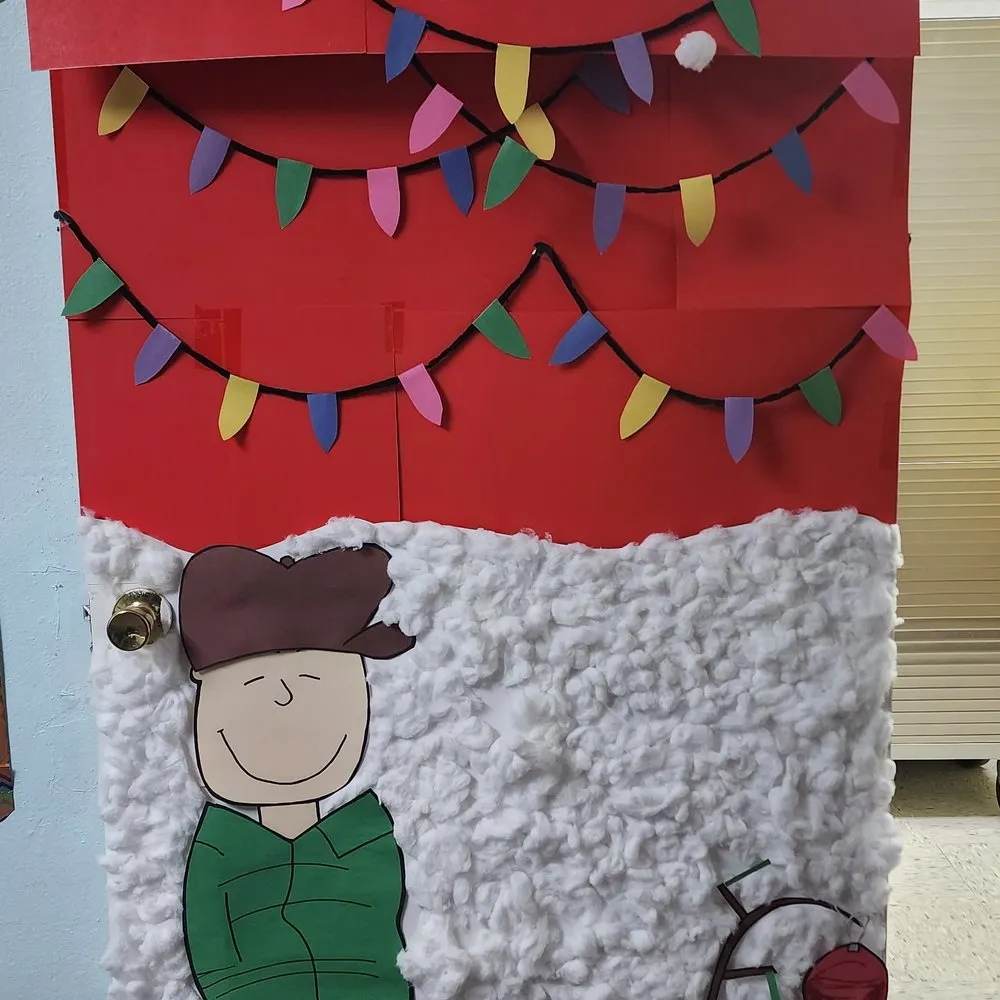
It reads as a landscape, not a poster. The paper lights create a festive sky band up top, the cotton becomes a snowbank below, and the cartoon character sits off to the left rather than dead center. That off-center placement is what keeps your eye moving around the composition instead of parking in the middle. Push the character to center and the whole thing goes stiff and symmetrical and instantly less fun.
7. Pink Gingerbread Facade With Paper-Plate Candy Roof
Paper plates and doilies make the best fake candy in the building. Glue a doily to a nine-inch plate, add a cellophane wrapper and twisted paper ends, and you have a peppermint swirl that reads from across the hallway. Stagger two rows along the roofline at different angles — flat, tilted, half-tucked — instead of lining them up like soldiers. Hot glue holds in cold hallways; tape does not.
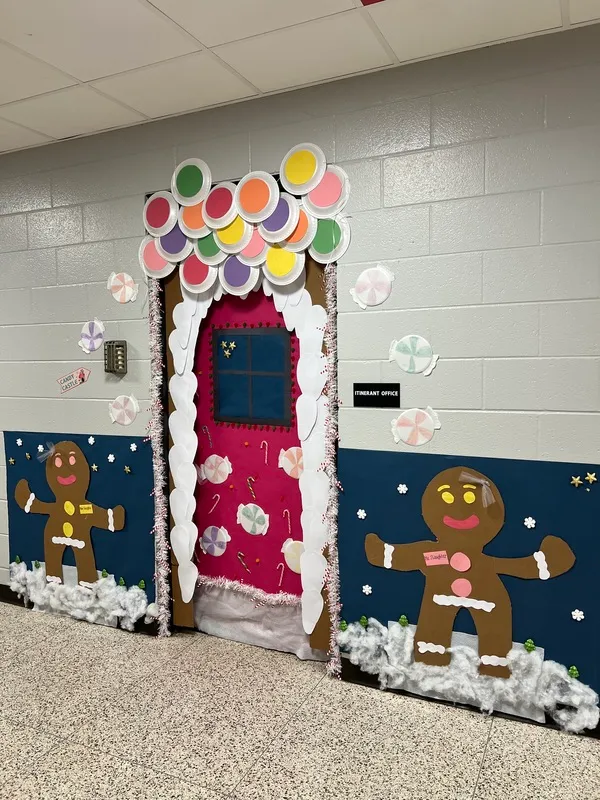
- Brown and pink kraft roll: $10–$18
- Paper plates, doilies, cardstock: $8–$15
- Cotton batting for snow: $5–$9
- Hot glue, tape, adhesive putty: $6–$12
- Gingerbread person cutouts, or hand-traced: $0–$10
Total: roughly $30–$65 for the door plus two flanking panels. Budget alternative: skip the kraft roll and flatten grocery bags instead, which drops you under $25.
8. A Single Santa Cutout and One Red Fabric Bow
It’s the bow. A paper bow here would have looked like a birthday party; a real fabric bow in a stiff red weave gives the whole door weight and a little shine under hallway fluorescents. Notice it’s tied off-center, sitting at the top left of the Santa head rather than dead center, which keeps the composition from feeling like a decal. One good ribbon, about $6 at a fabric store, is the difference between cute and considered.
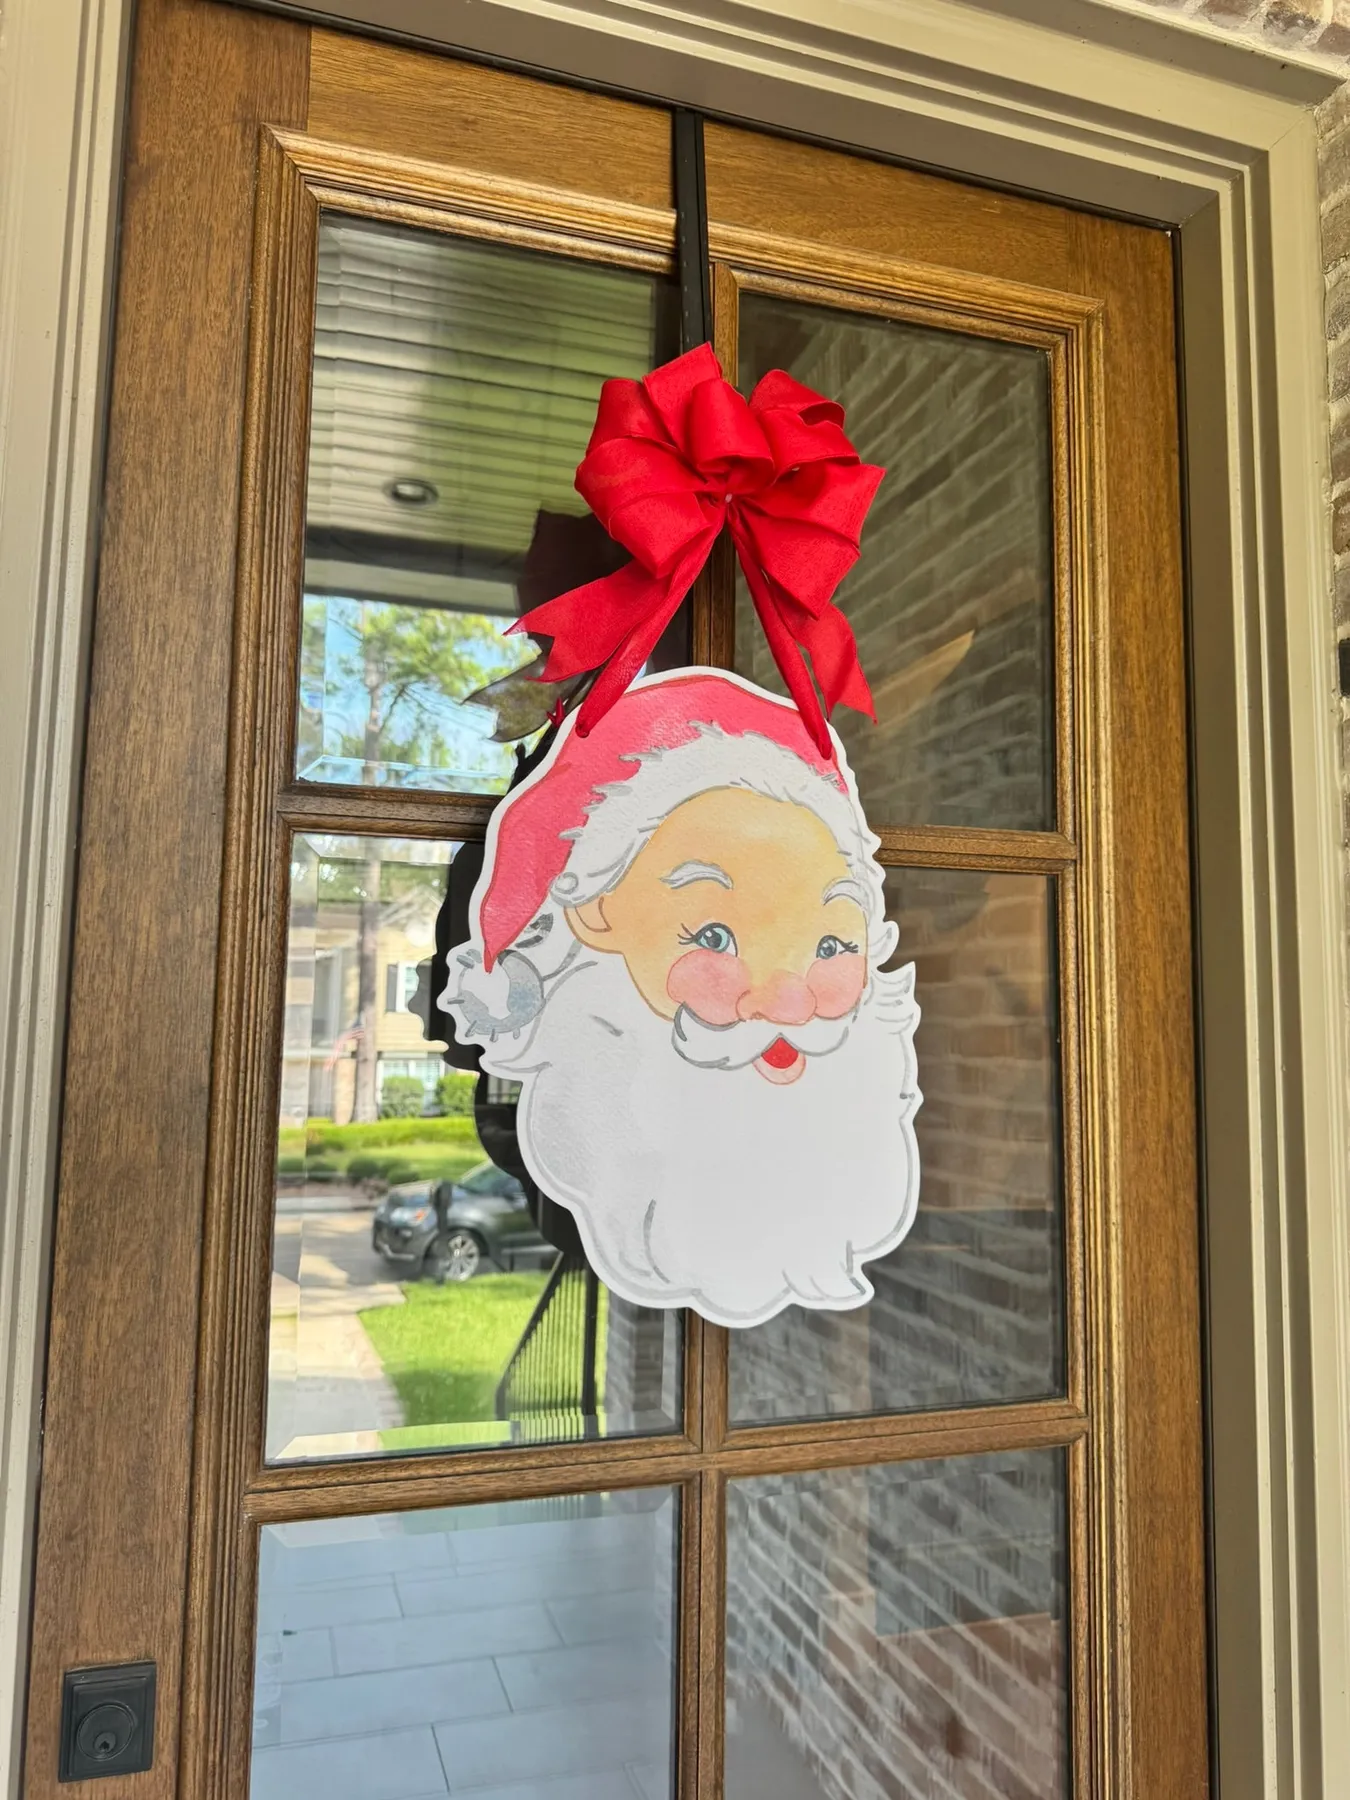
This door is mostly glass, which changes everything about how you hang things. Tape and putty won’t grip a smooth panel, and anything taped to the frame shows from the other side. Use suction cup hooks rated for a couple of pounds, or hang the cutout from a removable hook on the wood above the glass. And check whether that panel is a required sightline before you cover a single inch of it.
9. Gingerbread House Door With a Box-Stack Snowman
- Stack three progressively smaller boxes and wrap them in white paper.
- Tie a scarf around the middle box, then glue on a paper carrot nose and coal buttons.
- Cut a slot in a small red box, label it Santa, and attach it to the snowman’s side.
- Set the figure beside the door, never in front of it, so the doorway stays clear.
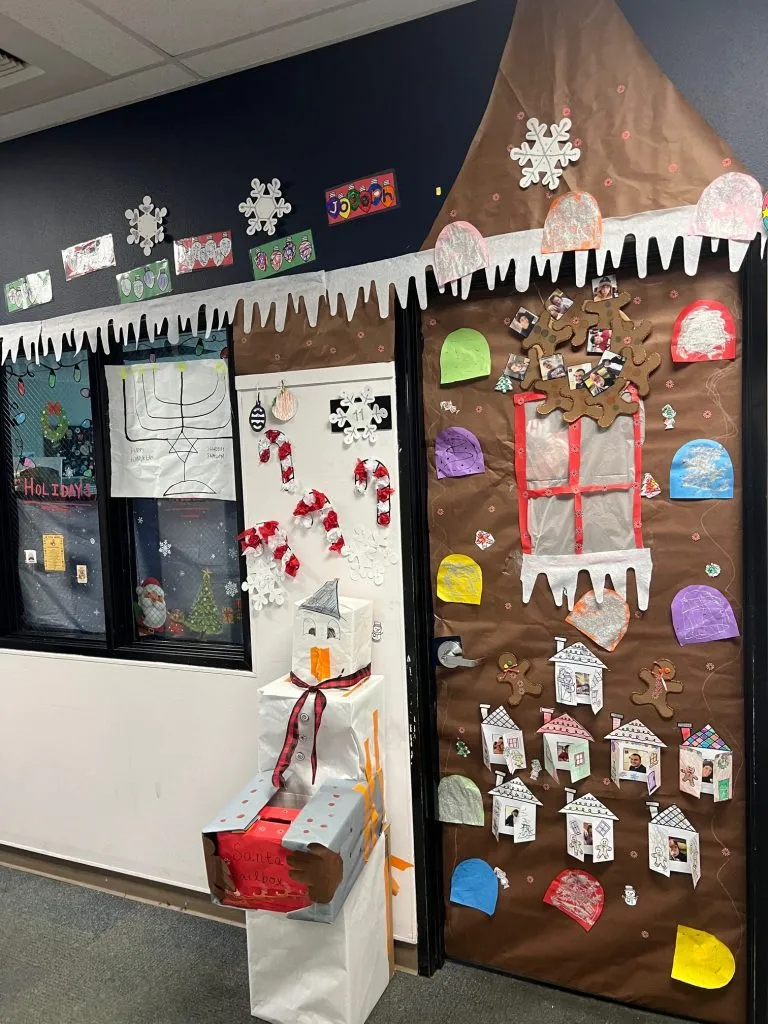
About ninety minutes and $10 in boxes and paper — the kind of project kids can genuinely help build.
The cardboard-and-kraft look is having a real moment in 2026, and it isn’t just a budget thing. Teachers are deliberately moving away from single-use plastic toward paper, boxes, and things that can be recycled in January. Searches for recycled classroom Christmas decor have climbed for three seasons straight. The upside: this style looks better than it has any right to, because visible tape lines and uneven edges read as handmade rather than sloppy.
10. Hand-Drawn Grinch With Cotton Ball Fur
Butcher paper, a black marker, a bag of cotton balls, and whatever colored paper is already in the cupboard. Under $15, and the drawing doesn’t have to be good — a wobbly Grinch reads as charming while a traced one reads as a printout. The cotton gets glued in clusters around the collar and cuffs rather than scattered evenly, which gives the costume a fuzzy three-dimensional edge. Buy the store brand; nobody can tell at hallway distance.
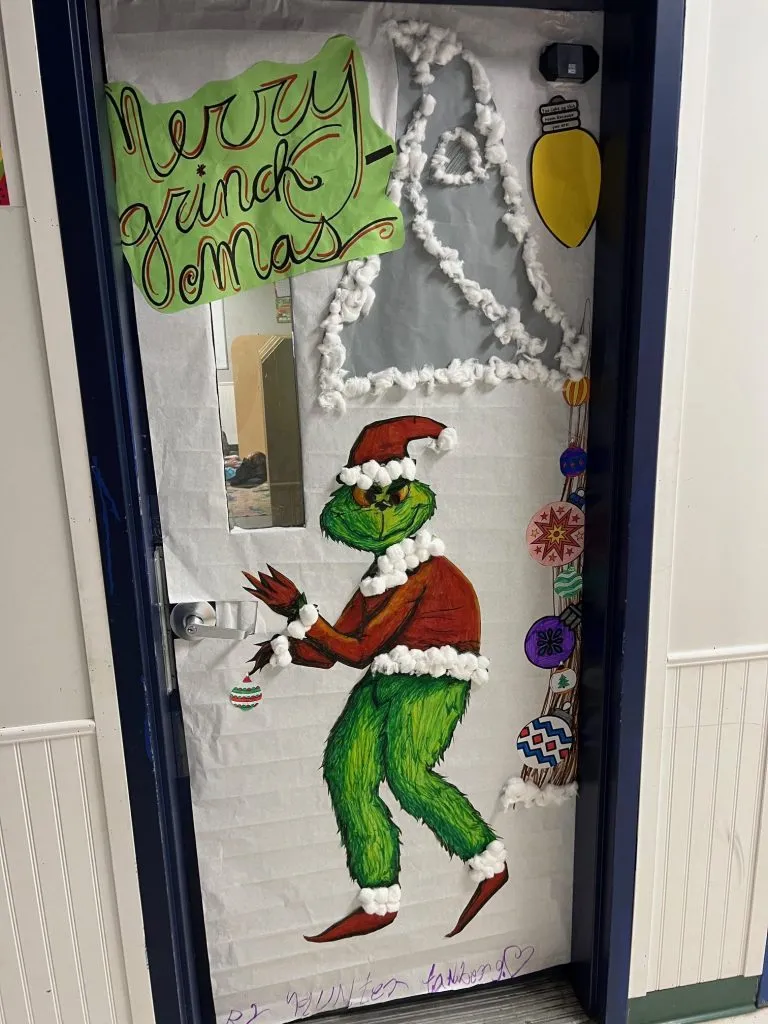
Density is everything with cotton balls. Glue them in tight overlapping clumps of six or seven and leave the paper between clumps bare. Evenly spaced singles look like a rash. Skip school glue and use low-temp hot glue or double-sided tape sheets, because white glue soaks through cotton and dries into gray lumps overnight.
11. Reindeer Name Speech Bubbles for Every Student
Repetition creates rhythm, and personalization creates ownership. Nine white speech bubbles with green script reindeer names march down the door in a consistent format, and each one carries a smaller colored bubble with a student’s name tucked underneath. The uniformity is what makes it look designed; the names are what make kids stop and point. This is the rare classroom door that works as decoration and as a roster at the same time.
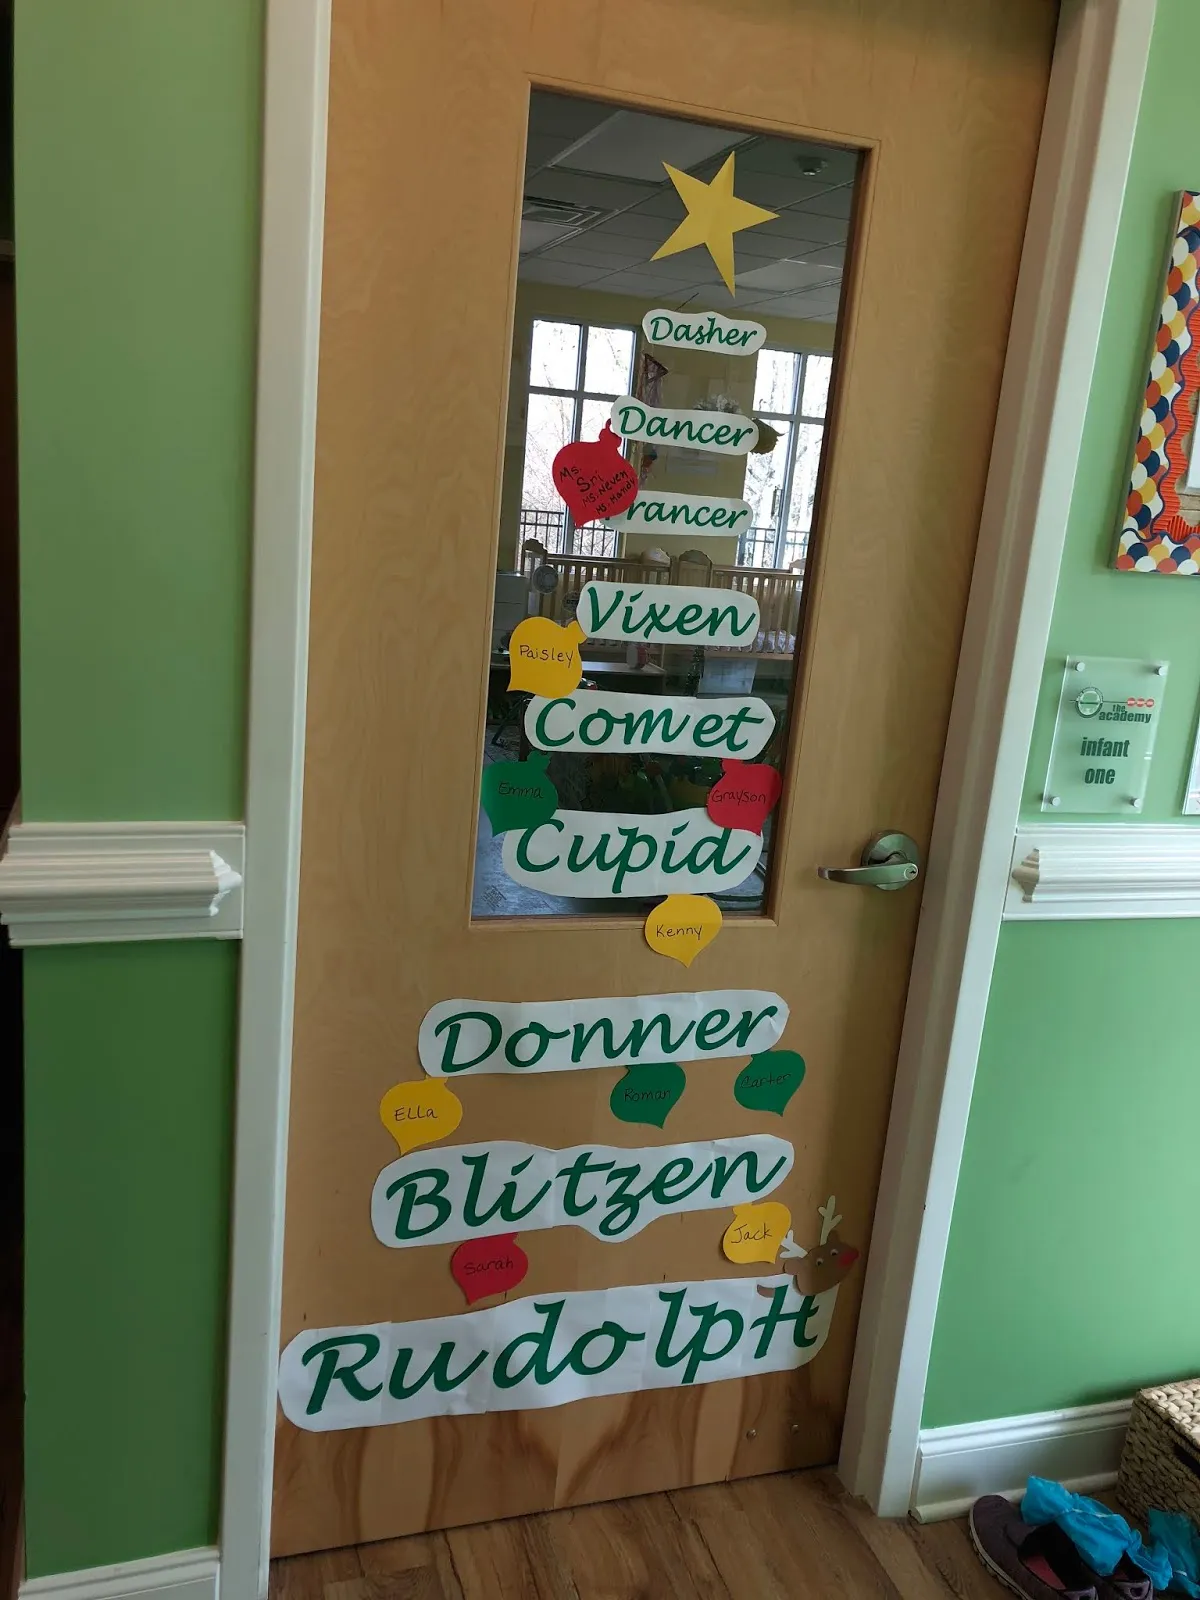
The reindeer bubbles run about six by four inches, with student tags at roughly two and a half — sizes that stay legible from the hallway but still fit 24 to 28 names on a single 36-inch door with breathing room. If your class runs over 30, drop the reindeer bubbles to five inches wide and stack two columns. Doors narrower than 32 inches look better with one column down the center glass.
12. Baby Faces Tucked Into Red Paper Stockings
- Red cardstock for stockings: $6–$12
- Printed photo cutouts, school printer: $0–$5
- Shiny red wrapping paper: $5–$10
- Assorted bows, ribbon, gold pen: $6–$14
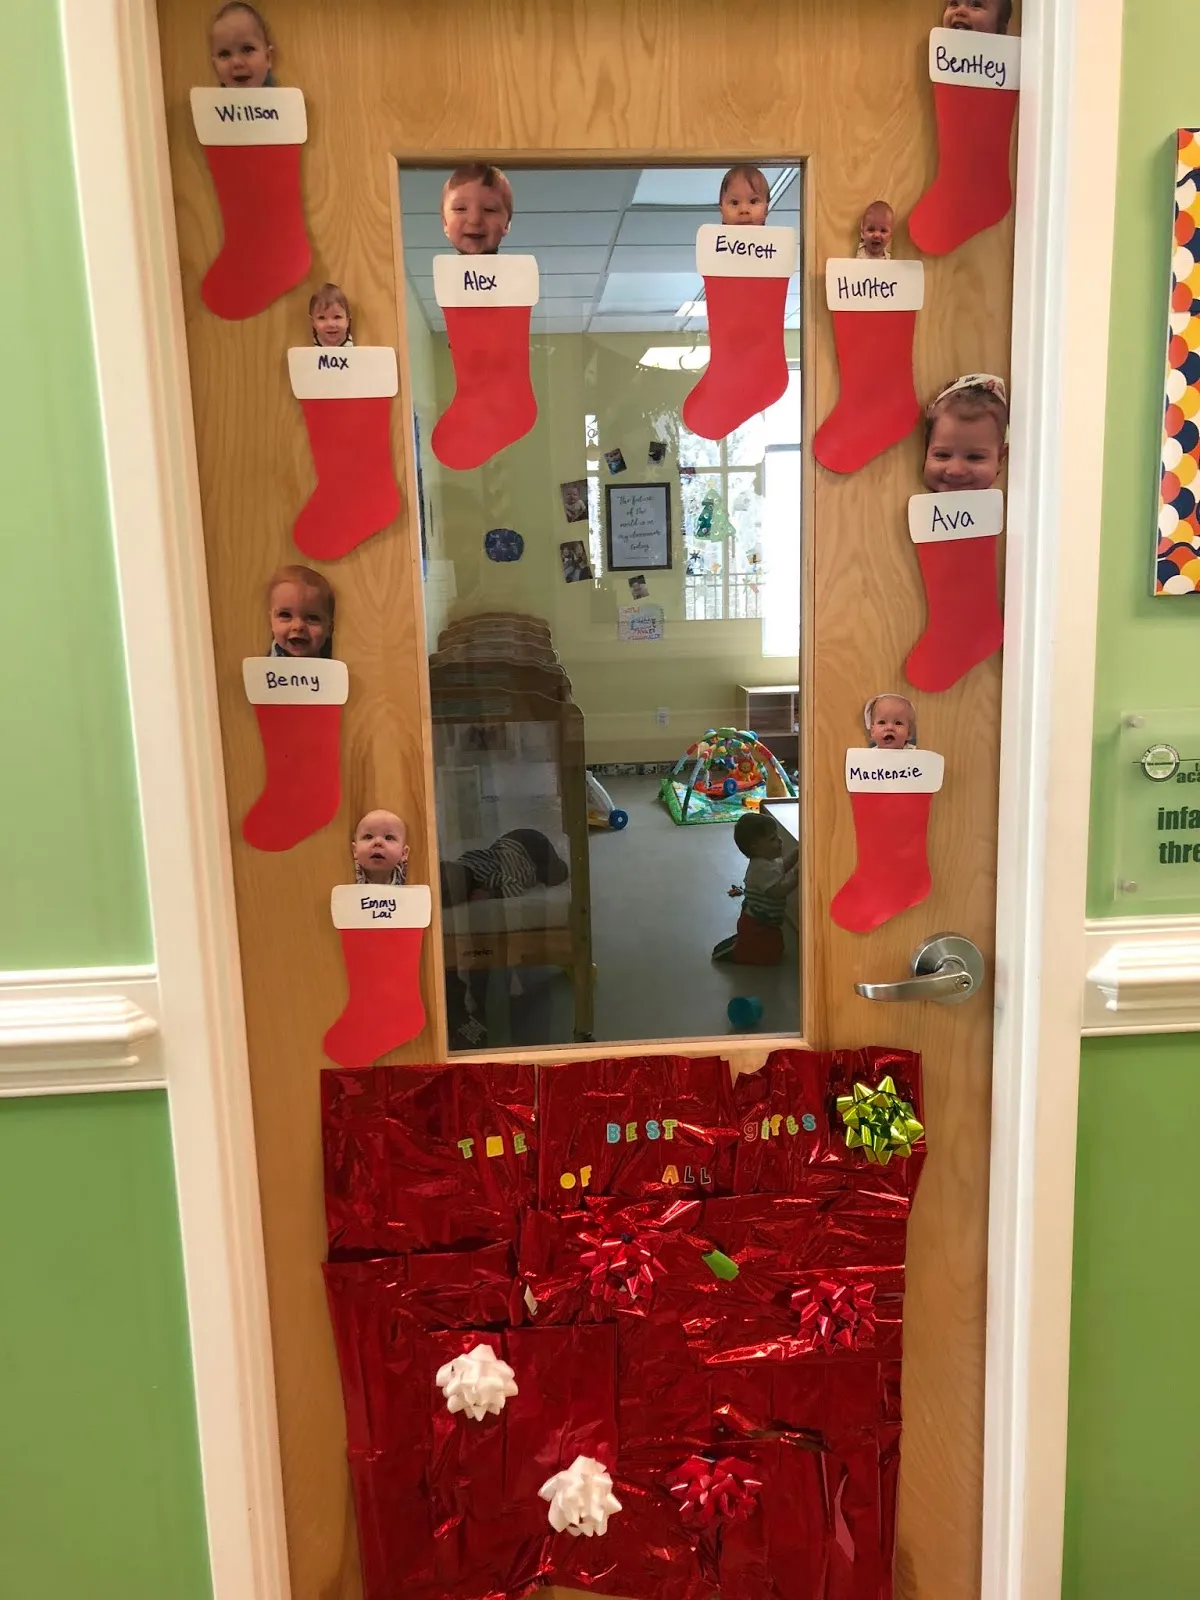
Total: roughly $17–$41 for a full door. Budget alternative: skip the wrapping paper and let the bare door be the background, which saves $10 and honestly looks cleaner in a hallway.
Check your school’s photo policy before you print a single baby picture. Many districts restrict displaying identifiable student images in public corridors, and a door facing the main hallway counts. If that’s a no, swap photos for hand-drawn self-portraits or first initials — the stocking concept works exactly the same. Also, shiny wrapping paper creases the moment a door swings, so tape it at the edges, not just the middle.
13. Whimsical Gnome Wreath With Dangling Striped Legs
The palette is 60 percent sage green and faux pine, 30 percent red, and 10 percent black and white buffalo plaid — and that last 10 percent is what keeps the red from turning syrupy. The plaid shows up on the doormat and the bows only, never on the gnome itself. Swap the sage door for navy and the whole thing gets sharper and more wintery. Swap the plaid for plain black and it goes flat in about four seconds.
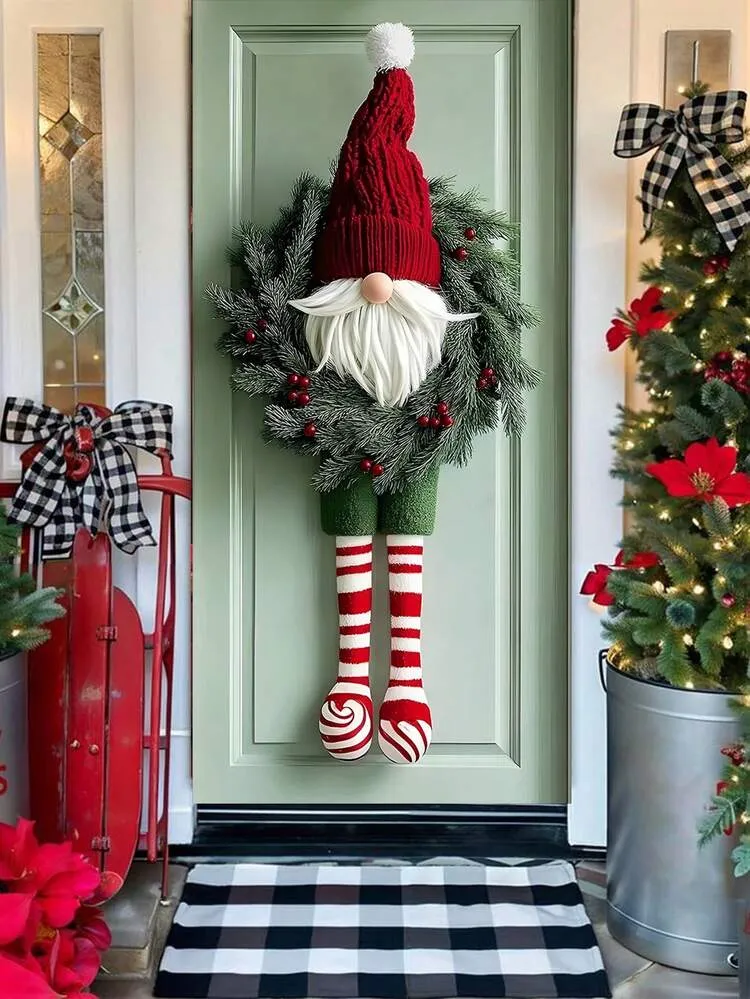
Faux pine sheds. Expect a small drift of plastic needles under the door by New Year’s, which is fine indoors and a genuine nuisance on a covered porch where wind gets at it. The knit hat will pill and collect every bit of lint in the hallway — hit it with a lint roller once a week. Striped fabric legs fade fastest near a window, so rotate or accept that they’ll soften to pink by mid-December.
14. Rustic Wood Slice Wreath With Red Candle Charms
- Cut 30 to 40 slices from a fallen branch, about two to three inches across and a half inch thick.
- Dry them on a rack for a week, or bake at 200°F for an hour to drive out moisture.
- Arrange the largest slices in a circle first, then fill the gaps with smaller ones.
- Hot glue from the back, one slice at a time, working around the ring.
- Tuck a small green garland and three red candle picks inside the frame.
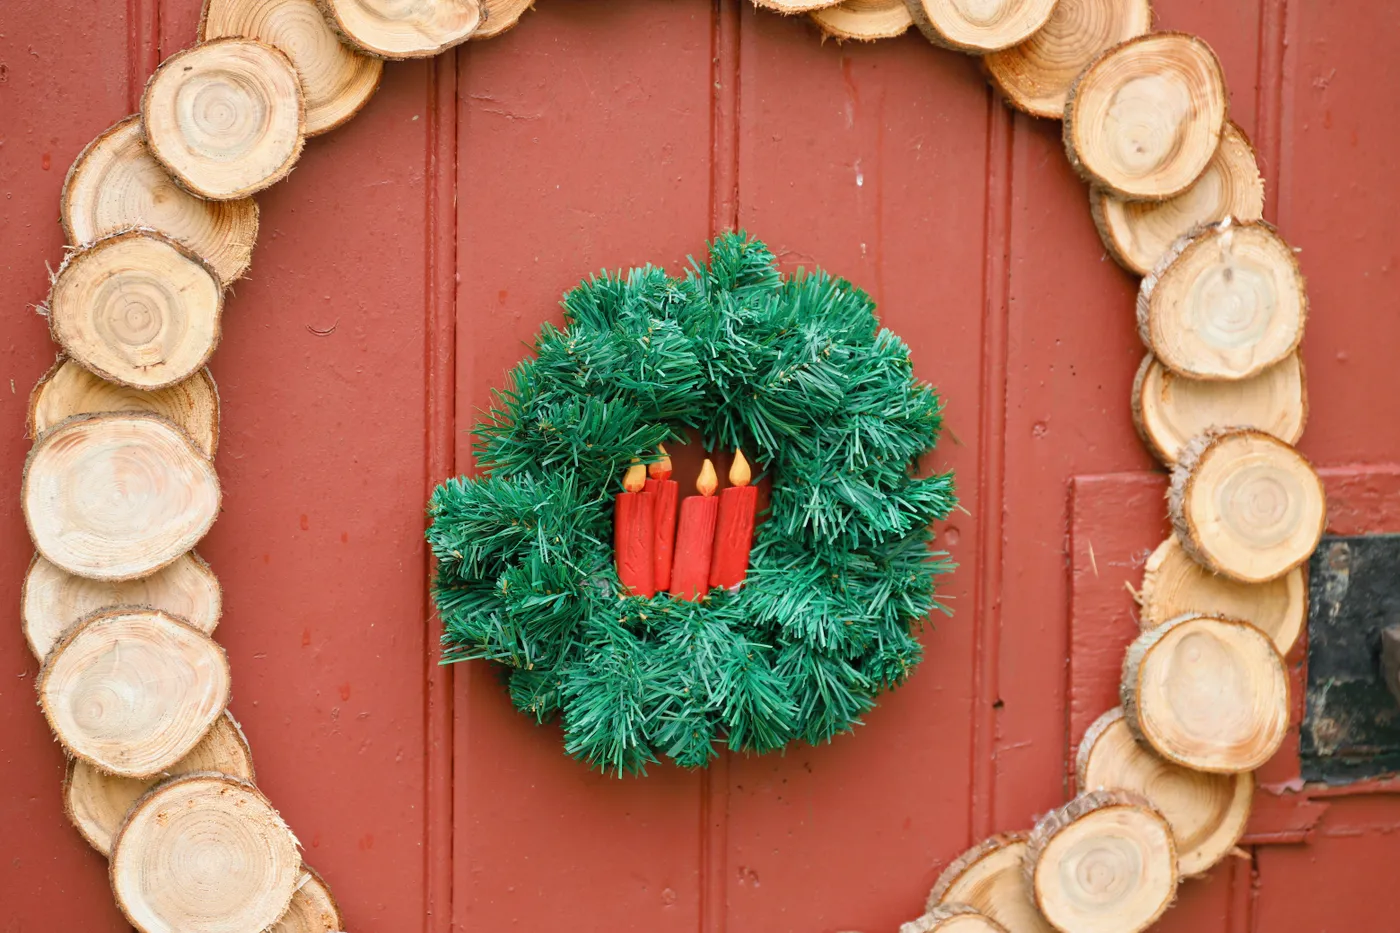
A weekend of drying plus two hours of assembly, under $20 if you cut your own wood.
Wood slices have been creeping out of the craft fair and into school hallways for a couple of years, and 2026 is peak. It’s the same instinct driving the whole recycled-decor shift: people want warmth that doesn’t come from plastic. These read as rustic from ten feet and as we made this from a tree branch up close, which is basically the dream combination for a classroom door.
15. Gnome With Striped Legs Under a Berry Garland
Garlands always look better built in threes. Cluster three red berries, then one gold bauble, then one white snowflake, and repeat that grouping — odd numbers read as collected and even numbers read as bought. Keep the garland off the door itself and on the frame only, so the door still swings freely. Wrap lights around the garland’s back side rather than the front so you get glow without visible bulbs.
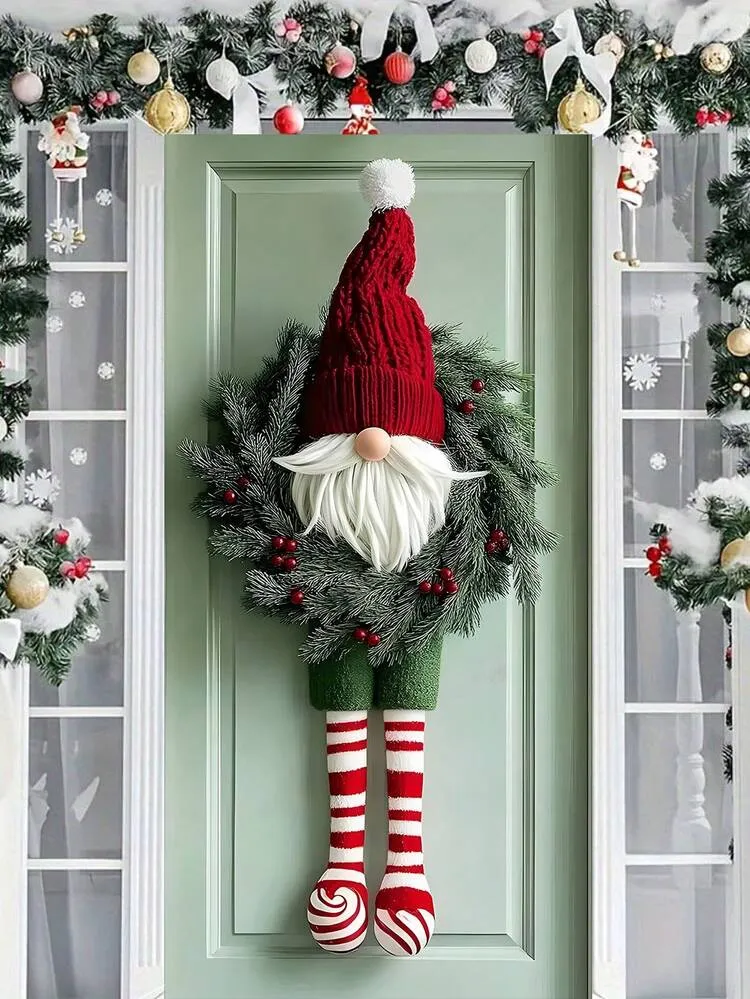
The legs. A gnome head on a door is common; a gnome whose red and white striped legs dangle down past the wreath with little swirled feet at the bottom is what makes people stop and grin. They hang free, slightly crooked, and they sway a bit when the door opens. Remove them and you have a nice wreath. Keep them and you have a character about to walk off the door. Compare with Idea #13 — same gnome logic, different habitat.
16. Wooden Door Framed With Bell and Bow Garland
This is the classic full-frame treatment: garland wrapped around three sides of the casing, and a wreath at 24 to 30 inches wide hung on the door itself. It needs a standard 36-inch door with at least four inches of visible trim to wrap — on a flush door with no casing, the garland has nothing to grab and will slide. Hallway width matters more than ceiling height; leave about four feet of clearance so people aren’t ducking.
The bows repeat. One on the wreath, six or seven along the garland, all the same red, all roughly the same size. That repetition ties a wreath and a garland together instead of letting them look like two separate purchases. The small bronze bells add a second repeated element at a different scale, and the Santa Stop Here sign breaks the symmetry right at the center, which is exactly where you want the eye to land last.
17. Nutcracker Guards and a Fireplace Decal on Red
Those nutcracker banners are print-at-home — design them or download a template, print on 11×17 cardstock at a copy shop, and hang from tension rods. About $12 for both. The fireplace effect below is a printed decal, but you can get the same read with black paper bricks, red paper flames, and a strip of white paper for the mantel — maybe $8. Two matching sconces from a discount store finish it for $20.
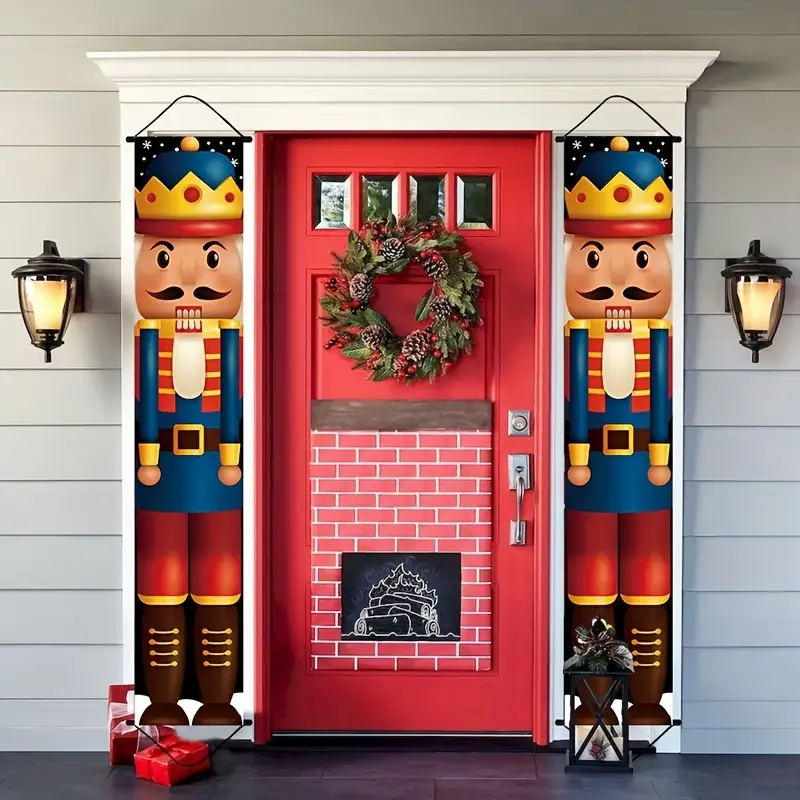
If this is an exterior entrance, wind will find every edge you didn’t tape. Use outdoor-rated adhesive and skip paper entirely on a door that faces weather — foam board or corrugated plastic instead. Check whether it’s a fire exit, because nothing can block the panic bar or the swing. And red doors show tape residue immediately, so test any adhesive on the hinge side first.
18. Gift-Wrapped Door With a Grinch Peeking Overhead
- Printed fabric or wide wrapping paper: $15–$35
- Red ribbon, two rolls: $8–$16
- Oversized bow or fabric to make one: $6–$14
- Grinch cutout and cotton balls: $8–$18
- Command strips and hooks: $8–$12
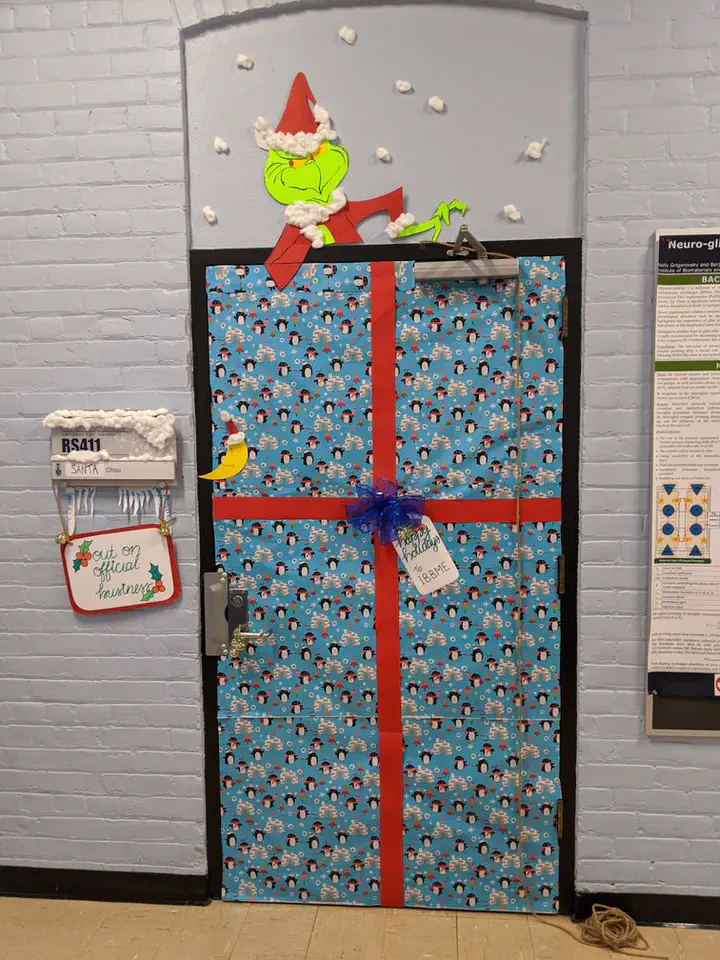
Total: roughly $45–$95. Budget alternative: a flat sheet from a thrift store in a penguin or snowflake print costs about $4 and nobody will know the difference.
Wrapping a door is a tension problem, not a decoration problem. Cut your paper or fabric two inches wider than the door on each side, attach at the top with a horizontal strip of hook-and-loop tape, then pull taut and work down in six-inch sections. Cross the ribbons above center, around the upper third — a bow sitting dead middle makes the door look like it’s wearing a belt.
19. Nutcracker Guards Along a Snowy Hallway Aisle
- Lay white paper down the hallway floor and tape the edges flat with painter’s tape.
- Cut snowflakes and scatter them on the runner, heavier near the doorway.
- Place four nutcracker cutouts in pairs, about six feet apart, facing the walkway.
- Run green tinsel garland with lights across the ceiling in two swooping spans.
- Hang white curly ribbons and faux snowballs at three different heights.
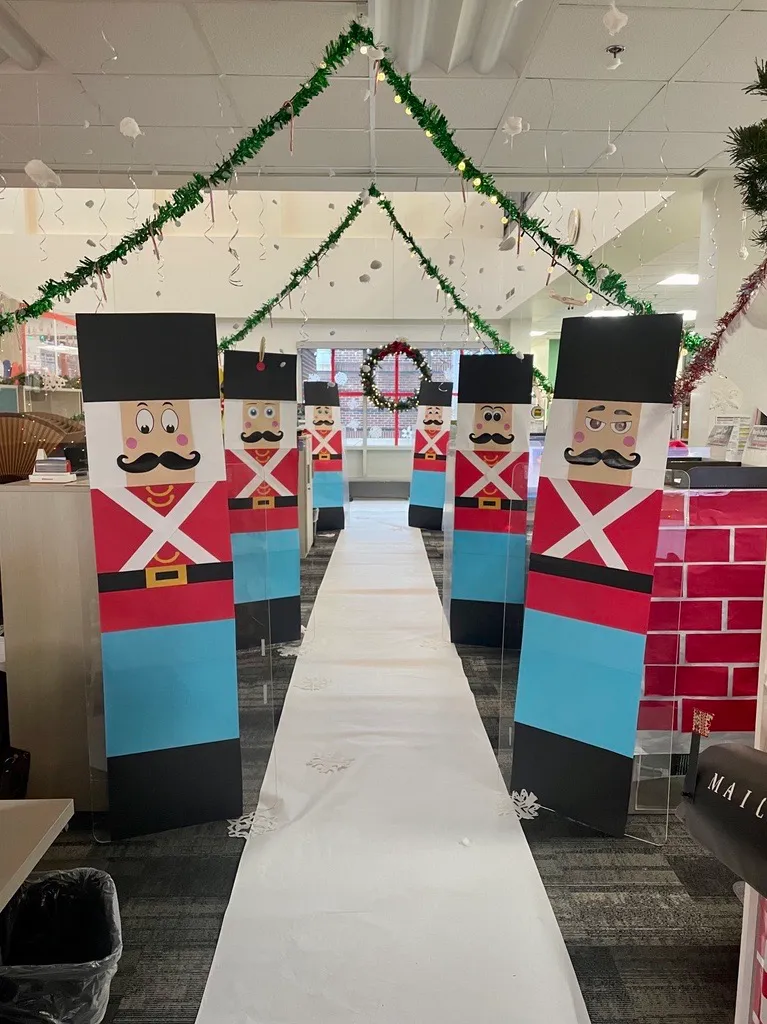
Half a day for two people, roughly $40 in paper, tinsel, and lights.
Roughly 50 percent white and paper, 30 percent nutcracker red and black, 15 percent green tinsel, 5 percent blue in the snowflakes. That white majority is what makes this feel like snow instead of a birthday party — the color is accent work, not heavy lifting. Want it warmer? Swap the white runner for kraft brown and the blue flakes for gold. The proportions hold either way.
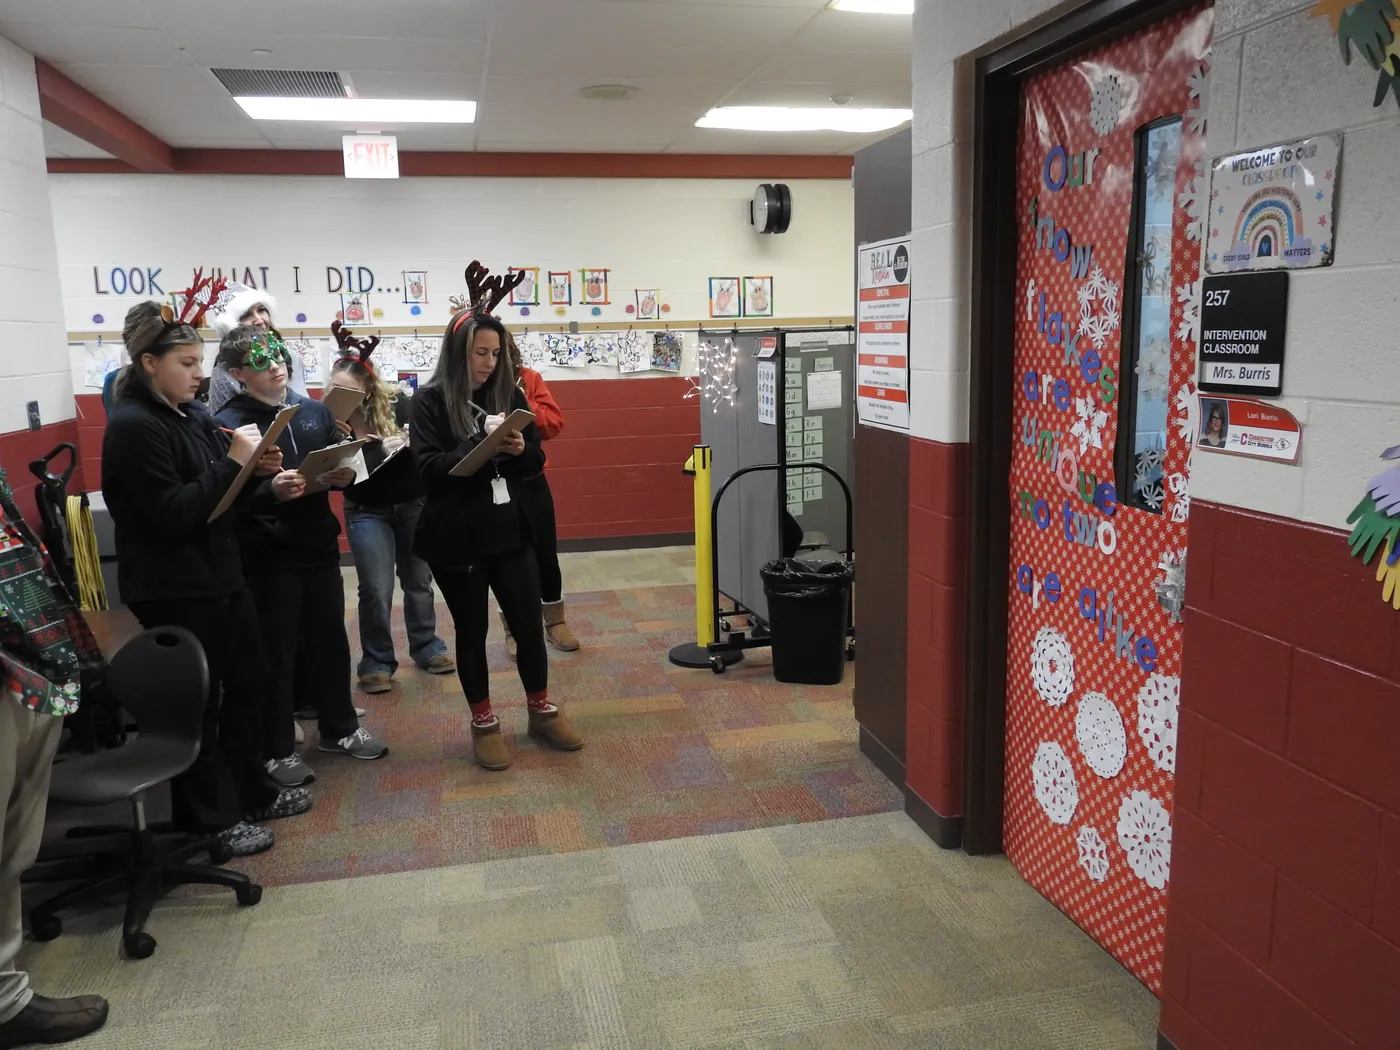
20. Red Polka Dot Door With Scattered Snowflakes
- Measure the door and add two inches per side before you buy the roll.
- Ask about your school’s fire code for covering doors, especially near glass.
- Confirm the handle, hinges, and closer stay fully clear.
- Check that the paper is fade-resistant — hallway windows bleach cheap rolls in weeks.
- Set a hard budget before you walk into the craft store.
Five minutes of checking saves an afternoon of redoing.
Polka dot wrapping paper and a stack of white cardstock will do this whole door for under $20. The snowflakes can come from coffee filters if you want the soft layered look — a pack of 200 runs about $4 and the scalloped edges do half the work. Blue paper letters cost almost nothing. Compare with Idea #22, which uses the same light-blue-and-white instinct with a bulletin board extension.
21. Castle Archway Framed by Two Nutcracker Guards
It’s the arch. Any door can have nutcrackers standing next to it; wrapping the whole opening in gray brick pattern and cutting a rounded arch changes the doorway into a place. The soldiers aren’t decoration, they’re guards at a gate. Everything inside — the hanging snowflakes, the little snowman with its North Pole sign, the faux snow — only makes sense because the arch promised something was behind it.
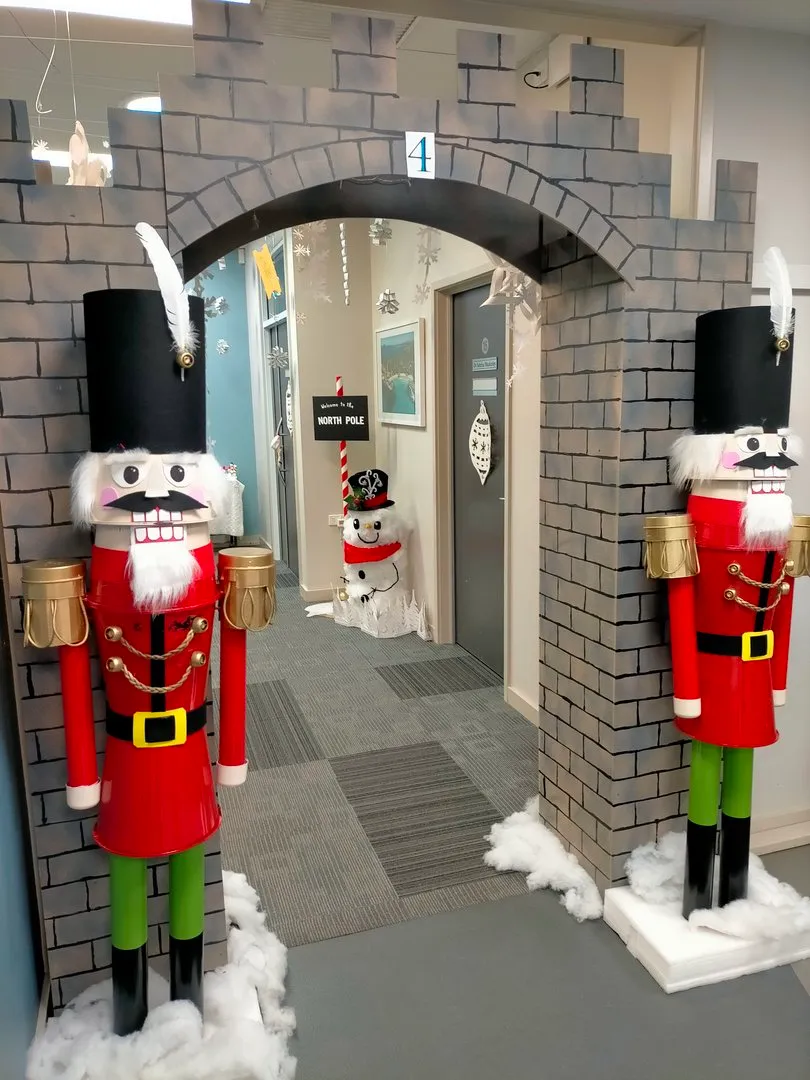
This needs a wide opening, ideally six feet across or more, because the arch itself eats about eight inches on each side. Standard single classroom doors are too narrow — the nutcrackers would crowd the walkway. It also wants a ceiling of at least eight feet so the hanging snowflakes clear everyone’s head by a foot. If your hallway is tight, borrow the approach in Idea #19 instead: line the path, not the frame.
22. Light Blue Door With a Matching Winter Bulletin Board
A door and a bulletin board in the same hallway need a shared spine or they fight each other. Here it’s the wavy dark blue border that appears on both, plus the same snowflake shapes in different sizes. Repeat one element exactly and vary everything else. Mount the bulletin background on butcher paper first, then layer borders — build straight onto cork and every staple shows.
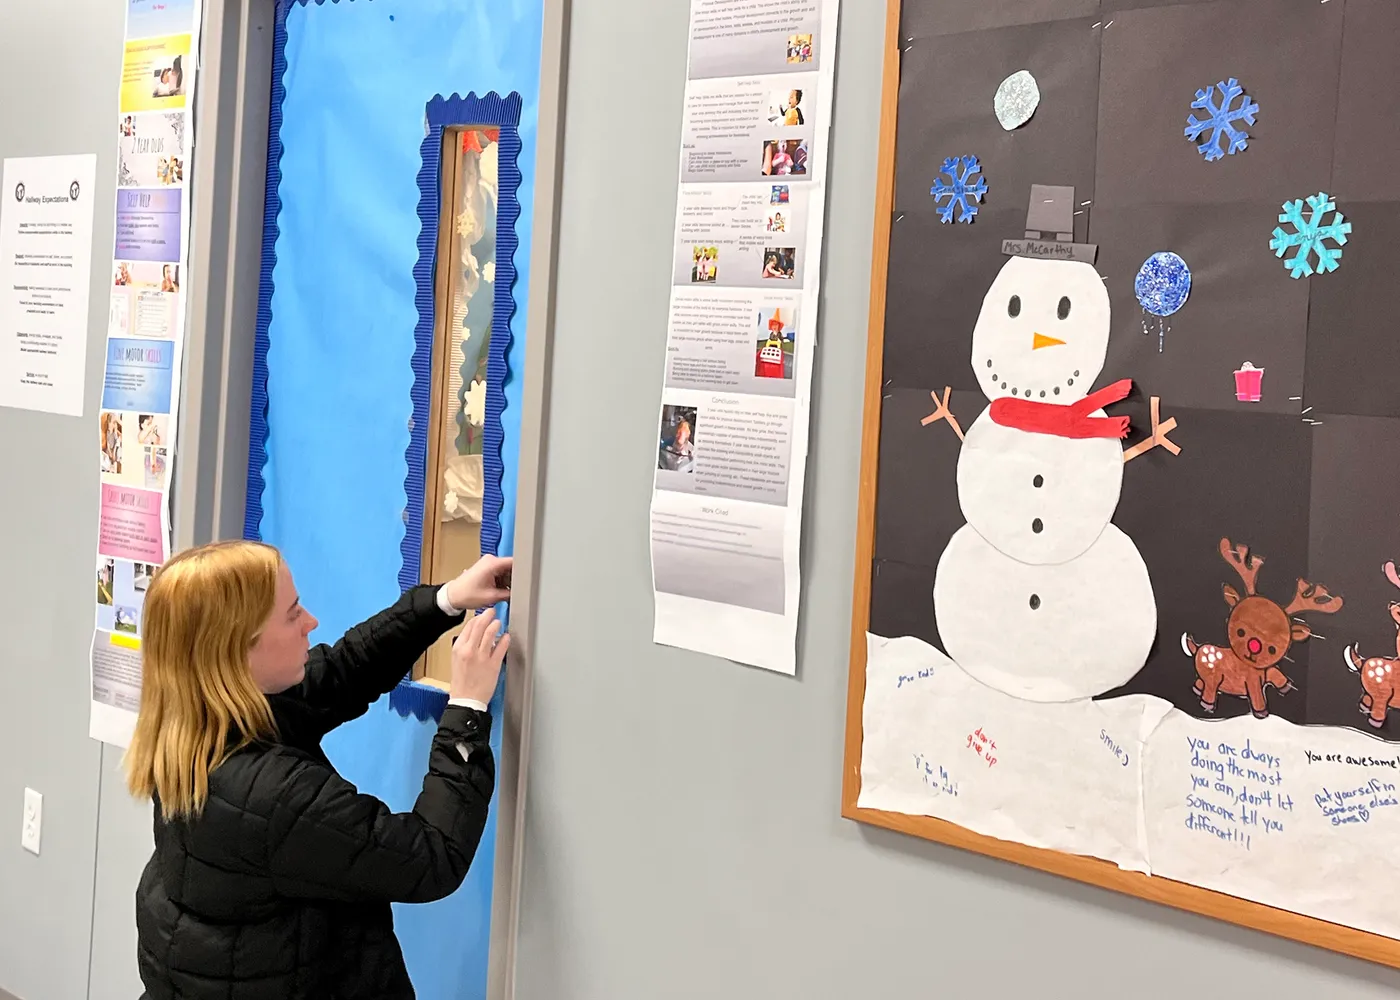
Construction paper fades. Light blue is the worst offender — six weeks near a hallway window and the top edge goes gray. Laminate the snowflakes and reindeer cutouts if you want to reuse them next year, and store them flat rather than folded. The handwritten motivational strips along the bottom will curl within days; back them with cardstock or tape both corners instead of one.
23. Upside-Down Deer on a Light Blue Winter Door
Light blue and white do 80 percent of the work here, with brown as a 15 percent warm anchor and near-black for the lettering. That warm brown deer against cool blue is the whole trick — pull it out and the door goes chilly and flat. Try the same formula with a cream background and a rust-colored deer for a warmer hallway. Keep the lettering dark; anything pastel disappears at ten feet.
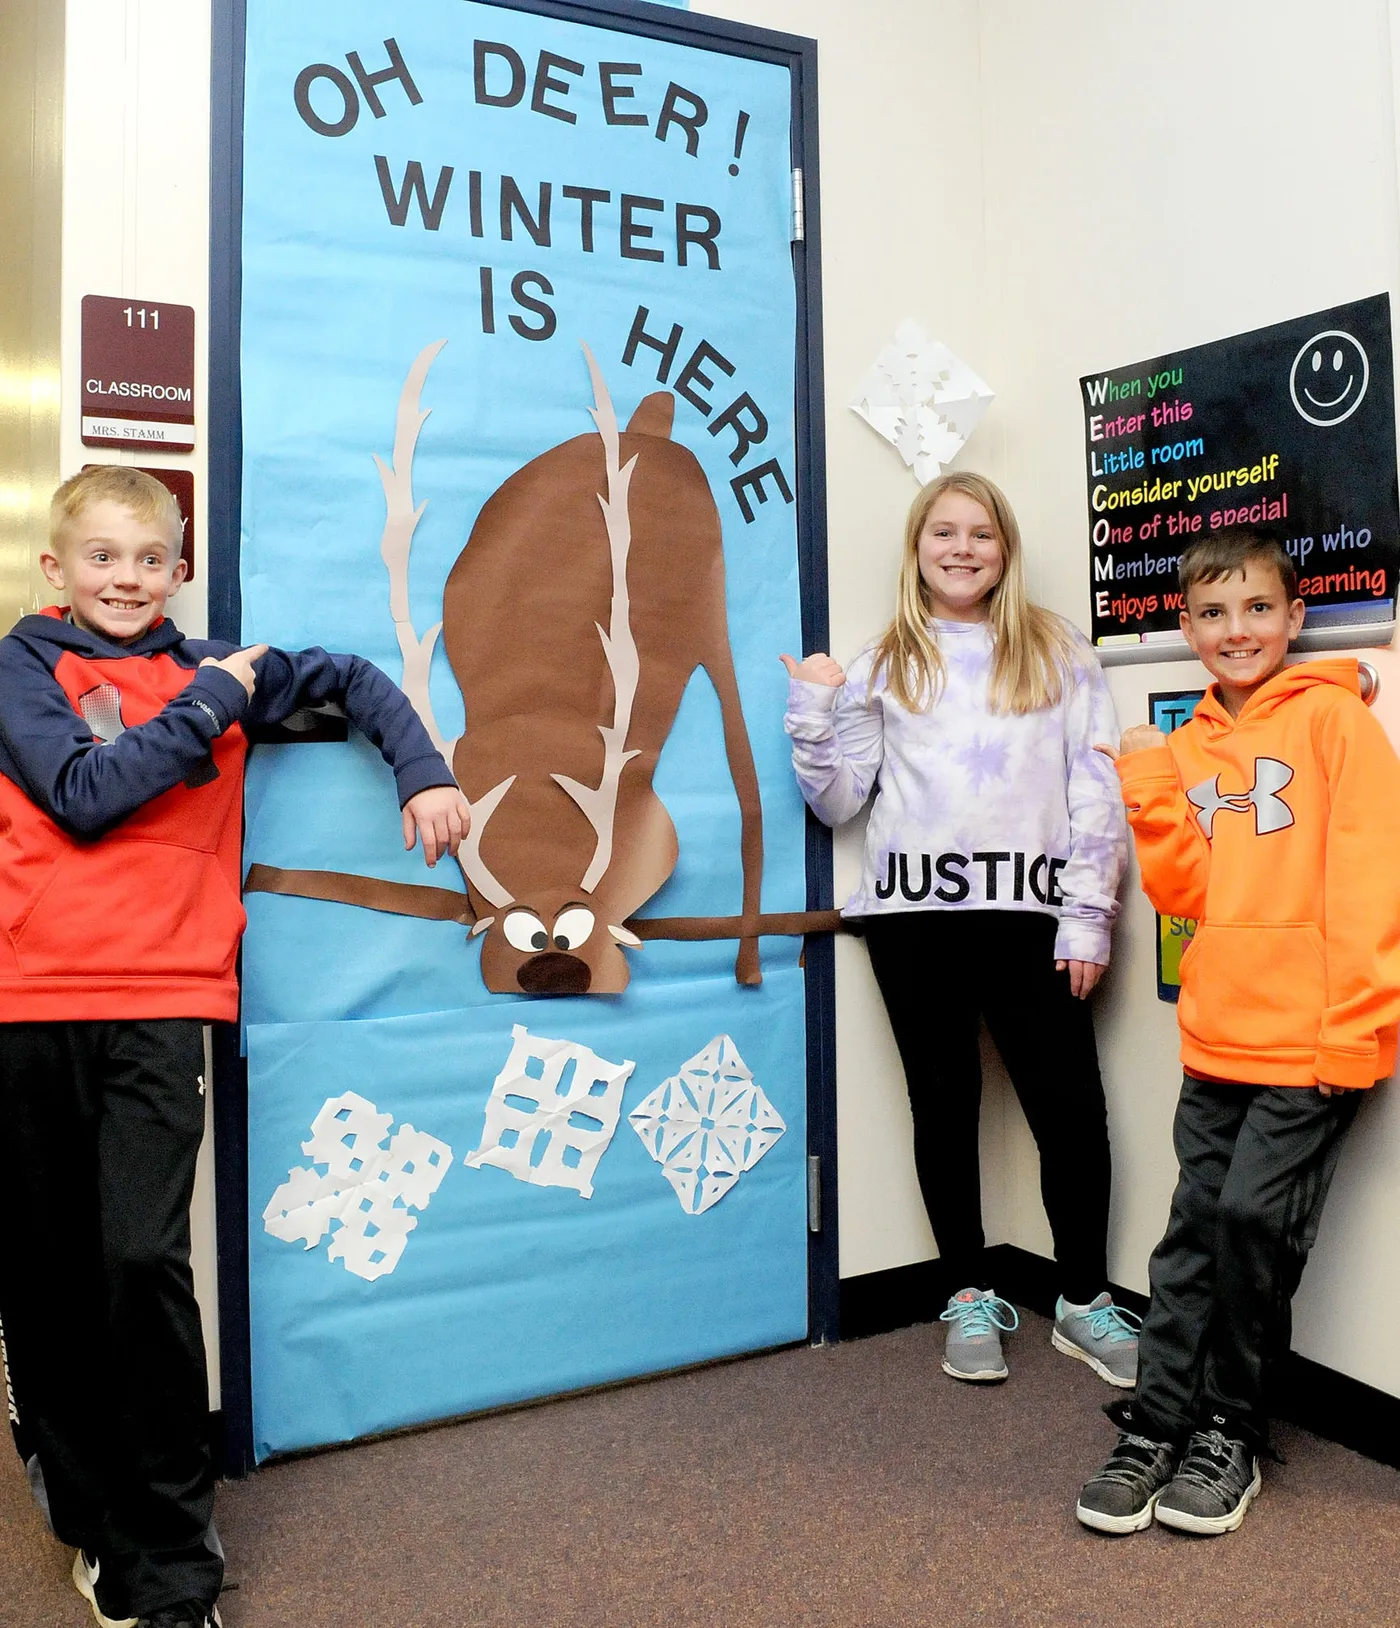
One roll of light blue paper, one brown sheet for the deer, white cardstock for antlers and flakes — about $14. Cut the lettering freehand or print and trace it; a chunky sans-serif in dark gray reads better than a decorative font from down the hall. Reusing last year’s blue paper? Iron it on low between two towels to flatten the creases. For the deeper blue version of this palette, see Idea #3.
24. Red Paneled Door With a Plaid Bow and Tiny Tree
- Measure the glass insert before buying ribbon — a bow overlapping glass by more than an inch looks accidental.
- Check that the ribbon won’t interfere with the door closer or latch.
- Decide whether the small tree sits beside the door or in front of it (beside, always).
- Match your plaid’s secondary color to something already in the hallway.
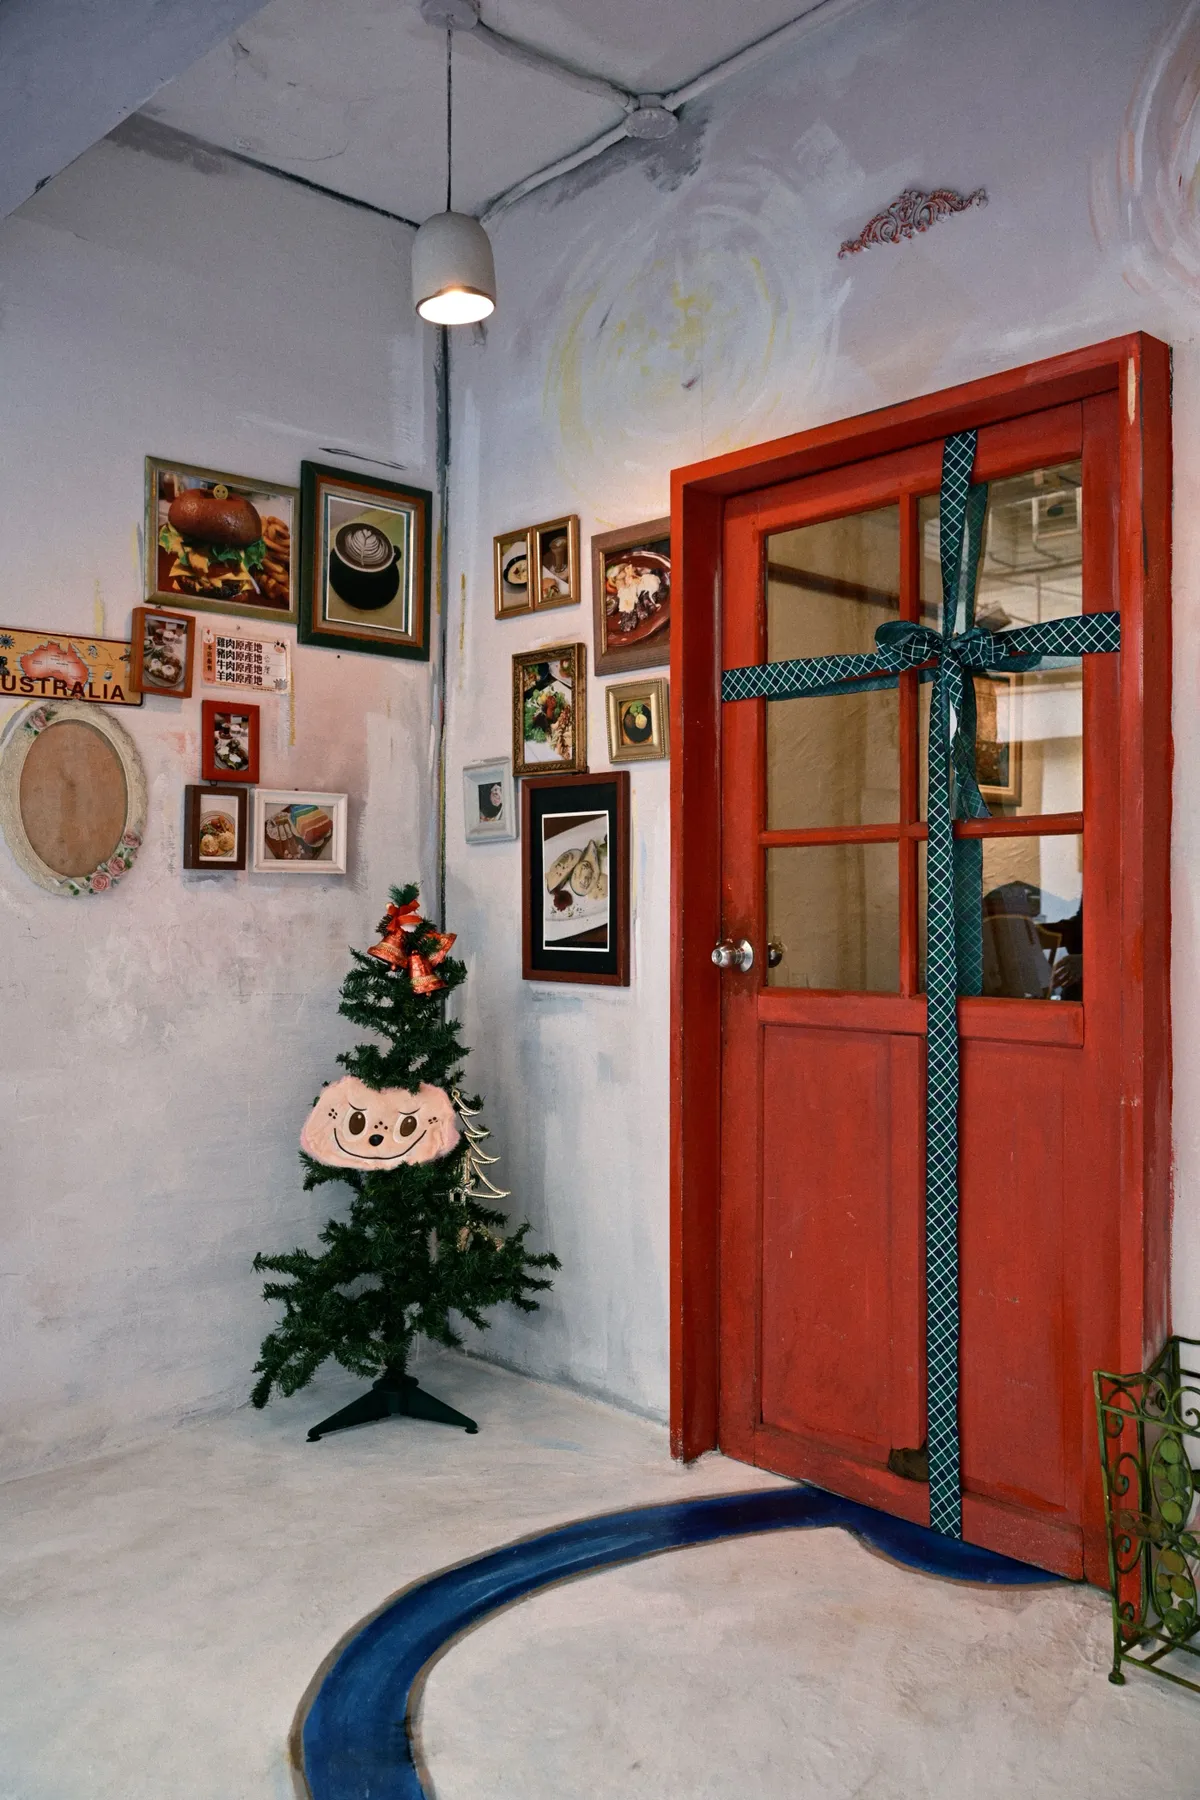
Ten minutes of planning keeps a good door from looking improvised.
Wired ribbon holds a bow shape; un-wired ribbon sags by day two. Spend the extra four dollars. And that red paneled door is doing a lot of decorating all by itself — on a builder-grade beige door, the same plaid bow will look like an afterthought, so give it a wreath or a small tree to answer to. Keep the tree out of the door swing.
25. Merry Grinchmas Door With Cindy Lou and Max
Grinch doors have been a school staple for a decade, but the 2026 versions are softer and more story-driven — Cindy Lou, Max, the whole Whoville cast instead of just the green face. It tracks with a broader shift toward narrative decor: saves for full character scenes have been outpacing single-character cutouts for two seasons. The buffalo check valance is what keeps this looking current rather than 2015, so don’t skip it.
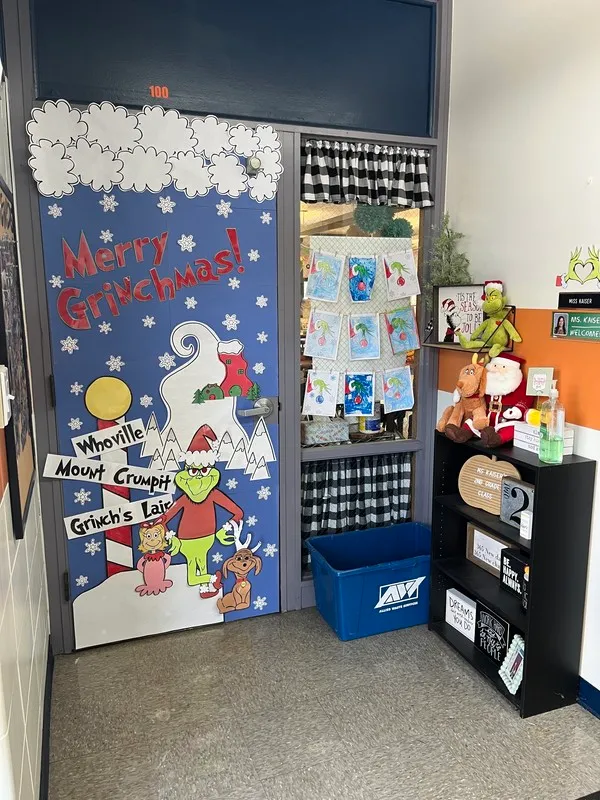
- Blue and white butcher paper: $8–$14
- Printed or hand-cut character templates: $0–$20
- Buffalo check fabric or paper for the valance: $8–$15
- Cotton balls and white paper for clouds and snow: $5–$9
- Adhesive putty and tape: $5–$10
Total: roughly $26–$68, and the characters are reusable if you laminate them.
26. Snowboarding Kids on a Blue and White Slope
Nearly all the visual energy sits in the bottom half, where forty small snowboarding cutouts tumble down a white paper hill in different poses and colors. The top stays quiet — blue paper, class letters, one snowman peeking over the edge. That imbalance is deliberate. An evenly busy door reads as noise; a heavy bottom with a calm top reads as a scene, and your eye slides down exactly the way it’s supposed to.
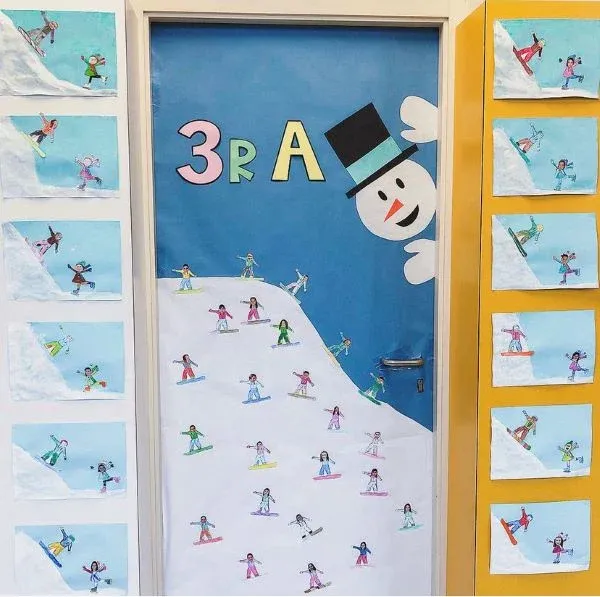
Small cutouts only work in volume. Ten snowboarders look like leftovers; forty look like a crowd. Cut from one template but vary jacket and board colors so the repetition reads as pattern rather than photocopying. Overlap them slightly at the edges and change the tilt — twenty degrees, forty-five, upside down — so the hill feels like motion instead of a grid.
27. Red Brick House Facade With an Elf at the Door
- Cover the wall and door in red brick-patterned paper, working from the top down.
- Cut green paper into a door frame and window frame, then tape over the brick.
- Add white cotton batting along the frames for snow accumulation.
- Hang string light cutouts along the roofline in a shallow curve.
- Place the elf, Santa, and snowman cutouts at three different heights.
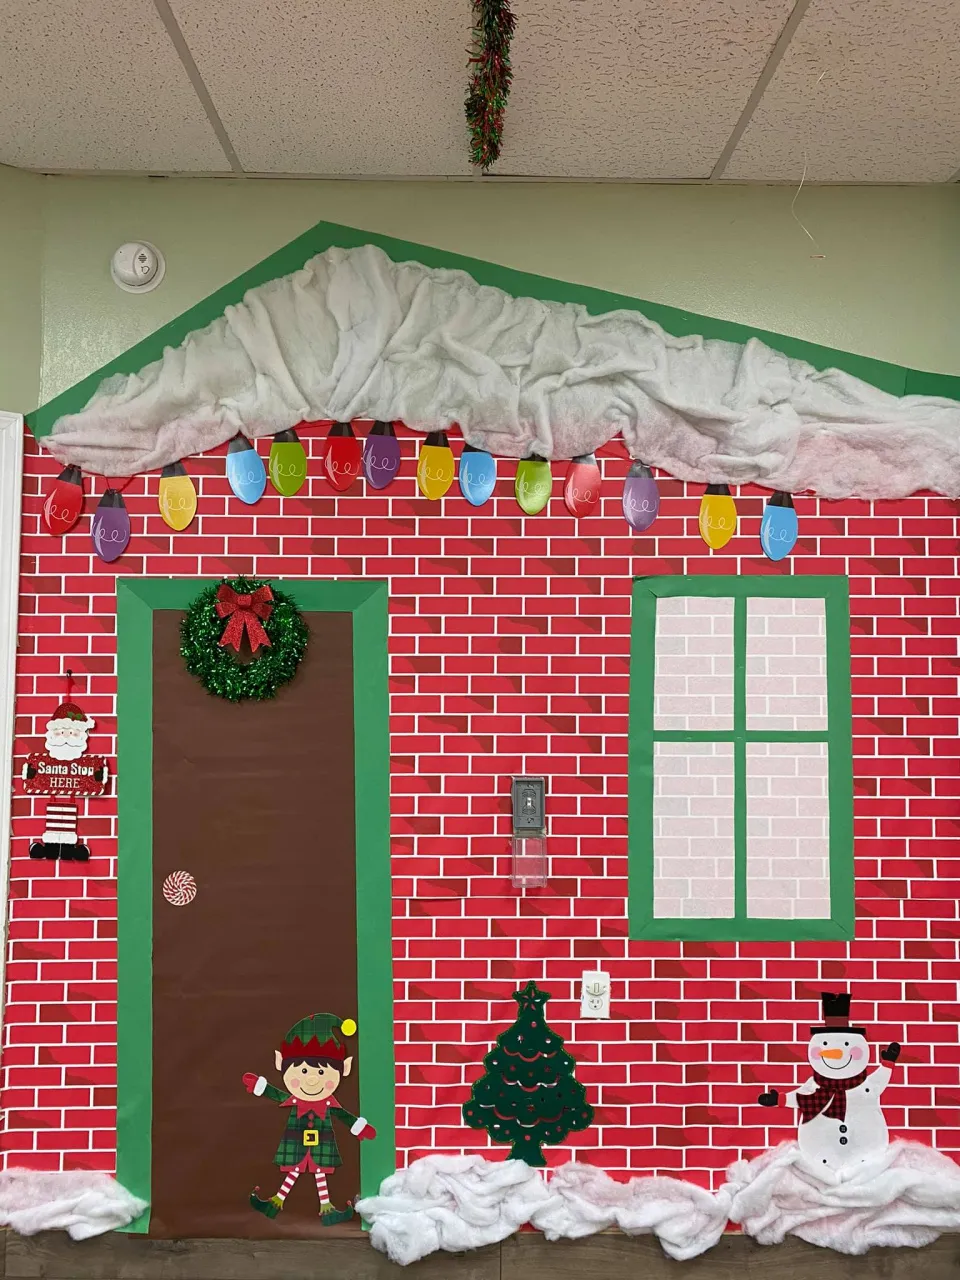
Two people, about four hours, roughly $35 in paper and batting.
This is a wall-and-door project, not a door project. Budget about four feet of wall on each side and the full height above it — otherwise the house looks like a house with its roof cut off. On a narrow door with less than two feet of flanking wall, use the door alone as the house and skip the roofline entirely. See Idea #9 for a gingerbread version that stays inside the door.
28. Paper Snowman With a Tinsel Scarf and Purple Garland
Tinsel sheds — genuinely, constantly. A purple and silver garland over a door leaves a sprinkle of metallic strands on the floor all month, and the static cling means it ends up on everything. If that bothers you, switch to a paper-chain garland in the same colors. Paper snowflakes taped flat will also curl at the corners within two weeks; cardstock and light lamination solve it.
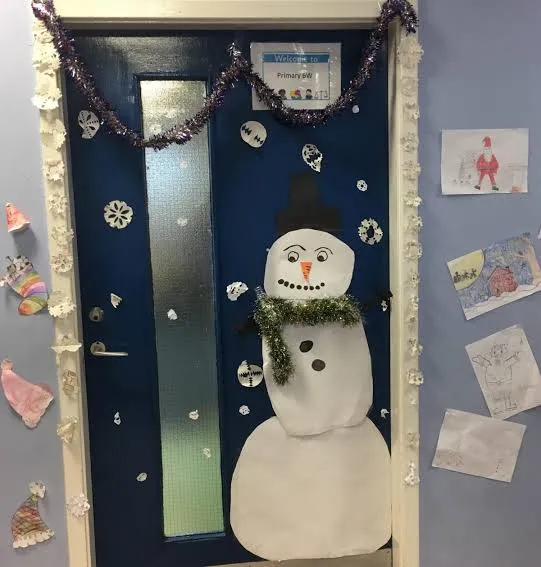
The tinsel scarf. It’s the only shiny thing on an otherwise completely matte door, and it catches hallway light in a way flat paper can’t. Notice it’s wrapped twice around the snowman’s neck and left to hang unevenly at the bottom — that slight mess is what makes him look handmade. A tidy scarf would have made him a graphic. The rumpled one makes him a character.
29. Pastel Nutcracker Sign on a Blush Pink Door
- Test the pastel palette against the door color in daylight — pink on pink disappears under warm hallway bulbs.
- Check that the wreath fits between the sidelights without covering the glass.
- Confirm the sign’s hanging weight and use a hook rated above it.
- Only add string lights if an outlet or battery pack is actually within reach.
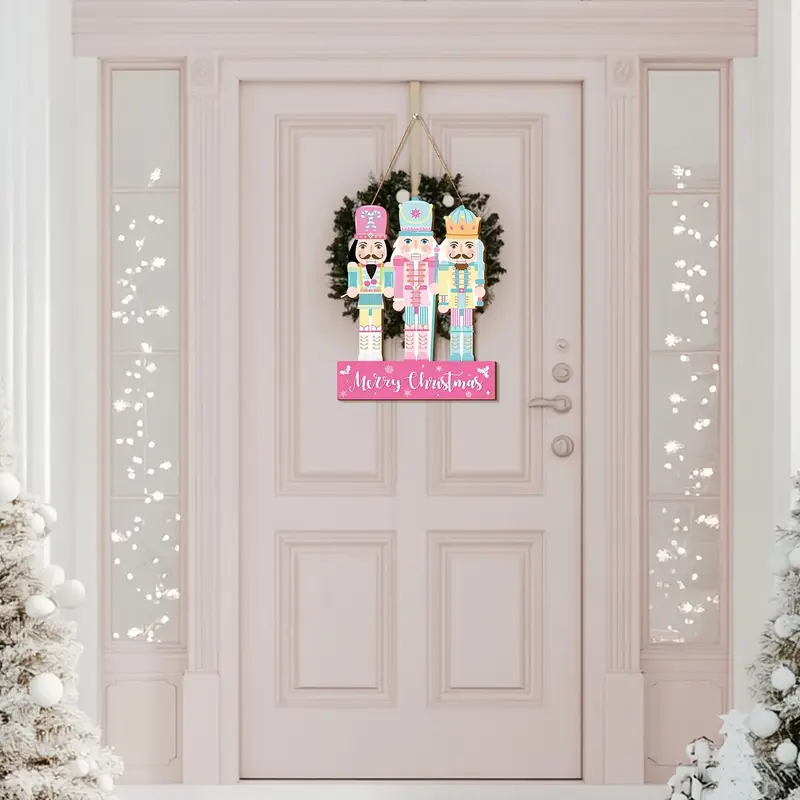
Two minutes with a tape measure prevents a wreath that swallows the door.
Pastels need one dark anchor or they float away. Here it’s the forest green wreath and the green sign frame — the only saturated notes in an otherwise blush-and-butter palette. Skip the green and the nutcrackers read as faded. If you’re building this from scratch, pick the wreath first and match the pastels to it, not the other way around. Loved the chunky yarn gnome in Idea #1? This is the soft-focus version of that same instinct.
Hang It, Tape It, Step Back, and Grin
Every door on this list started as a flat slab and a roll of paper — that’s the entire secret. Pick one idea, steal the palette, and don’t worry about matching it perfectly; the crooked tape lines are the part kids actually remember. 📌 Pin your favorites now so you’re not scrolling at 11 p.m. the night before.