
Gingerbread Christmas decor has officially outgrown the cookie plate. Pinterest is drowning in gingerbread-themed mantels, miniature candy villages, and candy-trimmed trees right now, and the 2026 version looks nothing like the kits you grew up with. We spent weeks digging through Hobby Lobby, Target, and Etsy — plus a whole lot of small shops and craft aisles — to pull together 35 ideas that actually work in a real house, from $6 dollar-store ornaments to $470 full dessert-table setups. You’ll find traditional gingerbread browns, pastel candy-land palettes, rustic woodland styling, and glitter glam, with budget and luxe versions compared side by side along the way. And stay until the end — we break down the most common mistakes that can ruin these looks. Gingerbread is having a moment in 2026 because nostalgia decorating went mainstream: people want warm, handmade-feeling holiday decor that photographs well and doesn’t force a whole new color scheme on the rest of the house. 📌 Save this to Pinterest for later — you’ll want to revisit these ideas.
1. Gingerbread Train on a Snow-Dusted Herringbone Mantel
Faux snow is the difference between a mantel that looks styled and one that looks cluttered. Spread a 2- to 3-inch layer across the whole shelf — not little puffs under each item — then nestle the gingerbread train and the flocked evergreens directly into it so they read as one scene. A 20-ounce bag of faux snow runs about $8 and covers a standard 5-foot mantel with room to bury every base, stocking holders included. Give the train a clear 4-inch runway of open snow in front so it doesn’t look parked against the wall, and cluster the flocked trees in odd numbers with the tallest around 18 to 22 inches.

Three things are doing the heavy lifting here: a dark anchor, a warm mid-tone, and a light cap. The herringbone brick firebox supplies the deep backdrop, the flocked trees and gingerbread train carry the creamy mid-tones, and the burning logs make the whole display feel lit from below. That warm underlight is the trick — it turns a shelf of objects into a scene. Notice the quilted stockings match the snow, not the trees. Keeping the textiles in one color family is what stops a busy holiday mantel from turning into visual noise.
2. A Miniature Gingerbread Lane Village on a Wooden Sled
The whole vignette hinges on one thing: the wooden base with its hand-painted ‘Gingerbread Lane’ sign. Without it, you have four cute houses sitting on a table. With it, you have a street. That little plaque gives the village a name, a direction, and a reason for the gingerbread man and the miniature pudding to be there at all — like characters in a story instead of objects on a surface. If you copy anything from this setup, copy the base. A scrap of 1×8 lumber and a paint pen does more for the scene than a fifth house ever would.
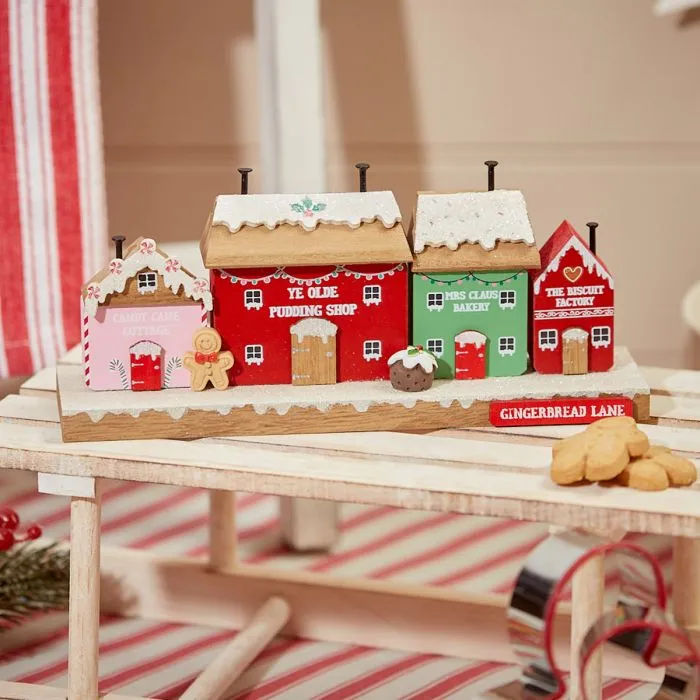
- Painted wooden village houses: $8–$22 each, or $6–$12 unfinished at craft stores
- Wooden base or small sled: $12–$30
- Faux snow and glitter accents: $6–$10
- Miniature figures (gingerbread man, pudding, tiny trees): $4–$12 each
- Hand-painted ‘Gingerbread Lane’ sign: $5–$15, or free from scrap wood
- Total: $75–$190 for four houses, or roughly $40 if you paint unfinished wood yourself
Budget alternative: buy one unfinished wooden house kit for $12, paint it with craft acrylics, and put the savings into the base and the sign — that’s where the charm actually lives.
One last check before you commit:
- Measure the surface — four houses plus breathing room needs 24 to 30 inches of width.
- Check for an outlet nearby if you want the houses lit.
- Choose your house colors before you buy, not after.
- Confirm the spot stays away from radiators and heat vents that melt faux snow.
- Photograph the arrangement before gluing anything down.
3. Gingerbread Village Kitchen Counter with Copper and Citrus
That dried orange slice garland is the easiest handmade touch in this whole kitchen, and it costs about $6.
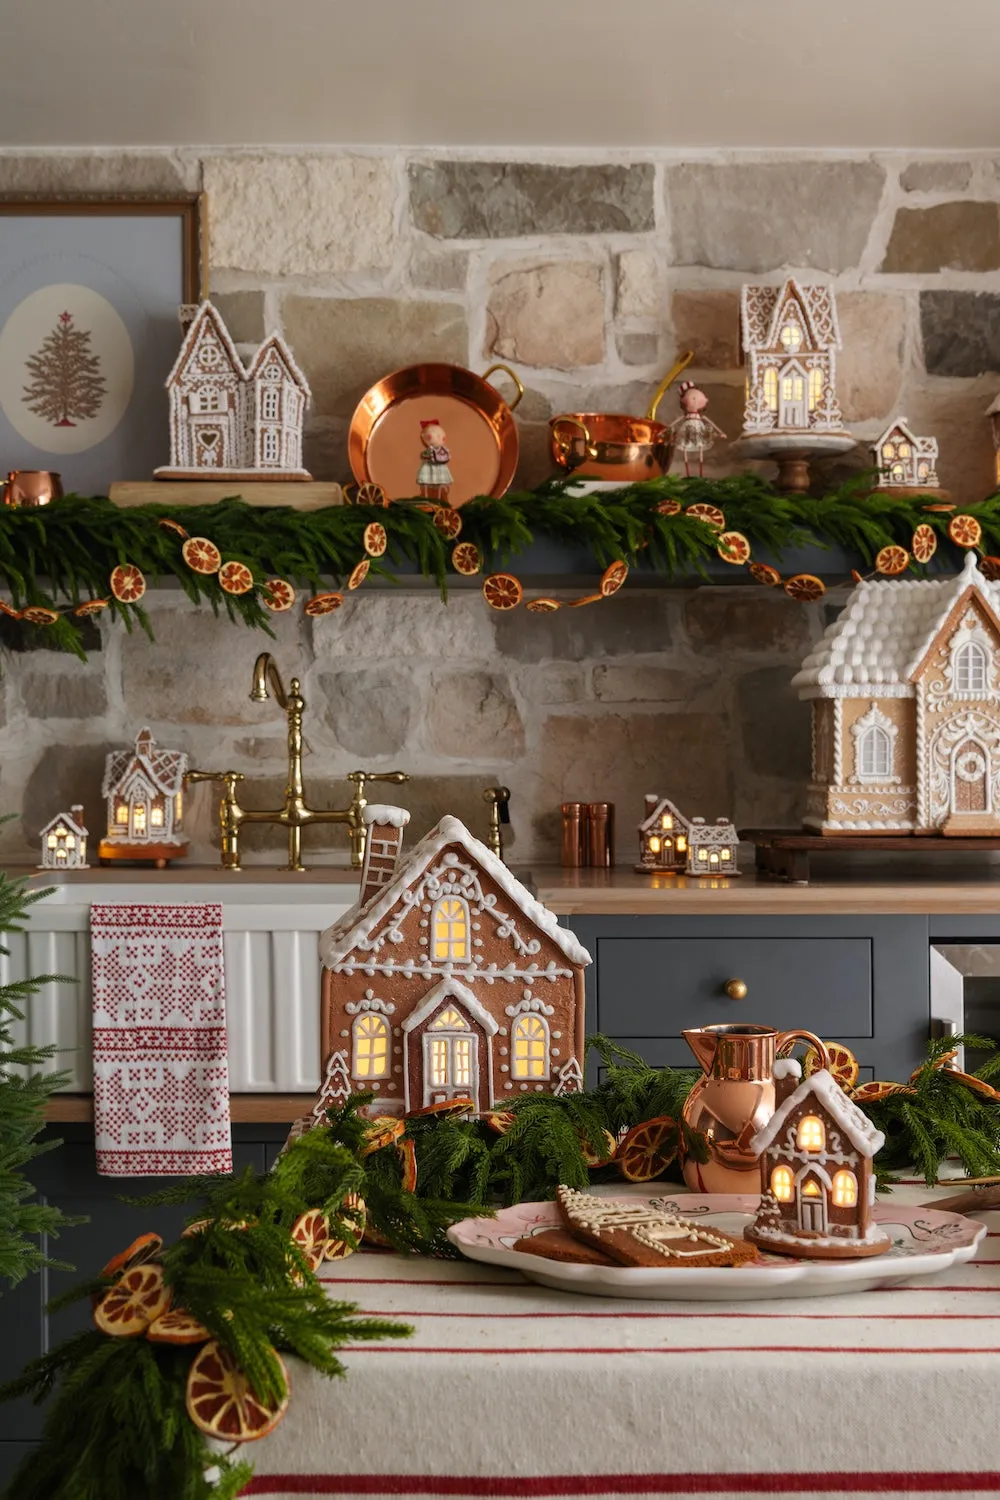
- Slice 2 to 3 navel oranges into 1/4-inch rounds and blot them dry with paper towel.
- Bake at 200°F for 2.5 to 3 hours, flipping every hour, until the centers are leathery and no longer sticky.
- Cool completely — overnight is best — or they’ll mold inside the finished garland.
- Thread jute twine through the top edge of each slice with a large needle, leaving about an inch between.
- Drape the citrus strand alongside the evergreen swag rather than wrapping it, so both textures stay readable.
Total time is around 3.5 hours including oven time, plus overnight cooling.
Kitchens are the hardest room in the house to decorate, and this counter scene has three built-in enemies: steam, grease, and heat. Real evergreen garland dries out fast within three feet of a stovetop — expect needle drop within ten days. Faux cedar or preserved garland holds up far better. Keep anything fabric, including that patterned towel, at least 18 inches from burners. And if the gingerbread houses are plugged in, run the cord behind the backsplash rather than across the counter where it’ll snag on everything you set down.
4. Two-Tiered Gingerbread House Centerpiece for Coffee Table Reading
The formula here is a steady 60/30/10. Sixty percent warm neutrals: medium brown wood, beige chunky knit, cream mug, white ceramic. Thirty percent holiday accents: the two-tiered gingerbread house on its wooden tray, green foliage with fairy lights, candy cane twists. Ten percent sharp contrast: one red-and-white pattern and the bright pinprick glow of the lights. Swap the palette without breaking the formula by holding the wood and neutrals steady and trading red-and-green for soft pink and mint — same composition, entirely different mood. The key insight is that gingerbread brown counts as a neutral here, not an accent. It’s warm, it’s muted, and it plays nicely with everything.
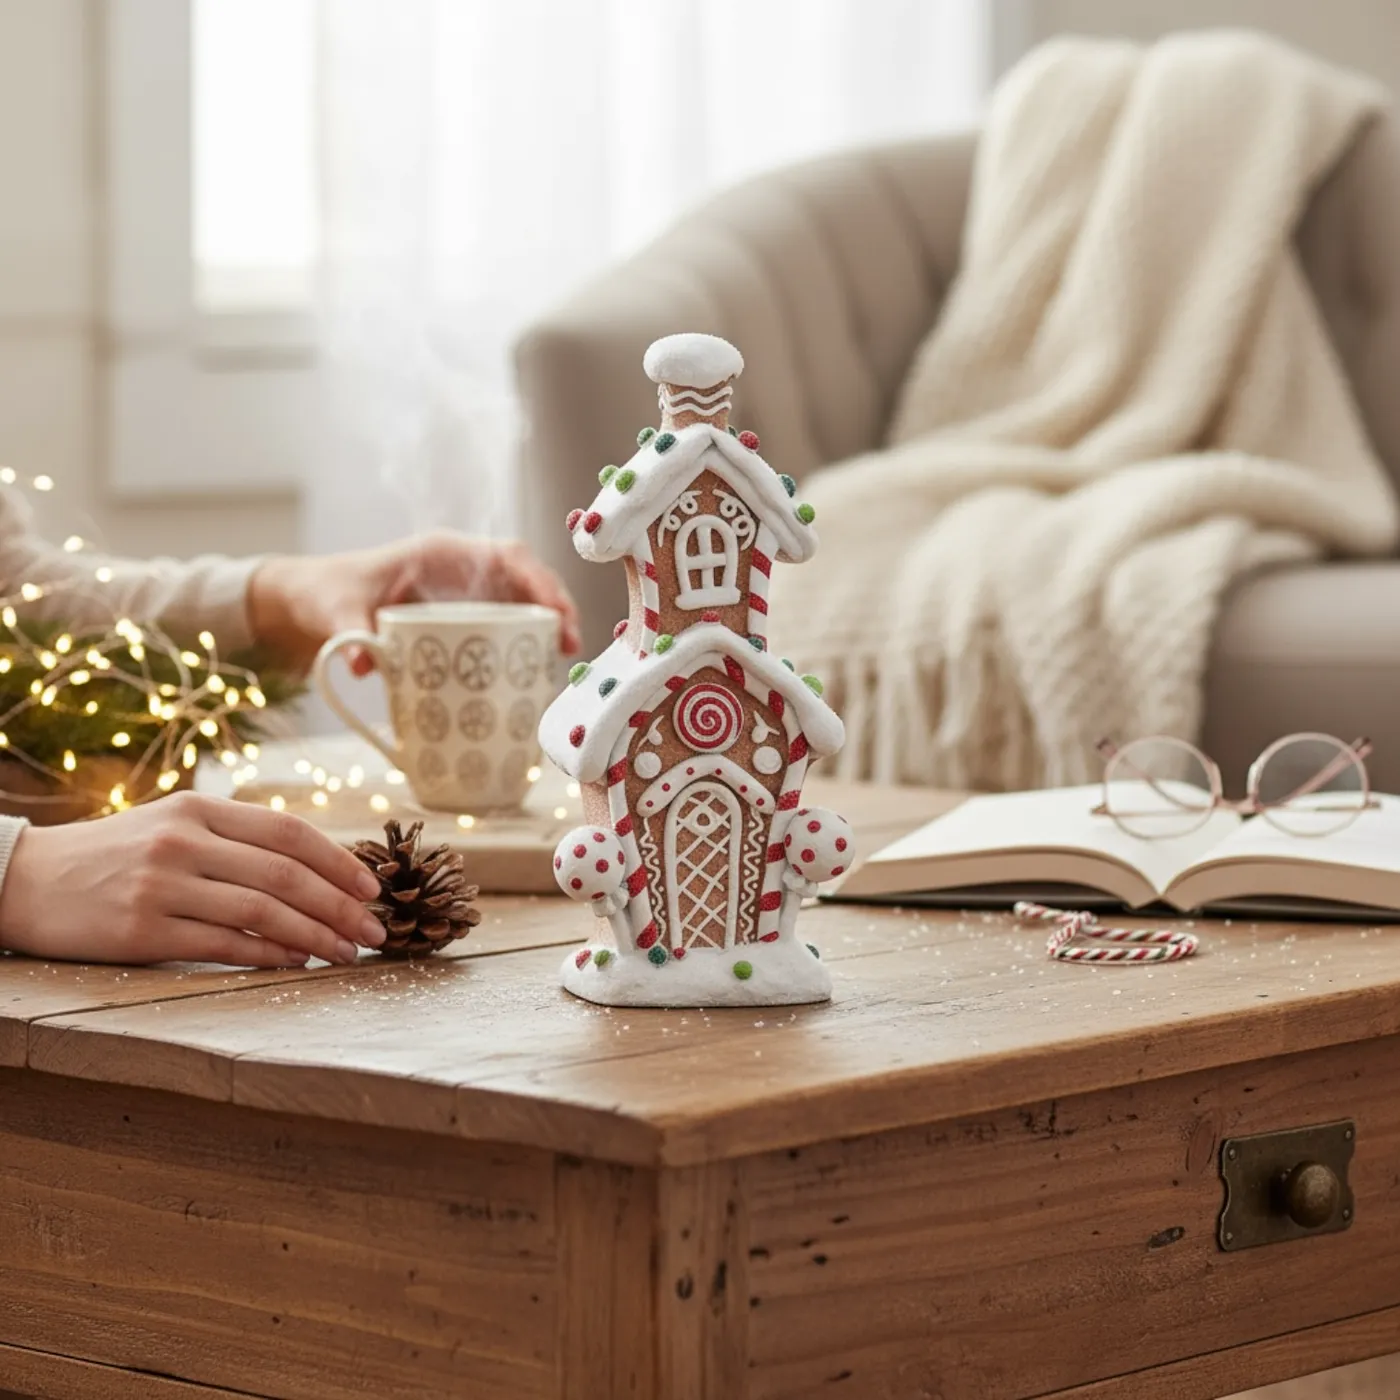
You don’t need the $60 designer version to get this. A plain wooden two-tier tray from IKEA or Walmart runs $12 to $20, and a gingerbread house figurine from Target’s Threshold line is $10 to $18. The fairy lights come in a $6 two-pack almost anywhere in December. The open book is the one you’re already reading, and the pinecone is a free walk in the park. Facebook Marketplace is quietly excellent for this exact look after the holidays — people unload tiered trays and figurines for $5 in January. Total: about $35 instead of $150.
Nothing here is high-maintenance. Faux greenery and fairy lights wipe clean with a dry microfiber cloth, and the figurine just needs a soft brush every couple of weeks. The real risk is the wooden table — warm mugs leave rings, and fairy light batteries corrode if you store them installed. Pull the batteries every January and a cheap strand gives you three or four seasons. If you’d rather not think about it, look for a house with a USB plug instead; Idea #21 has a version that lives on a shelf year-round.
5. Illuminated Gingerbread Village Lined Along a White Mantel
Hanging gingerbread stars is the cheapest way to make a mantel look twice as tall. Thread them on clear fishing line or thin white twine and hang at three heights — roughly 4, 8, and 12 inches below the shelf — so the eye reads a staggered cascade instead of a row. Keep the spacing between hooks around 5 to 7 inches. Anything tighter turns into a curtain and swallows the mantel display entirely. A $4 roll of fishing line disappears against the wall far better than ribbon does, and it holds more weight than you’d expect.
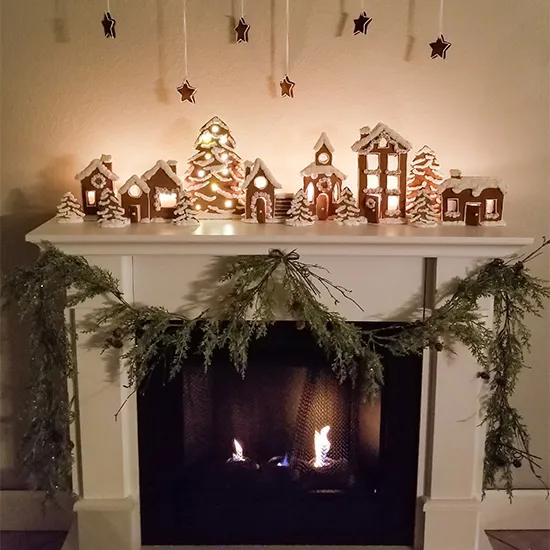
The single element that makes this mantel work is restraint in the garland. Look at it: a sparse green swag with a few pinecones draped across the firebox opening, deliberately not following the top of the mantel. If that garland were thick and full, the little gingerbread village would fight it and lose. The thin garland frames the fire and lets the flame read as part of the display. Most people over-garland their mantel because it feels emptier without it. Here, the emptiness is the design.
- Village houses along the top, largest one centered
- Hanging stars at three staggered heights
- Sparse pinecone garland framing the firebox
- Warm white lights only — no multicolor strands
- One unmistakable focal point: the tallest house
6. Gingerbread Men in Scarves Beside Brass Candlesticks
This is a small-mantel idea and it knows it. Two figurines, two candlesticks, one gilded frame — that’s about 30 inches of shelf. It works beautifully on a 4- to 5-foot mantel in a room between 120 and 200 square feet, and it’s ideal for apartments where a full village would swallow the whole wall. If your mantel runs 6 feet or longer, either double the pairing to four figurines and four candlesticks, or move up to the fuller lineup in Idea #29. Ceiling height barely matters here — this reads at eye level, not from across the room.

What makes this arrangement feel collected rather than decorated is the mixed material story: matte gingerbread figures, reflective brass, a carved gold frame, and soft green garland. Four finishes, one warm palette. The brass candlesticks do a quiet job too — their vertical line echoes the framed art behind them, so your eye travels up through the display instead of stopping at the figurines. And notice the two figures turn slightly toward each other. Two objects facing one another create a conversation; two objects facing forward create a shelf.
- Anchor the center with the tallest item — here, the gilded frame leaned against the wall, about 14 inches tall.
- Place the candlesticks 8 to 10 inches to either side of the frame, at slightly different heights.
- Set the gingerbread figures in front, nearer the mantel edge, overlapping the candlesticks by an inch or two.
- Drape the berry garland below the shelf line rather than on it, so the surface stays clean.
- Step back four feet — you should see three distinct heights, not one flat row.
About 20 minutes of arranging, and $0 if you shop your own house first.
7. Ceramic Gingerbread Luminaries with Paperwhites and Fairy Lights
Ceramic luminaries are the low-drama choice — no crumbs, no sticky fingers, no batteries to swap if they’re plug-in. Dust them every week or two with a dry soft brush, and if a bulb burns out, most designs let you unscrew the base and swap a single candelabra bulb for about $3. The paperwhites are the diva of this display: they bloom for roughly two weeks, drink constantly, and get top-heavy enough to flop. Stake the stems with a thin bamboo stick and twine, or swap in white amaryllis, or go with white faux blooms if you want the look without the daily fuss.
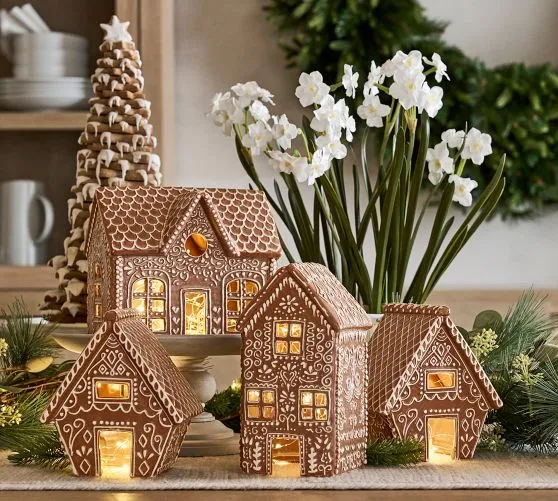
This is the quiet corner of the gingerbread trend, and it’s the version with the longest shelf life. While candy-colored gingerbread exploded on Pinterest in the mid-2020s, the all-white take keeps winning with people who don’t want to redecorate around Christmas. It sits inside the broader 2026 pull toward warm minimalism and nostalgia-driven decor — the same impulse bringing back vintage glass ornaments and heirloom quilts. You’ll still see these luminaries in five years. The rainbow-sprinkle version? Maybe not. If the pastel take is more your speed, see Idea #20.
8. Gingerbread Skirted Dessert Table in a Warm Kitchen
- Main table: 6- to 8-foot folding table $60–$120, or use your existing dining table for $0
- Gingerbread print table skirt: $45–$90 ready-made, or $15–$25 in fabric plus a staple gun
- Lighting: pre-lit tabletop tree $40–$90, lantern with LED candle $20–$45
- Serving pieces: red mugs $5–$8 each, cake stands $12–$30, platters $8–$20
- Decor: pine boughs and red berry sprays $25–$60
- Total: $215–$470, and closer to $90 if you already own a table and a tree
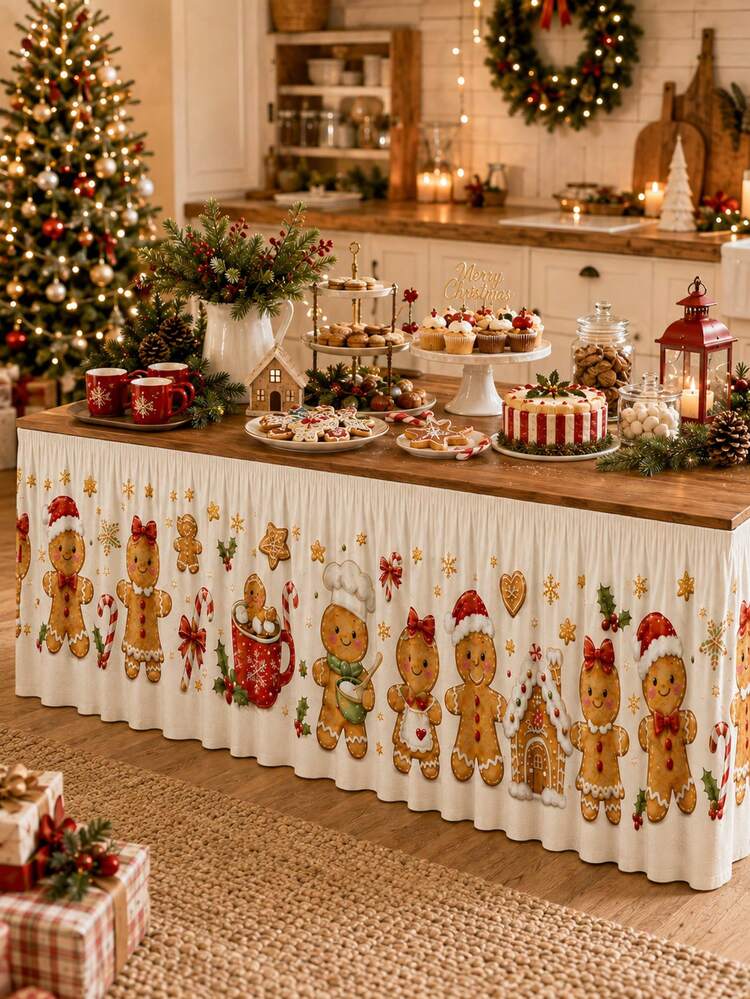
Budget alternative: buy the gingerbread-print fabric by the yard instead of a finished skirt and pin it along the table edge with safety pins — nobody sees the back of a dessert table.
Skirted tables look cheap when the skirt stops mid-air. Ground it. Take the fabric all the way to the floor with no gaps and no peeking table legs, and press the pleats before you attach them so they hang in crisp vertical lines. A 2-inch strip of double-stick fabric tape along the table edge holds a fabric skirt all night without a single visible pin, for about $6. And keep the food spread to three heights maximum: a low tray, a mid cake stand, a tall lantern. More than three and the eye can’t find the cookies.
- Measure the table height and floor-to-edge drop — most skirts need 29 to 30 inches.
- Confirm your guest count before buying platters.
- Check that one outlet can handle the tree plus a lantern without a strip underfoot.
- Decide the dessert menu first; the layout follows the food.
- Test your cookie and icing recipes two weeks ahead — candy melts in a warm room.
9. Gingerbread House Lanterns Nestled in Evergreen Branches
The burlap-wrapped base on that one evergreen branch is the detail that sells the entire scene. It’s a 99-cent fix — a strip of burlap ribbon wrapped around the bottom inch of a branch and tied off with twine — but it changes how the whole thing reads. Without it, the branches are just filler. With it, they look gathered and handmade, like something someone carried in from the yard. Take the burlap away and the two lanterns float. Keep it, and they suddenly sit in a landscape instead of on a table.
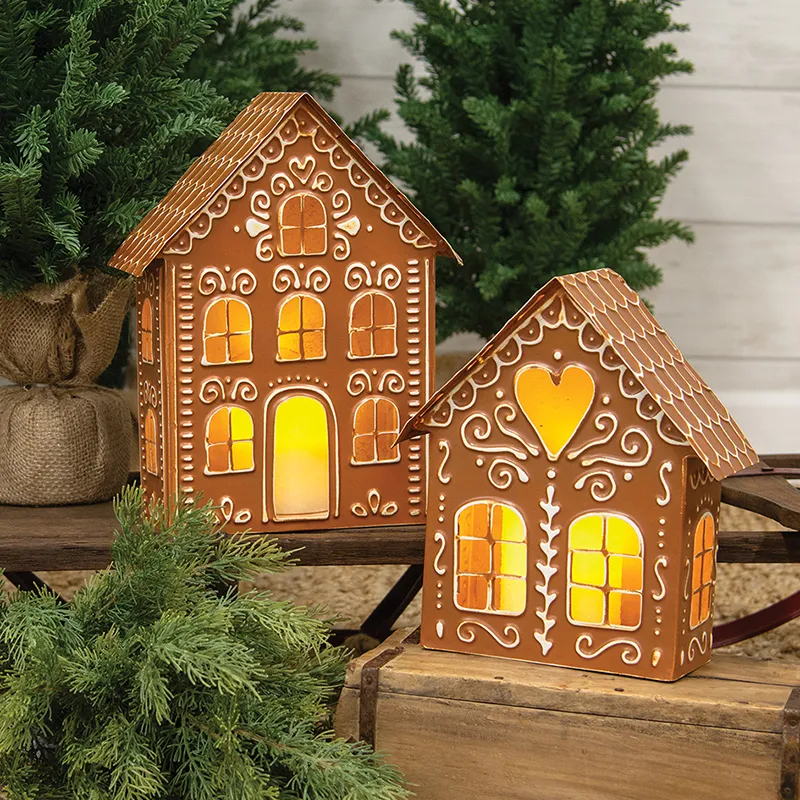
Lanterns at roughly 10 and 14 inches tall need real estate. Give them a surface at least 36 inches wide and 14 inches deep — a console, a sideboard, or the bottom step of an open staircase. They work under ceilings as low as 8 feet because they’re low-profile and keep their light at eye level. A room under 100 square feet will feel crowded with both, so use just the smaller one. For a narrow entryway that can’t take a whole village, this is your answer — Idea #6 is another small-space-friendly approach.
10. Gingerbread House Stocking Holder with Bottlebrush Tree
This little vignette runs on a clean three-part formula: 50% white, 40% gingerbread brown, 10% candy red. The white mantel and the bottlebrush tree do the heavy lifting, the stocking holder and frosted pine branch carry the warm middle, and the candy cane stripes deliver the only real pop. Swap the red for metallic gold and it turns elegant. Swap it for mint green and it goes full pastel-candy. The proportions stay identical either way, which is why this formula works on a fireplace, a bookshelf, or a bathroom counter without changing a thing.
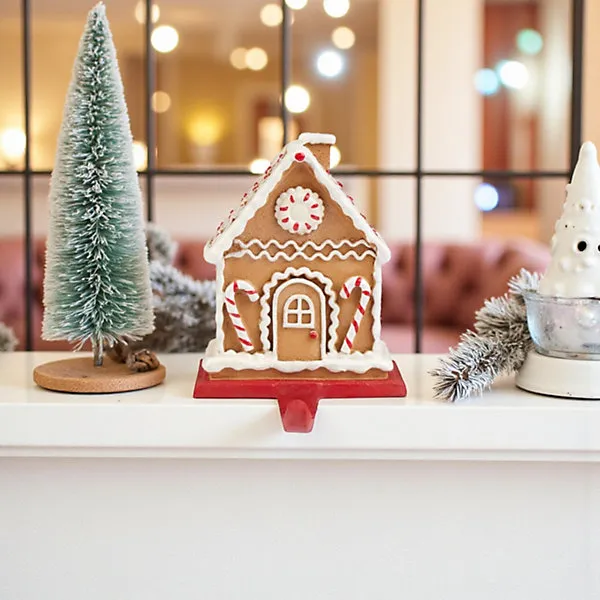
Stocking holders are load-bearing decor, and gingerbread house shapes are usually hollow. Test yours with the stocking you actually plan to hang — a heavy knit stuffed with small gifts can weigh 5 to 8 pounds. If the base feels light or the house tips when you nudge it, tuck a small bag of rice inside, or move it somewhere the stocking is decorative rather than full. And keep real candy canes away from a working fireplace; warm sugar gets sticky fast.
- Center the stocking holder on the mantel, about 4 inches back from the edge.
- Add the taller element to the left — the frosted pine branch, angled about 15 degrees outward.
- Place the bottlebrush tree to the right, 6 to 8 inches away, so the two sides don’t mirror.
- Fill the gap with one small item — a white ceramic figure on a silver base works nicely — never three.
- Hang the stocking and check that it doesn’t cover the icing details on the house.
11. Candy-Cane Roofed Gingerbread House on Plaid
Store-bought illuminated gingerbread houses run $40 to $120. Here’s the cheaper path: an unfinished wooden house at a craft store is $8 to $15, a bottle of gingerbread-brown acrylic is $2, white puffy fabric paint for the icing runs $4, and a battery tea light is $3. Candy cane roof trim is a $2 roll of striped ribbon. The Santa and snowman figures? Dollar Tree sells small ones for $1.25 each in November. Total: about $25. It won’t have molded gumdrop detail, but at three feet away nobody can tell — and you can repaint it next year.
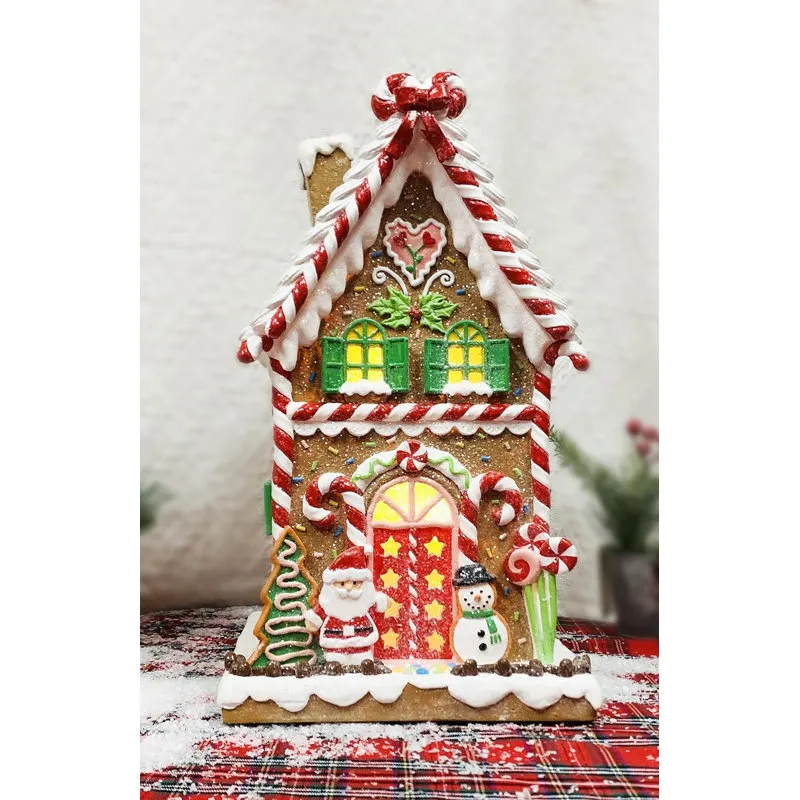
Two principles are doing the work. First, contrast: the plaid cloth is busy, so the house decoration stays graphic and simple — stripes, dots, solid brown — rather than trying to match the plaid’s complexity. Second, framing: the Santa and snowman flanking the glowing door create a symmetrical entry point, so your eye lands exactly where the light is. It’s a classic focal-point trick that costs nothing but placement. Move those figures 6 inches further out and the doorway loses its spotlight entirely.
- Measure your surface — this scene wants 18 to 24 inches of width.
- Decide battery or plug-in based on where your outlet actually is.
- Pick your cloth first; a solid white one reads calmer than plaid.
- Choose fluffy faux snow, not plastic beads — beads roll off and get everywhere.
- Photograph the layout before you add snow, so you can rebuild it next year.
12. Flocked Pastel Tree with Gingerbread Houses on the Sill
This is a 7- to 7.5-foot flocked tree with a 45- to 50-inch base spread, which means you need a corner or wall section at least 5 feet wide and a ceiling of 8 feet or more so the top doesn’t feel crammed. The window sill houses need roughly 30 inches of combined width, and since standard residential sills are only 4 to 6 inches deep, keep the houses under 5 inches wide or they’ll teeter. In a small living room under 150 square feet, a 6-foot flocked tree plus two sill houses tells the same story in two-thirds the footprint.
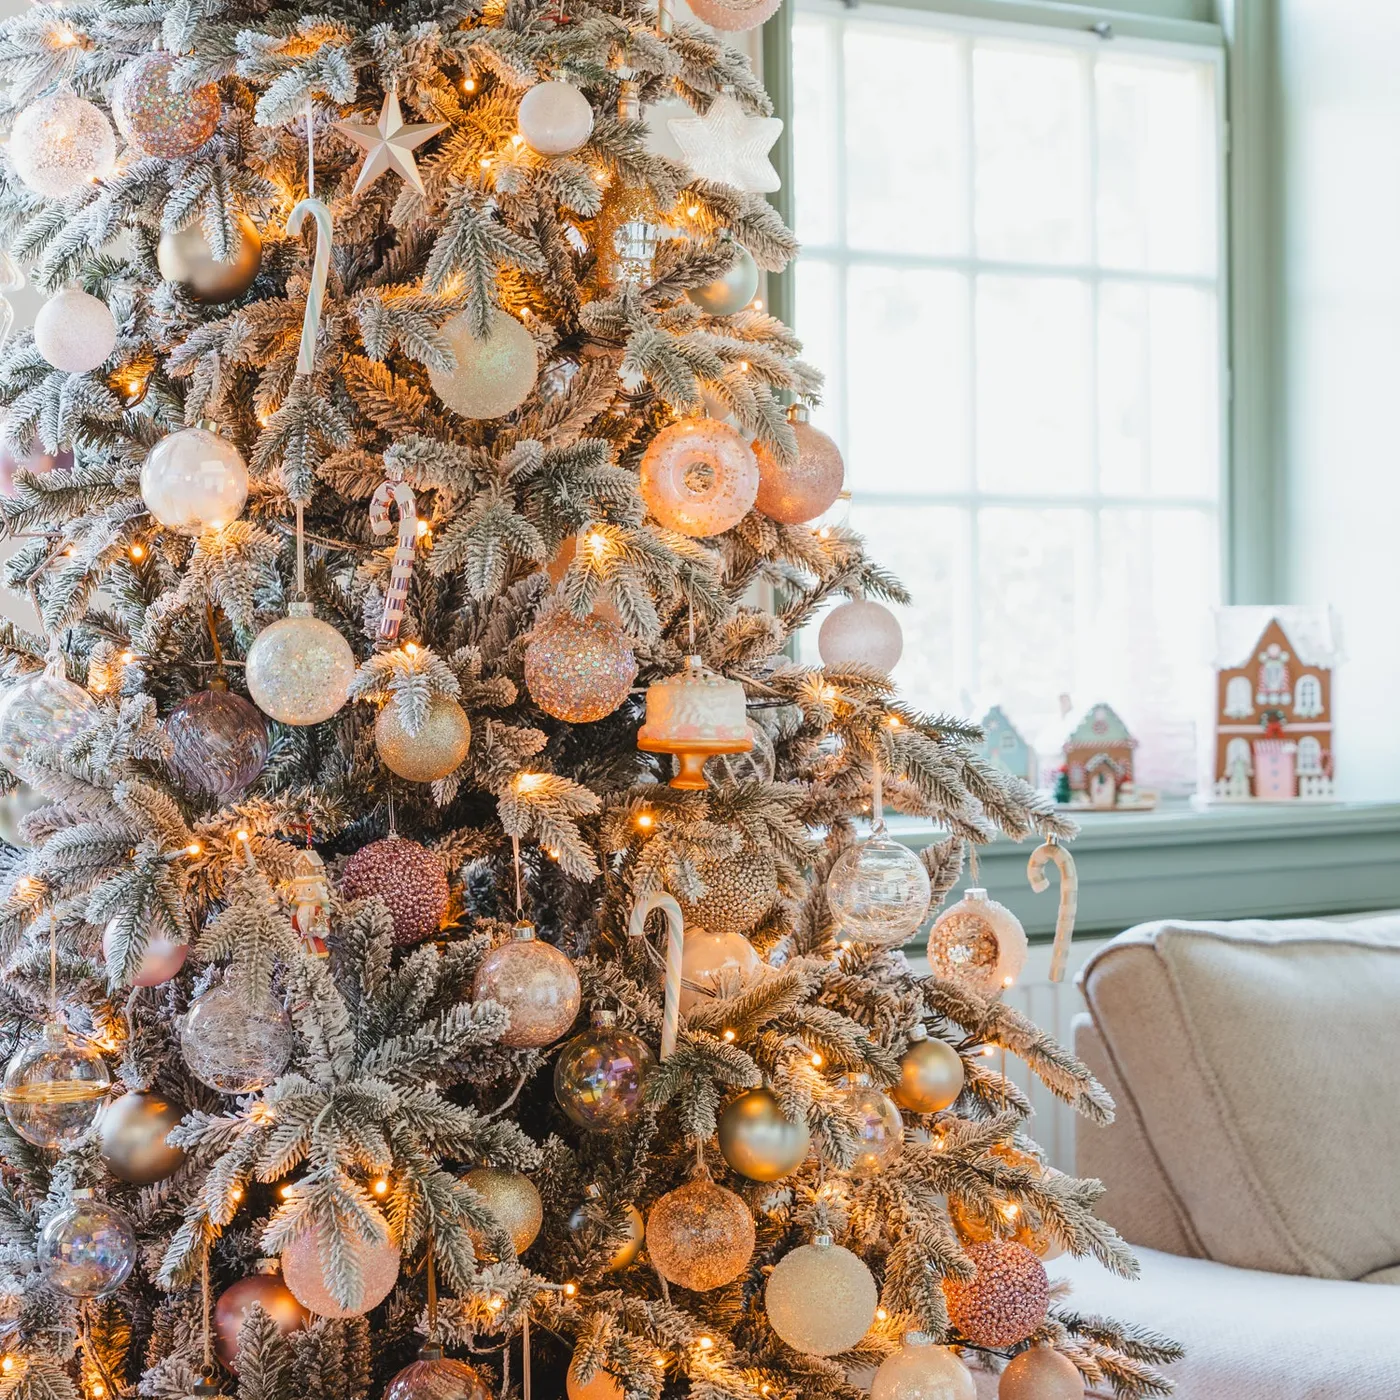
tying the tree and the sill together is the sage green trim on that window. It isn’t Christmas decor at all — it’s architecture — but that soft green is the exact bridge between the tree’s pastel flocking and the gingerbread brown of the little houses. No green trim at your place? Fake it. Run a narrow sage ribbon along the sill edge, or lean two green bottlebrush trees at either end. The point is that the transition between the tree and the display shouldn’t be a jump.
13. Chef Elf and Marshmallow Props on Frosted Branches
Small props need small-scale companions. A 12-inch elf doll reads as lost next to a full-size pillar candle, which is exactly why this setup uses a faux candle around 8 to 10 inches tall and a mirror no wider than 14 inches. The rule of thumb: keep everything beside a small figurine within twice its height. If the elf is 12 inches, nothing next to it should exceed 24 inches. And put the mirror behind the arrangement rather than beside it, so it bounces glow back onto the figurine instead of doubling the clutter in the frame.
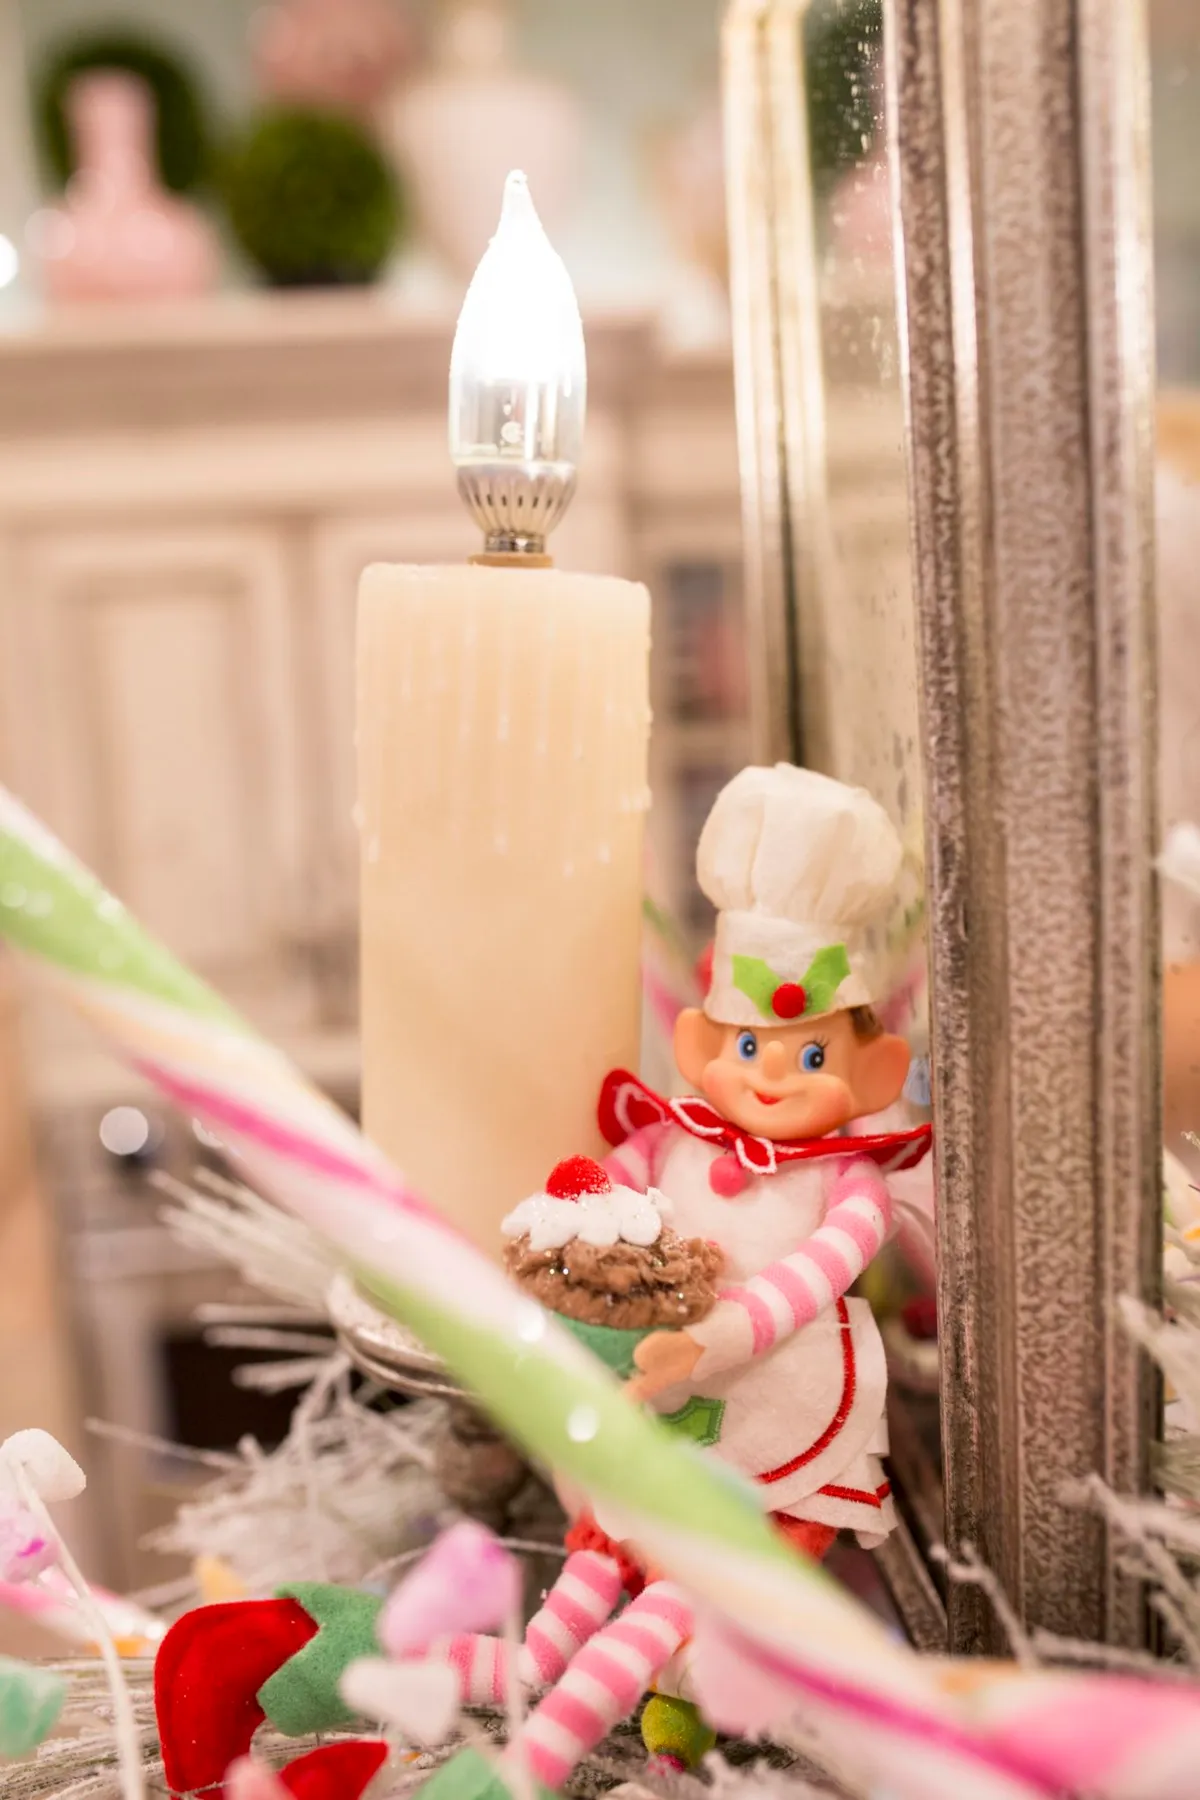
The elf-on-a-shelf era trained a whole generation to treat small dolls as decor, and 2026 is the year that habit went upscale. Elf figurines have moved off the bookshelf and into styled vignettes — Etsy sellers now make chef outfits, candy props, and matching tabletop scenes. It’s the same nostalgia economy driving the gingerbread revival: adults buying the childhood aesthetics they remember, then assembling them with grown-up styling. This one has real staying power as long as people keep decorating for the photos as much as for the season.
14. Pink Gingerbread House on a Rustic Shelf Against Subway Tile
- Measure shelf depth — this vignette needs 10 to 12 inches, plus 6 inches of clearance above.
- Check your tile’s color temperature; pink reads warmer against white subway tile than against gray.
- Confirm the shelf is anchored into a stud — collectibles get knocked.
- Make sure the house fits the shelf height with the mini tree’s topper included.
- Test the pink in daylight before committing to a whole pink-and-white palette.
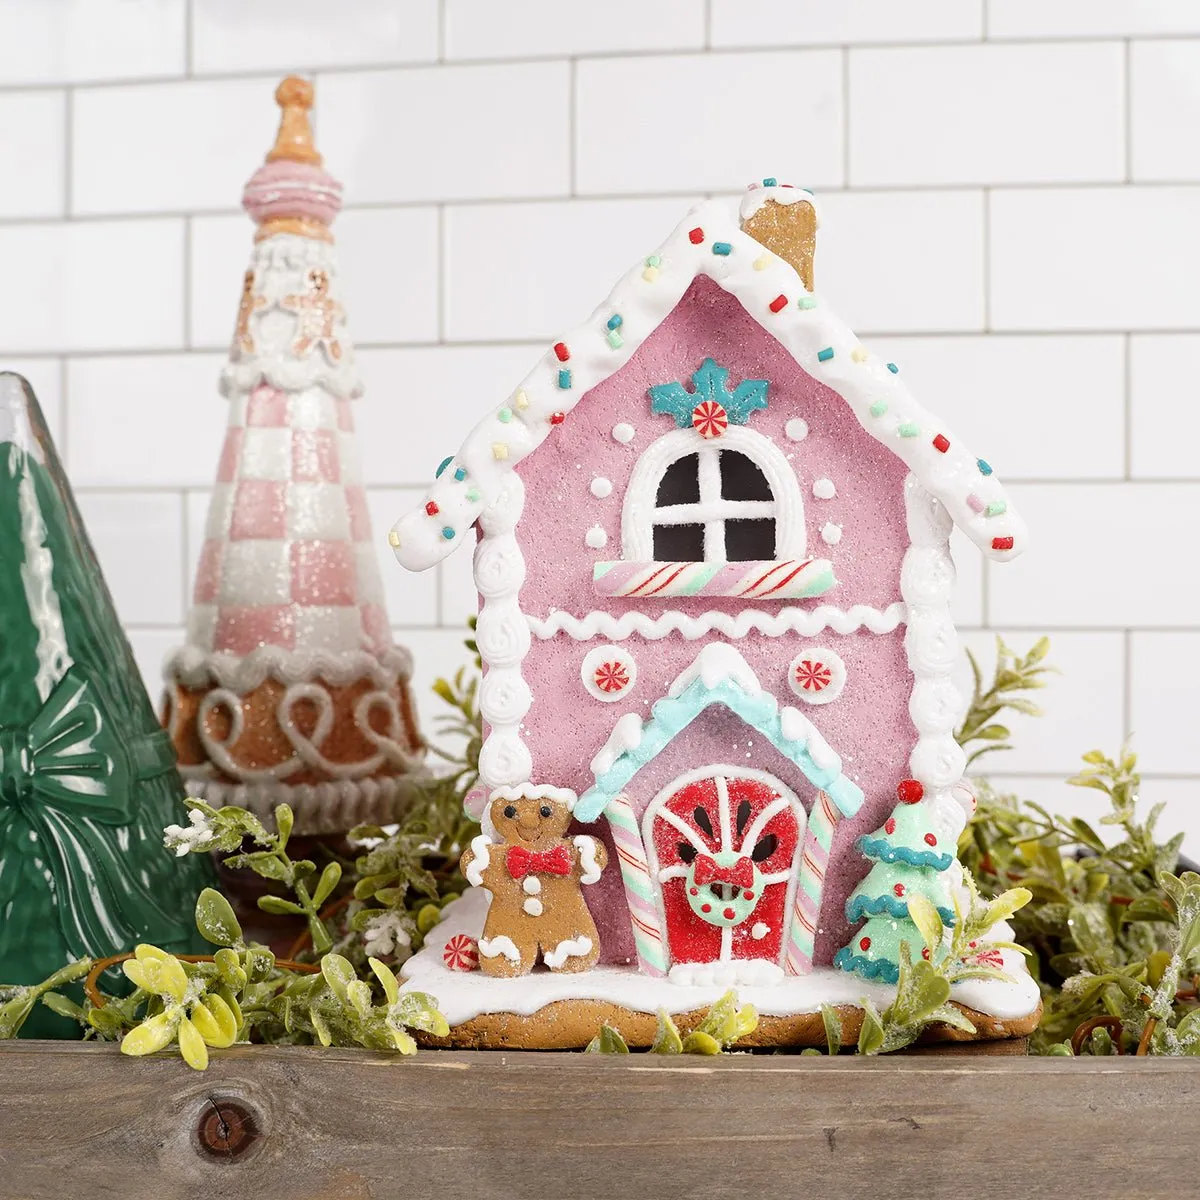
- Pink gingerbread house figurine: $12–$28
- Gingerbread man and mini tree figurines: $6–$14 each
- Frosted green foliage garland: $8–$18
- Pink and white glitter conical decoration: $5–$12
- Rustic wooden shelf or riser: $15–$40, or $0 if you use one you own
- Total: $46–$112, or roughly $25 if you thrift the shelf and skip the glitter cone
Budget alternative: spray a plain white ceramic house from a thrift store with pink craft paint, seal it with matte acrylic, and you’re in for about $6. It’ll look hand-poured rather than mass-produced.
15. Pastel Glitter Gingerbread Cake Tower on a Blue Scalloped Stand
Scale is the whole story. Three tiers of decreasing size create a natural pyramid, which the eye instantly reads as ‘centerpiece’ rather than ‘objects.’ Repeat that shape with the single pink bottlebrush tree beside it and you get rhythm — tall, short, tall. The palette stays disciplined too: soft pink, mint, white, and gold glitter, with no red anywhere. That’s what makes it feel like candy instead of Christmas. Remove the gold glitter and the whole thing goes flat and pastel-shop; the sparkle is the ten percent that makes pink look expensive instead of nursery.
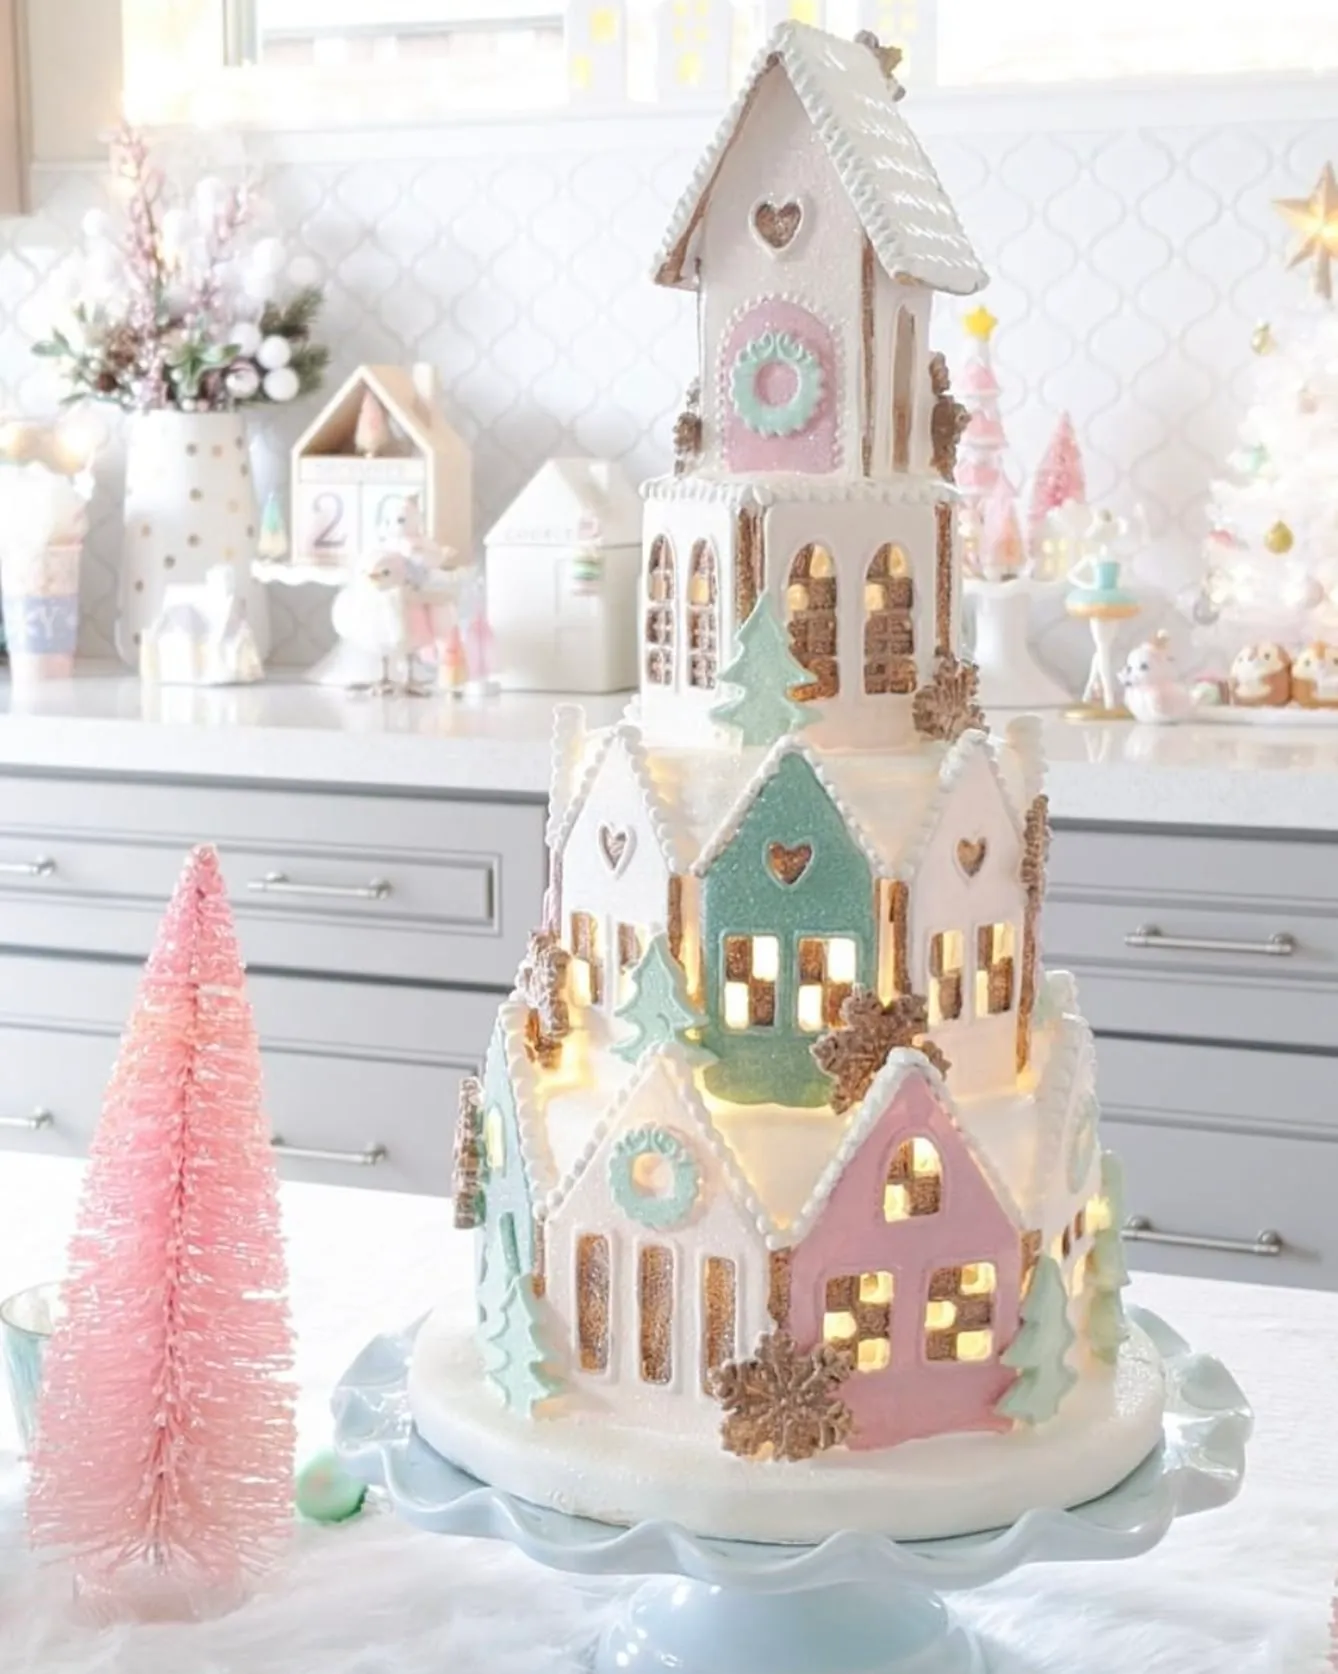
Call it 55% white, 30% pastel, 15% sparkle. The white comes from the icing details, the cake stand, and the fluffy textile. The pastels live in the house facades and the bottlebrush tree. The sparkle is gold glitter plus the warm glow behind the windows. Want a different season? Shift the pastels to lavender and sage for spring, or keep the exact formula and go deep green and burgundy for a classic Christmas tiered display. The proportion is the recipe; the colors are just the flavor.
Tiered gingerbread displays went from bakery window to living room shelf somewhere around 2023, and by 2026 they’re a full-blown Pinterest staple. The appeal is that they photograph ridiculously well — glowing windows plus a pastel palette equals an image people stop scrolling for. Pastel Christmas keeps growing because it matches how people already decorate the rest of their homes: soft, warm, unfussy. It won’t replace red and green, but it’s now a permanent second lane.
16. Gingerbread House with a Rainbow Candy Path
Here’s the thing nobody tells you about candy paths: they attract ants, and they attract kids. Real hard candy is fine on a display shelf for about a week, but in a warm room it gets tacky and starts to slide, and colors bleed once humidity creeps up. If this sits anywhere near a kitchen or a heating vent, swap the real candy for resin or foam pieces — they look identical at a glance and last for years. If you do use the real stuff, set it on parchment or a glass tray rather than directly on fabric you care about.
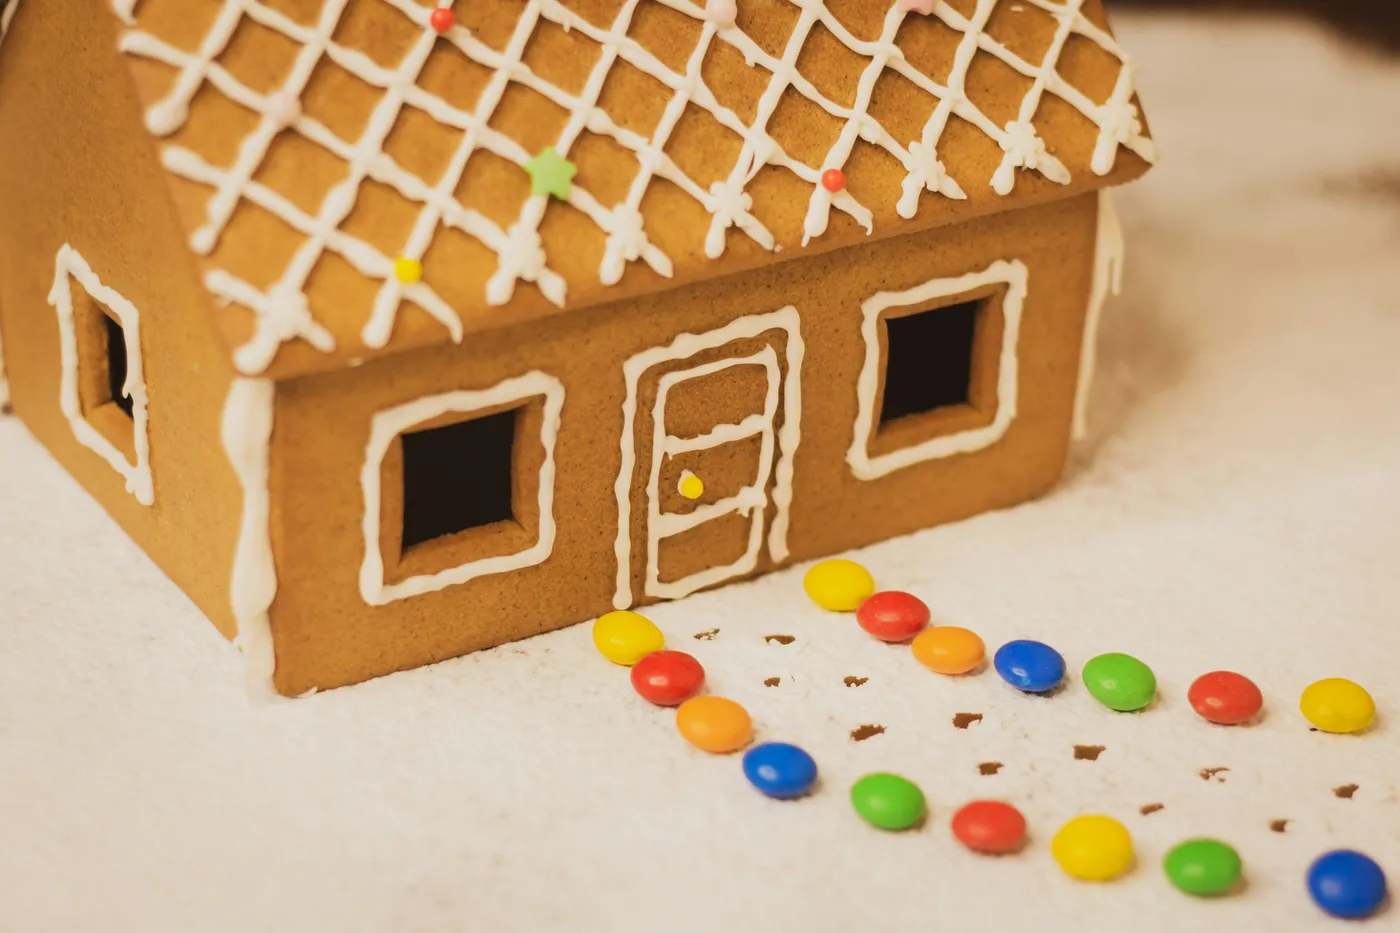
- Sketch the path on paper first — a soft S-curve or a gentle zigzag reads far better than a straight line.
- Lay a strip of double-sided tape or a thin line of icing down as your route guide.
- Place the largest candies at the house door and taper to smaller pieces at the outer edge.
- Alternate candy colors so no two of the same shade sit side by side.
- Fill the gaps with sprinkles, then step back five feet and check the spacing.
About 30 minutes of work and $6 to $12 in candy, depending on how elaborate you go.
17. Gingerbread Houses as Place Cards Along an Evergreen Runner
Garland centerpieces fail for one reason: they’re too wide. Keep the greenery under 12 inches across on a standard 36- to 40-inch table so each guest keeps a clear 24 inches of space. Run battery-operated string lights through the garland on the underside, not the top — light shining up into faces is the fastest way to kill dinner conversation. A 10-foot strand of warm-white micro lights is about $8, and you can hide the battery pack inside a hollowed pinecone or tucked under a votive. Nobody will look for it.
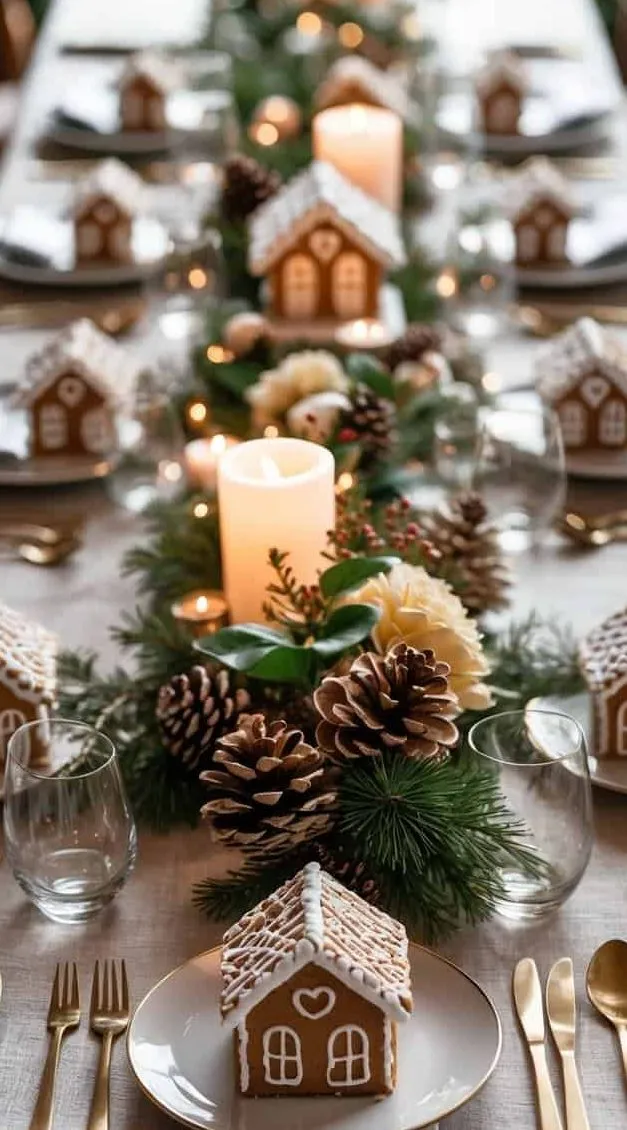
This setup is built for a table 6 to 8 feet long and 36 to 40 inches wide, seating six to eight. The garland wants a 10- to 12-foot run to look generous, and each gingerbread house plate needs about 11 inches of linear space — measure before you buy eight houses. In a dining room under 120 square feet, skip the garland entirely and use three small gingerbread houses spaced down the center with two candles. For a similar effect on a much smaller scale, see Idea #30.
You can set this table for about $45. Faux evergreen garland runs $12 at Walmart, pinecones are free if you’ve got a pine tree nearby, and candles come in a $10 multi-pack. The gingerbread houses don’t need to be real — small ceramic or wooden ones are $3 to $6 each at discount stores. Gold cutlery? Thrift stores sell mismatched gold flatware for a dollar a piece, and honestly, the mismatched set looks better here than a matched one. Save the money for the food.
18. Gingerbread House with Peppermint Window and Candy Lights
Real gingerbread is food, and it behaves like food. Expect it to soften within a week in a humid room and the icing to yellow slightly by mid-month. If you want it up for the whole season, bake it hard — an extra 10 minutes at 300°F — and keep it away from the kitchen and any heat source. Candy decorations absorb moisture and go sticky, so a light dusting of cornstarch on the underside of the base helps. If you’d rather skip the upkeep entirely, a ceramic or resin version of the same design lives forever and wipes clean with a damp cloth.
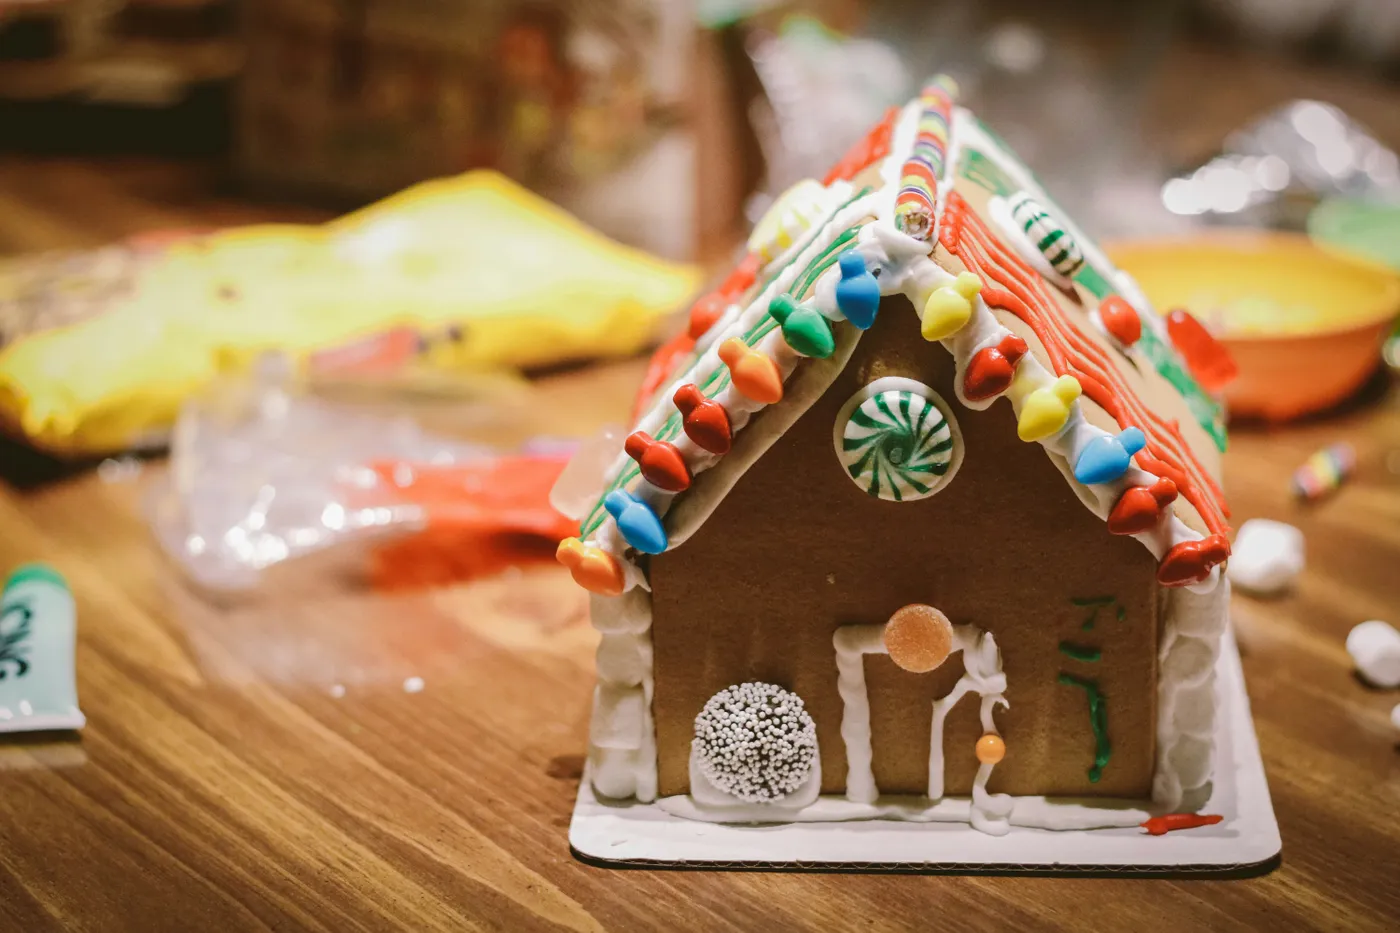
The peppermint window is the hinge of this whole house. A single round peppermint set into the front wall turns a generic gingerbread house into something with a face — it reads as a porthole, a glowing eye, a bubble of sugar. Everything else, the candy roof lights and the striped icing, is trim. Take the peppermint out and the house goes back to being a nice but forgettable cookie. Find your one round element and build the facade around it.
- Round peppermint as the focal window
- Candy ‘lights’ evenly spaced along the roof edges
- Three icing colors maximum: white, red, green
- Base fully covered — sprinkle any bare cardboard
- One asymmetrical detail so it doesn’t look machine-made
19. Gingerbread House with Candy Heart Door and Rainbow Sprinkles
- Gingerbread house kit or scratch ingredients: $10–$20
- White royal icing (powdered sugar plus meringue powder): $4–$8
- Assorted small candies and sprinkles: $10–$18
- Piping bags and tips: $5–$12
- Cardboard base or cake board: $2–$6
- Total: $31–$64 for one house, or about $19 if you start from a kit
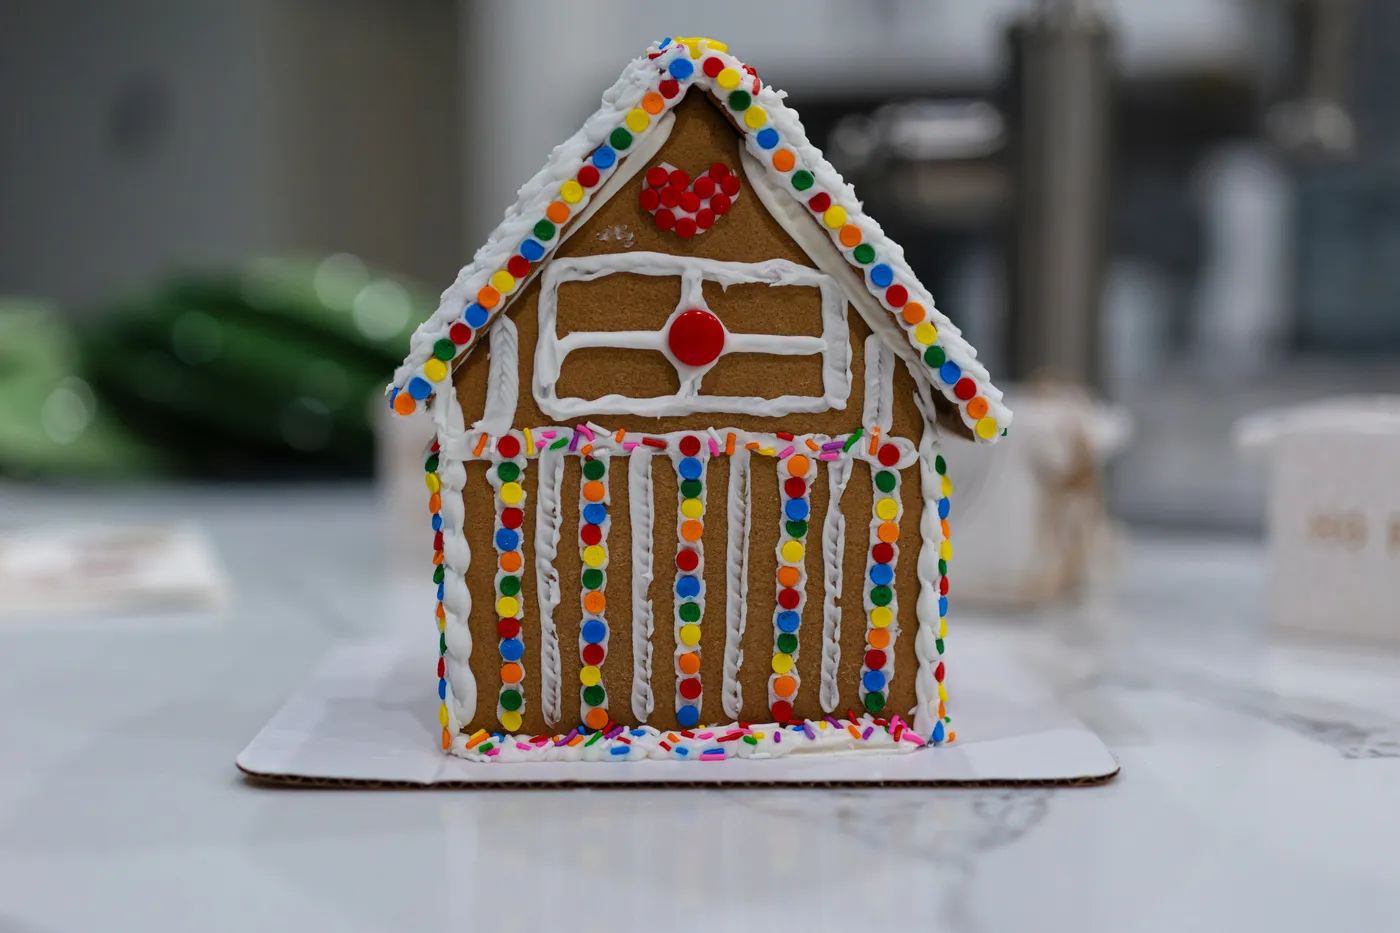
Budget alternative: skip the kit and buy a $4 box of graham crackers plus a $3 bag of powdered sugar. The classic shortcut builds the same house for a third of the price, and honestly it tastes better.
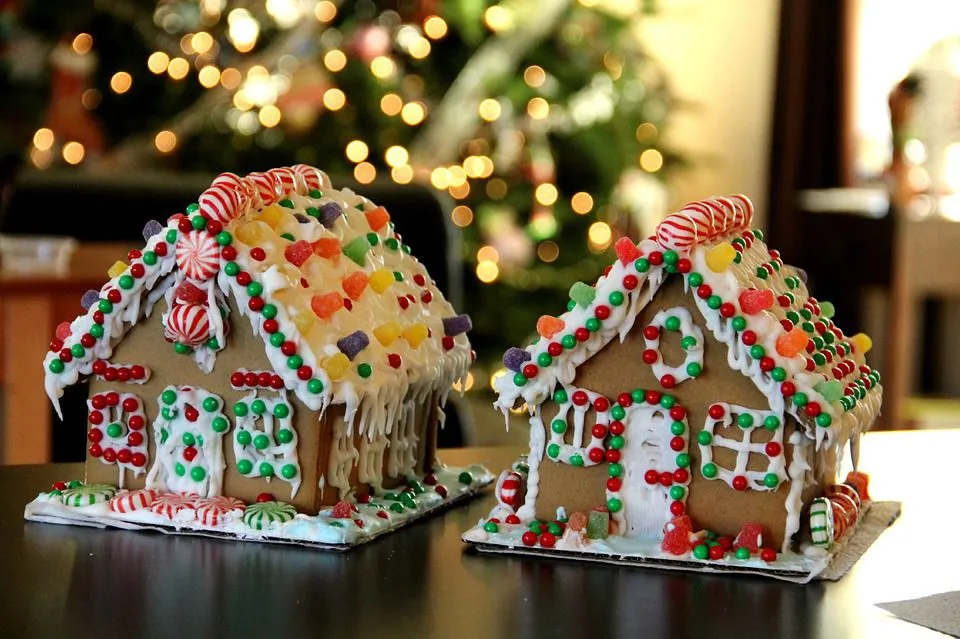
Two design principles make this house feel more expensive than it is. First, white icing is used as a solid, not just as lines, so the roof reads as snow rather than decoration — which gives the gingerbread brown room to breathe. Second, color discipline: every candy is small, and the red candy heart and the single red round candy are the only saturated accents on the entire facade. Everything else is white or muted. Most homemade houses fail because they use six candy colors at once. Two accents is a design decision.
A house this size — about 5 x 6 inches on a 9-inch base — fits comfortably on a kitchen counter, a 12-inch-deep shelf, or a sideboard with room to spare. It’s a great starter size for a first attempt and works in tiny kitchens where a full village won’t fit. On a 30-inch counter, set the house slightly off center and add one small candy dish beside it. On an 8-foot sideboard, you’ll want three houses at staggered heights — Idea #27 shows that approach.
20. Pastel Glitter Gingerbread Houses Among Frosted Bottlebrush Trees
This is the pastel branch of the gingerbread family, and its formula is 50% white snow and base, 35% pastel — mint, pink, and soft blue houses plus bottlebrush trees — and 15% warm light. The catch is that the pastels have to be the same value. All pale, none dusty or dark, or the whole scene turns muddy. Swap the pink bottlebrush trees for cream ones and you get a snow-globe version. Swap them for deeper teal and it reads vintage. The white base never changes; that’s the constant.
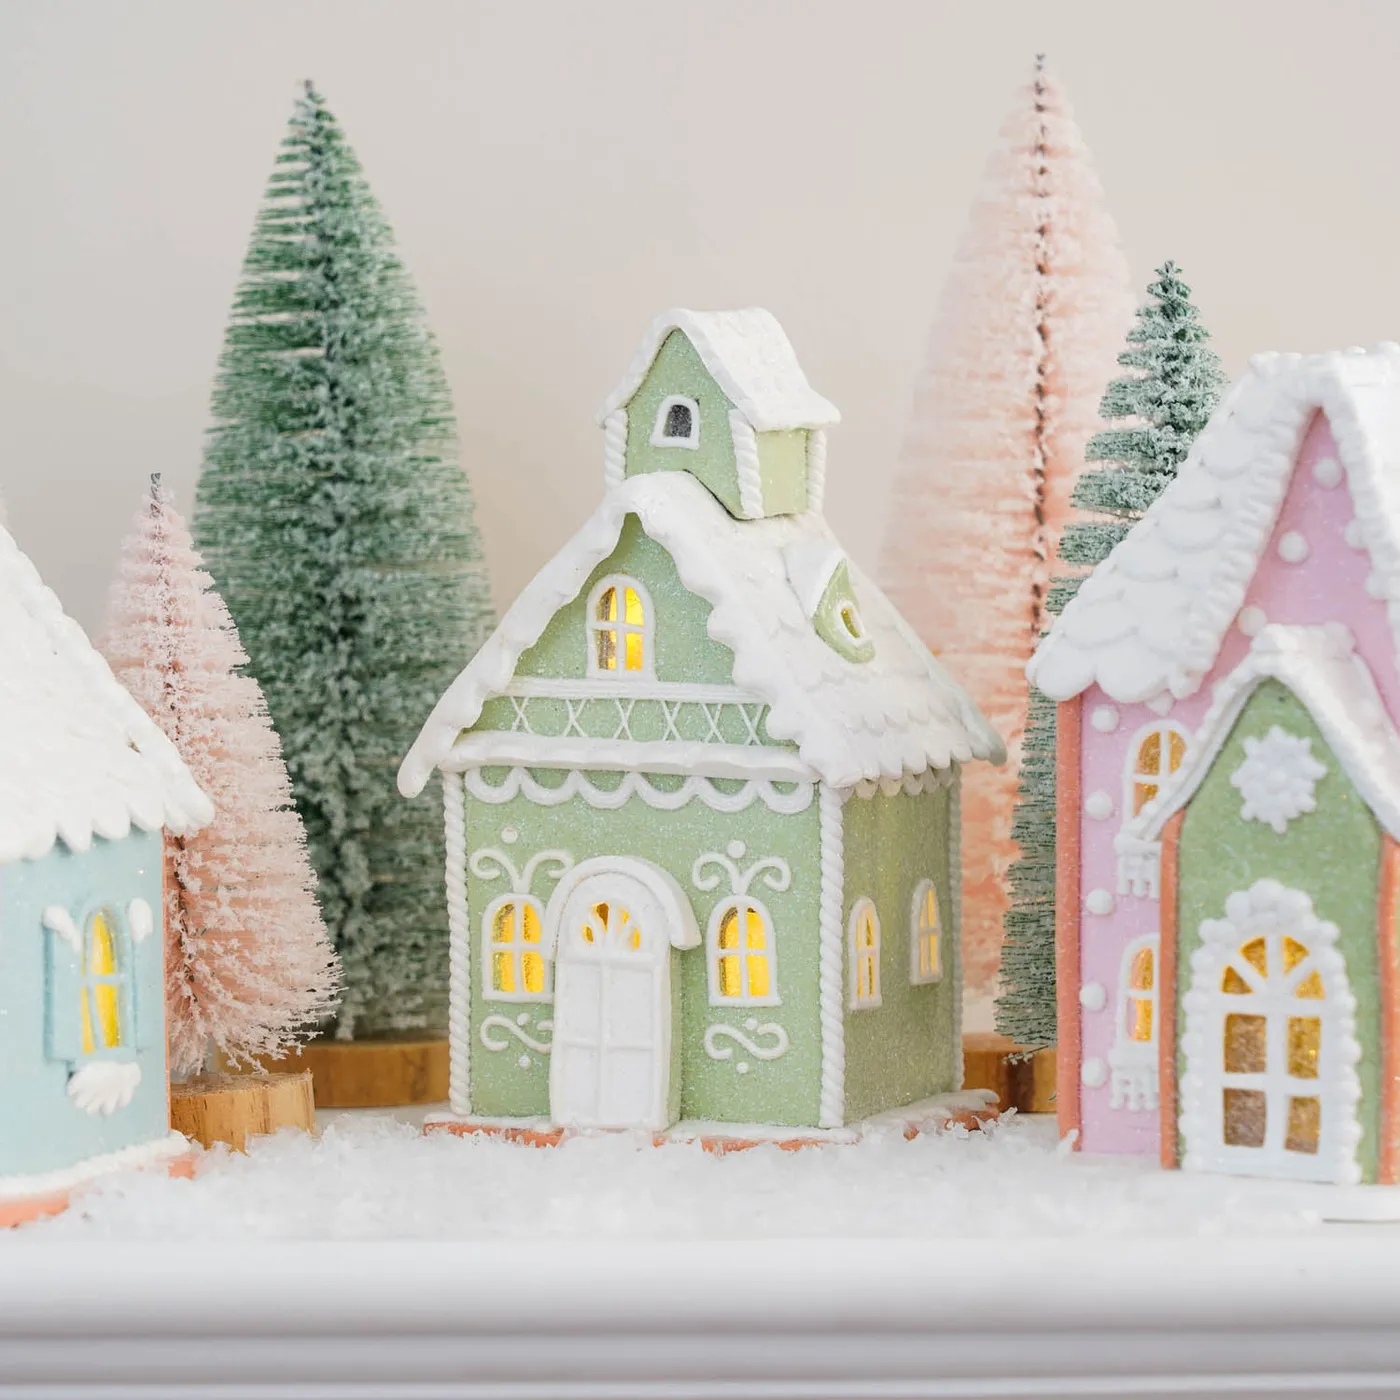
Glitter is a commitment and faux snow is an oil spill waiting to happen. Glittered houses shed for the first two weeks, so set them on a tray rather than directly on a wood shelf, or you’ll be vacuuming sparkle out of your tabletop finish until spring. Loose bagged faux snow drifts and clings to everything, while the kind bonded to a felt mat stays put and is worth the extra couple of dollars. And if you have pets, know that cats love to chew both glitter and faux snow — neither is good for them.
21. Gingerbread Luminaries with a Stacked Cookie Tree
Stacked cookie trees are the fastest way to add height to a shelf display without adding bulk. Build yours on a foam cone — about $5 at a craft store — starting with 4-inch cookies at the base and working down to 2-inch cookies near the top, hot-gluing each one in an overlapping spiral. The whole build takes around 90 minutes, and a $5 cone plus a $6 bag of cookies gets you a 24-inch tree. Keep the bottom row slightly proud of the second row so the spiral actually reads as a spiral instead of a stack of cookies.
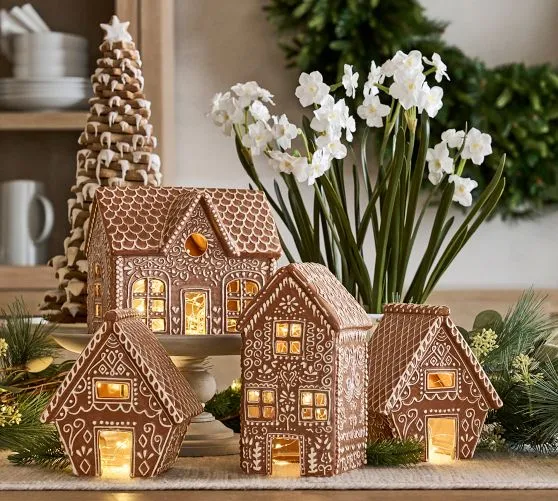
A shelf display like this needs 36 to 48 inches of width and 12 inches of depth, with at least 26 inches of vertical clearance for the cookie tree plus its star topper. It fits beautifully on standard 12-inch-deep built-ins and on a kitchen counter under an 8-foot ceiling. If your shelf is only 24 inches wide, drop to three houses and a 16-inch cookie tree. For a mantel-height version of the same idea, see Idea #5.
22. Frosted Tree with a Gingerbread Man Twig Wreath Ornament
Wreath-style ornaments are having a moment because they solve a real problem: a big tree needs a few unusually large focal ornaments, and standard 3-inch balls vanish into the branches. Ornament-wreaths — a small twig ring with a figure nested inside — give you a 6- to 8-inch statement piece for under $15. It’s part of the broader 2026 move toward handmade-looking, personalized decor: burlap, kraft paper, satin ribbon with names lettered on it. This trend has legs because it scales; one wreath ornament on a small tabletop tree reads just as well as twelve on a 9-footer.

The whole thing costs under $20 if you build it yourself. A 6-inch grapevine or twig wreath is $3 at a craft store. A gingerbread man ornament with a top hat runs $2 to $5 at Dollar Tree or Walmart. The red satin bow is $2 worth of ribbon, and a metallic paint pen handles the gold lettering in five minutes. Burlap for the tree base is about $4 a yard. Total: roughly $16, against $28 to $45 for ready-made versions on Etsy.
23. Flocked Gingerbread Swag with a Tiered Ribbon Bow
- Start with a flocked swag base about 30 inches long and fluff every branch outward from the spine.
- Build the bow first: layer a 4-inch gingerbread-patterned ribbon over a 3-inch red satin one, plus a 2-inch tail.
- Place your largest ornament — the plush gingerbread man in the top hat — just below the bow, slightly left of center.
- Add six to eight mid-size ornaments in a loose triangle, spaced 4 to 6 inches apart.
- Fill gaps with berry clusters and small cookie ornaments last, so the big pieces still read.

About 45 minutes and $35 to $60 in materials.
The tiered bow at the top is the element holding this swag together, and it isn’t just a topper — it establishes scale. A bow made from 4-inch ribbon tells your eye that everything below it is decoration on a large scale, which is exactly why the plush gingerbread man doesn’t look oversized. Swap in a thin 1-inch bow and the whole swag suddenly looks like a craft project. Match your bow width to your largest ornament and you’re most of the way there.
Flocked swags shed. Expect a light dusting of white flakes on the floor for the first week, and more every time you brush past. Vacuum with a hose attachment rather than sweeping, or the flocking smears. Hang it away from a doorway, because flocking wears off fast in traffic zones. Store it in a breathable bag, never plastic — trapped moisture makes the branches clump. A decent swag gives you three to five seasons before the flocking gets patchy.
24. Pastel Candy Gingerbread Wreath with a Plush Face
Wreaths read as flat discs unless you build them in layers. Attach the largest items first — the plush face, the big lollipops — directly to the wreath form with floral wire. Then hot-glue the mid-size pieces, the snowflakes and mini candy canes. Finally, tuck the ribbon tails and the wooden sign into the gaps. Depth matters too: push a few elements 2 inches forward on short wooden skewers so the wreath has actual dimension. A flat wreath hung on a door looks like a picture. A layered one looks like a sculpture.

- Weigh the finished wreath — anything over 4 pounds needs a metal over-the-door hook, not a suction cup.
- Check door clearance; a wreath thicker than 6 inches won’t fit between door and frame.
- Lock your palette before buying — pastels here, not red and green.
- Test-hang it and check the light before you glue anything down permanently.
- Decide indoor or outdoor; sun fades pastel ribbon in about six weeks.
25. Gingerbread Cookie Ornaments in a White Wire Basket
- Spherical gingerbread-style ornaments: $3–$8 each, or $12–$20 for a six-pack
- Molded cookie-like ornaments: $4–$10 each
- White wire basket: $12–$25
- Textured white cloth or runner: $8–$20
- Pinecone filler: free if you forage, $5–$12 if bought
- Total: $36–$83 for a full basket, or about $20 if you thrift the basket and use what you own
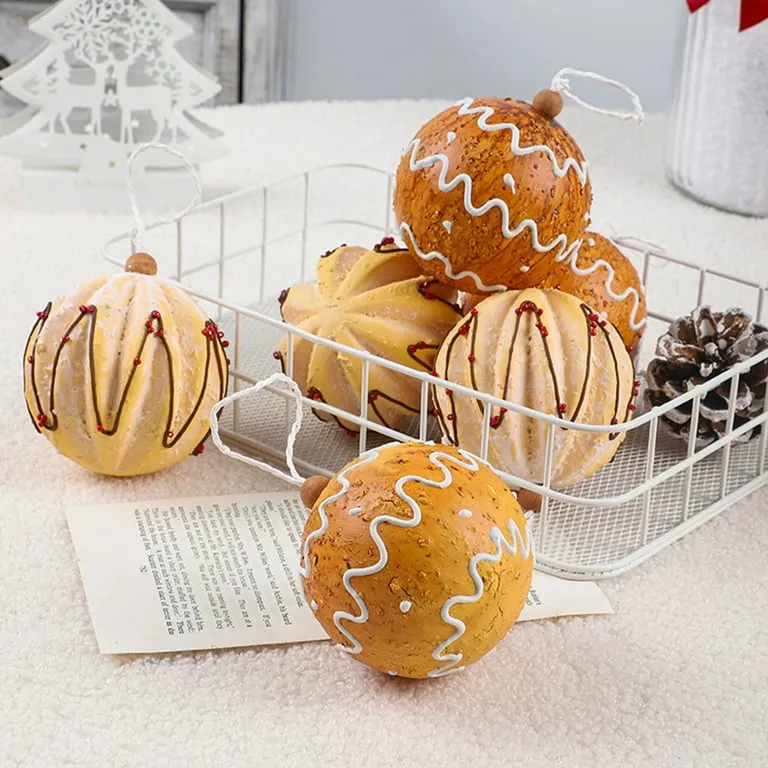
Budget alternative: buy a $3 set of plain brown ball ornaments, pipe white puffy fabric paint on them in wavy lines, and dot with red nail polish. Twenty minutes of work and they look remarkably close to the real thing.
Grouping is the whole design move here. Individually, each ornament is cute but not particularly interesting. Together in a shallow basket, they read as a collection, and a collection is always more compelling than a display. The white wire basket matters too — it nearly disappears against the white cloth, so the ornaments appear to float rather than sit in a container. Swap in a dark basket and the whole thing turns heavy. And the sizing works because every ornament sits within about an inch of the others; a single oversized piece would break the rhythm outright.
26. Gingerbread Man and Woman Wreath with Candy Canes
A wreath with two full-size gingerbread cutouts needs to be at least 24 inches across — and honestly, 28 to 30 works better. Anything smaller and the figures look like they’re falling off the edge. Hang it where there’s 8 to 10 inches of clearance on each side: a front door with sidelights, a wide interior door, or a blank wall between windows. On a standard 32-inch front door, a 24-inch wreath fills about three-quarters of the width, which is the sweet spot. Go bigger and you start blocking your door hardware.

If this wreath goes outside, understand what you’re signing up for. Faux pine with frosted tips yellows in direct sun, and felt or paper gingerbread cutouts warp and fade within a season. Ribbon tails fray in wind, and candy cane ornaments snap in the cold. If your front door faces south or west, hang this one inside and use a simpler evergreen wreath outdoors. If you love the look for outside anyway, seal the cutouts with outdoor acrylic spray and bring the wreath in during ice storms.
27. Gingerbread House Ornament Tree with Wide Striped Ribbon
The recipe here is 65% green — tree needles plus ornaments — 25% red and white, and 10% gingerbread brown. The wide ribbon does double duty: it delivers the red-and-white pattern and it creates a diagonal line that breaks up the tree’s predictable cone shape. Swap it for a narrower ribbon and the tree loses all its motion. Want a different mood? Keep the same proportions and trade red for royal blue, or trade gingerbread brown for silver and go full snow-queen. Same formula, brand-new tree.
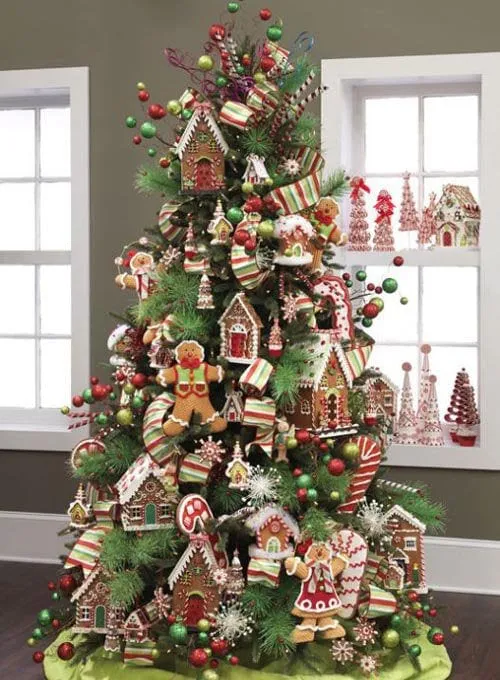
Wide wired ribbon is the sneaky expense in a tree like this — a 30-foot roll of 4-inch ribbon runs $25 to $45. Buy it off-season at 70% off, or buy two narrower rolls at $8 each and layer them side by side to fake the width. Gingerbread ornaments are cheapest at dollar stores in November, often $1.25 each. If you want the house-shaped ornaments specifically, Etsy sellers sell them in six-packs for around $18, which beats $6 apiece at retail. Whole tree: about $85 instead of $250.
- Fluff the tree for 20 minutes before you decorate. Every season, no exceptions.
- Run the lights first in a zigzag from trunk to branch tip, so no bulb ends up buried inside.
- Weave the wide ribbon next, working in loose S-curves rather than tight wraps.
- Hang the gingerbread ornaments, spacing them about 10 inches apart so they don’t cluster.
- Fill gaps with baubles and candy canes last, then add starbursts near the branch tips.
Plan on 2.5 to 3 hours for a 7.5-foot tree.
28. Gingerbread Houses Tucked in Greenery with Red Baubles
Miniature houses disappear in a centerpiece unless you raise them. Set each gingerbread house on an overturned white teacup, a small wooden block, or a stack of two coasters — get them 2 to 3 inches above the greenery so the roofs clear the foliage. Then angle the red berry sprays so they frame the houses rather than cover them. And keep the glitter ornaments to three or five total; an odd number reads as intentional, while an even number reads as a pattern, and patterns inside organic greenery always look slightly off.

Centerpieces built around a single motif rather than a full theme are one of the more practical trends of 2026. People are tired of buying entire coordinated collections, so they buy one strong element — here, the little houses — and let greenery, berries, and a couple of ornaments handle the rest. Gingerbread works especially well because it’s warm and nostalgic without being overtly religious or novelty. Expect this approach to outlast the more themed decorating waves.
Faux greenery with frosted tips collects dust fast. A hairdryer on the cool setting beats a cloth, which just smears the dust around. Glitter ornaments shed, so lift them individually when you rearrange, then wipe the wooden surface with a barely damp cloth. Use felt pads under anything with a rough base, because glitter scratches finishes faster than you’d think. This arrangement holds up about six weeks with one mid-season touch-up.
29. White Mantel Garland with Gingerbread Men and Pillar Candles
Real gingerbread cookies in the garland — that’s the move, and it’s what separates this from every other mantel on the block. Not ornaments shaped like cookies; actual cookies, wired into the greenery. They add scent, an edible wink, and a texture nothing manufactured can match. The catch is that they only hold for about two weeks before softening, so hang them a few days before your gathering and swap them out afterward. Everything else here — the garland, the candles, the little white trees — is supporting cast for that one honest detail.
- 9-foot faux pine garland: $15–$35
- White string lights: $8–$14
- Pinecones and red berry sprays: $10–$25
- Gingerbread cookies, baked or bought: $8–$18
- Glass hurricane lamps with pillar candles: $20–$45 per pair
- Small white Christmas trees: $8–$20 each
- Total: $77–$177, or roughly $40 if you bake the cookies and reuse last year’s garland
Budget alternative: skip the hurricane lamps entirely and use $1 glass candle holders from the dollar store with white pillar candles. At mantel height, nobody can tell the difference.
30. Gingerbread Man Plates on a Traditional Dining Table
- Lay the garland runner down the center first, keeping it 10 inches wide so plate space stays clear.
- Build each setting bottom-up: charger, then red plate, then brown plate, then the gingerbread man plate on top.
- Roll a red-and-white checkered napkin and lay it horizontally across the stack, slightly left of center.
- Set the goblet an inch above the knife tip, not beside the plate.
- Turn every gingerbread man plate to face the same direction — this is the detail that makes it look styled.
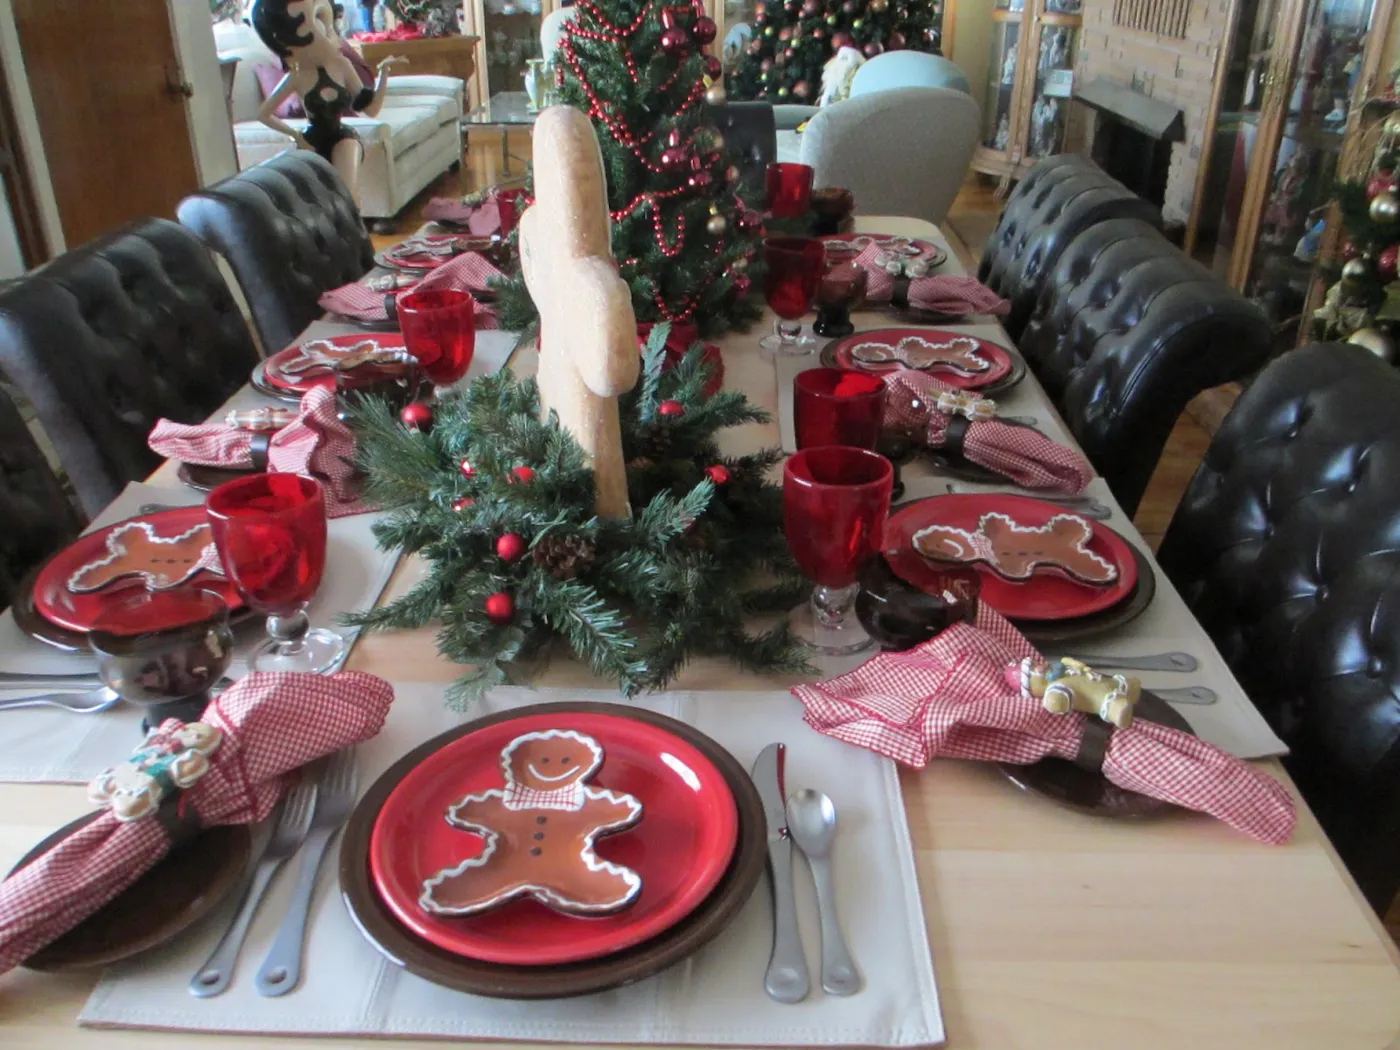
About 40 minutes for eight settings, and $0 if you already own the dishes.
Stacking four plates at each setting needs a table at least 40 inches wide. On a 36-inch table, drop the charger and use three. The garland runner should be about 10 inches wide and 12 inches shorter than the table, so there’s breathing room at the ends. This works for six to ten guests on an 8- to 10-foot table. For a smaller round table, use the gingerbread houses on plates from Idea #17 instead — same motif, less width required.
31. Classic Gingerbread House with Icing Snow and Tree Cookies
Three small decisions make this house look professional. The icing snow is applied with a spatula and lifted at the edges rather than piped in a smooth sheet, so it reads as drifts with real dimension. The two tree cookie cutouts are the same size and lean the same direction, giving the facade symmetry without mirroring it exactly. And the wreath is deliberately undersized — a 1-inch ring on a 5-inch door. Oversized details are what make homemade gingerbread houses look clumsy; slightly-too-small is almost always more charming.

Red icing is a gamble. Standard gel food coloring won’t get you a true red — you’ll land on pink unless you use gel paste or a no-taste red, which costs a few dollars more. Red icing also bleeds into white if applied too close while wet. Pipe the white first, let it set for at least two hours, then add the red. And if you’re building this with kids, plan for smudging. Cookies are more fun when they look homemade.
- Gingerbread house kit or scratch ingredients: $10–$20
- Gel paste food coloring set: $10–$18
- Royal icing supplies: $6–$12
- Tree cookie cutter and wreath mold: $4–$10
- Fairy lights for the backdrop: $6–$12
- Total: $36–$72, or about $22 if you already own the coloring and cutters
Budget alternative: buy a pre-baked house shell for $8 instead of baking from scratch, and use a ziplock bag with the corner snipped as your piping bag. Saves about $15 and works just as well.
32. Snow Globe and Beaded Garland Table Runner
Snow globes are the one holiday item where the cheap version is often indistinguishable from the expensive one. A $12 snow globe with an LED house inside looks the same at arm’s length as the $60 version; the differences live in the glass clarity and the base finish. Thrift stores and estate sales are goldmines from January through March. The beaded garland is $8 at Target, or $4 in the wood-craft aisle if you string plain beads yourself. Bottlebrush trees run $1 to $3 each at most dollar stores. Total: about $28.
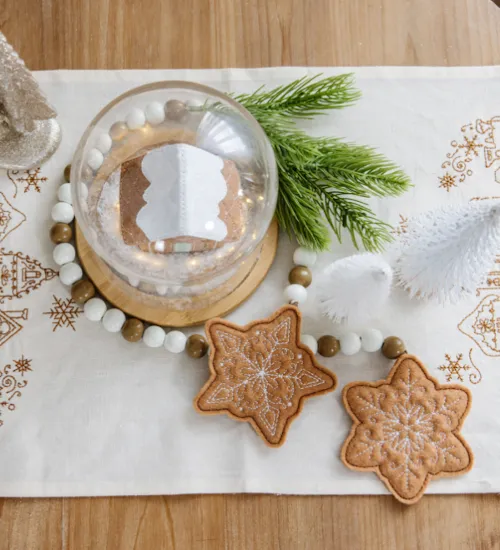
This runs 60% white and natural wood, 30% gingerbread brown, 10% forest green. The white comes from the bottlebrush trees, the linen runner, and the beaded garland. The wood tones come from the globe base and the garland beads. Brown lives in the little house and the felt star ornaments. That’s it. Green shows up only in the faux pine sprig and a hint of embroidery. Swap the natural wood beads for silver and it goes wintry; swap them for red and it turns traditional. The 60/30/10 balance is what keeps it from looking like a pile.
33. Individual Gingerbread House Cakes with Gold Cutlery
Powdered sugar is the cheapest finishing trick in dessert styling and the easiest to ruin. Use a fine-mesh sieve held about 10 inches above the cake, tap it gently, and move in slow circles — a shaker or a spoon leaves clumps. Do it right before serving, because within an hour the sugar starts absorbing and disappears. Build your gingerbread house cake on a flat base board, then slide the whole thing onto the plate with a spatula so the sugar stays exactly where you put it.
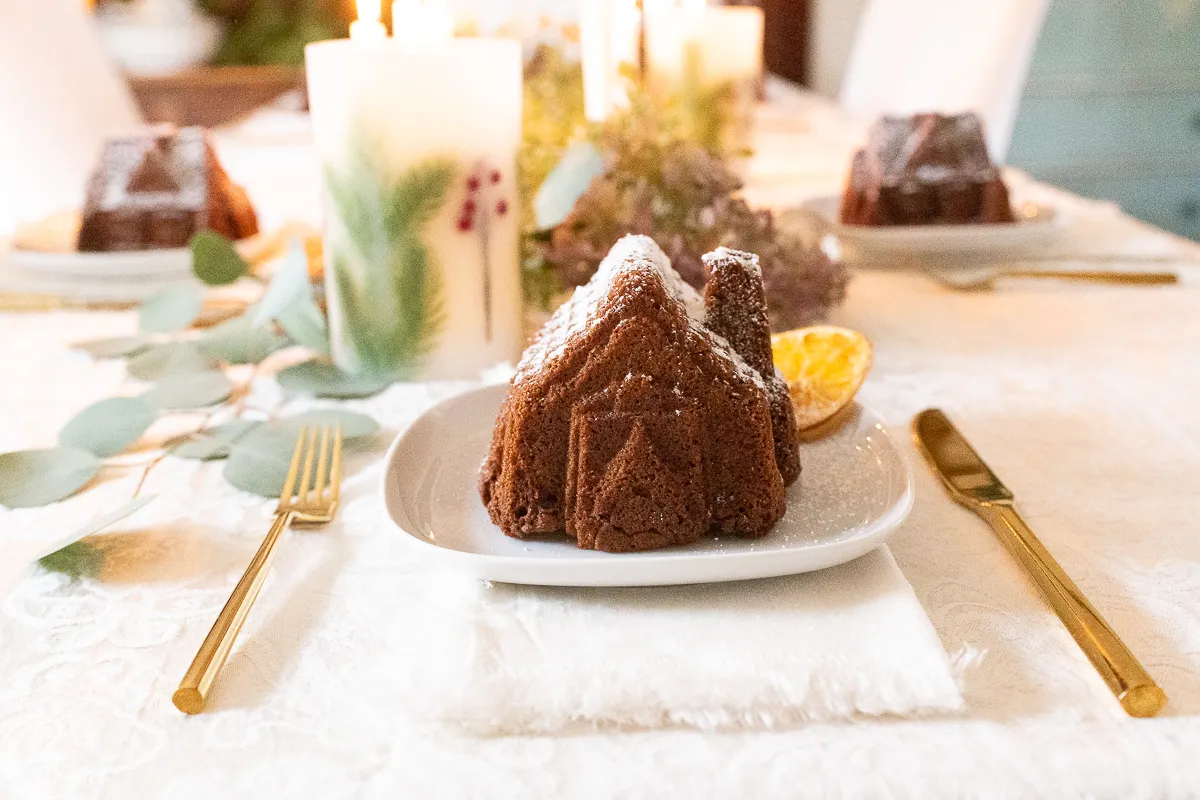
The gold flatware is what lifts a brown cake on a white plate from potluck to place setting. It’s a tiny thing — a knife and fork about 8 inches long — but the warm metallic picks up the gingerbread tone and makes the white plate feel deliberate rather than default. Swap it for stainless steel and the setting reads plain. Gold, brass, or even matte black flatware gives a table an intentional point of view for the price of a $20 thrift-store set.
- Fine-mesh sieve for an even sugar dusting
- One sprig of eucalyptus or rosemary for green
- Napkin rolled, not fanned — cleaner silhouette
- Cutlery polished and aligned to the plate edge
- A small shaker of extra powdered sugar at the table
34. Glitter Gingerbread Figurines with a Snowflake Garland
- Measure the shelf — two 14-inch figures plus a gift box need about 30 inches.
- Confirm you have an outlet or batteries for the tree lights behind them.
- Check your surface tone; gold glitter pops on light brown and disappears on dark wood.
- Decide whether the gift box is a real gift or a dummy — a real one gets opened.
- Lay down a felt pad or tray to catch glitter before you set anything down.

- Glitter gingerbread figurines: $15–$35 each
- Small decorated Christmas tree: $25–$60
- White snowflake garland: $10–$18
- Striped gift box and ribbon: $6–$14
- Gold glitter for the surface: $4–$8
- Total: $75–$170, or about $40 if you reuse a tree you own and make paper snowflakes for the garland
Budget alternative: buy plain resin gingerbread figurines for $5 each at a craft store and coat them yourself with spray adhesive and fine gold glitter. Twenty minutes, and the finish looks nearly identical to the pricey versions.
35. Gingerbread Ceramic Sleighs on a White Brick Mantel
White painted brick is beautiful and completely unforgiving. Faux snow and glitter will find every mortar line, and once glitter settles into the texture of painted brick, it never fully comes out. Lay a white fabric runner over the mantel before placing anything on it, and skip loose glitter entirely in favor of glittered ornaments that shed less. Faux snow should sit in shallow trays, not directly on the shelf. If glitter does land on brick, a lint roller works far better than a cloth, which just pushes the sparkle deeper into the texture.
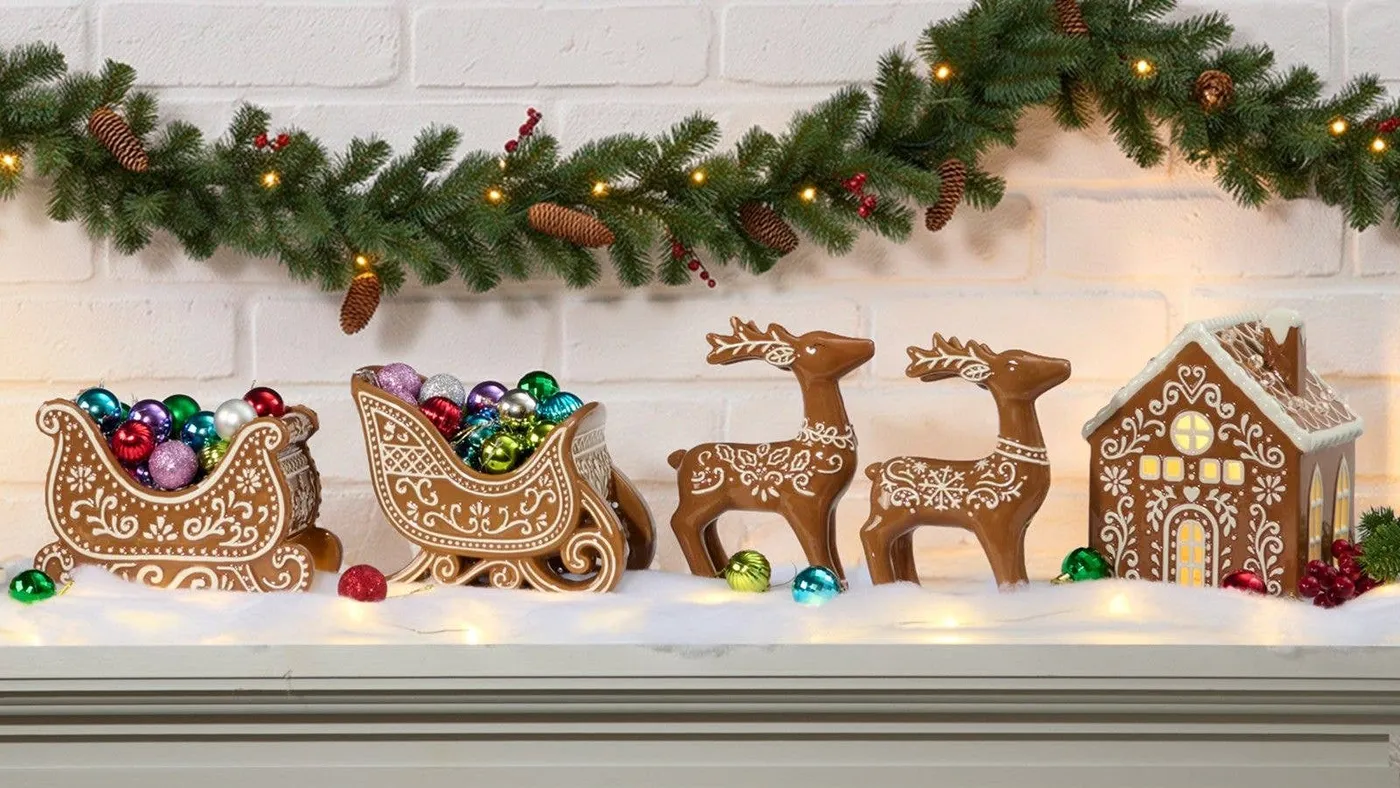
The reason this mantel reads playful rather than chaotic is that the gingerbread ceramics are all matte while every ornament above them is shiny. That finish split gives the display two clear zones: a warm, homespun base and a bright, glittery garland overhead. If the gingerbread pieces were glossy too, the whole thing would collapse into sparkle soup. Notice as well that the ceramic figures sit low and the garland hangs high — a 14- to 18-inch vertical gap that lets the white brick actually breathe between them.
Your Gingerbread Season Starts on the Mantel
Pick one idea, not five — a single well-styled gingerbread moment beats a house that looks like a bakery exploded in it. Start with the spot you look at most, whether that’s the mantel, the kitchen counter, or the tree, and build outward from there once it feels right. If you try one of these, snap a photo and save it alongside this post so next December you remember exactly what worked. 📌 Pin this guide now so it’s waiting for you when the season sneaks up again.