
You know the tree — the one with the top bent sideways like it changed its mind halfway up, a plush green hand poking out of the branches, and a red-and-white swirl ornament dangling off the crook. It’s all over Pinterest right now, and it’s exactly the kind of thing that looks effortless in a photo and slightly impossible in your own living room.
We spent serious time combing through Target, Walmart, Dollar Tree, and Etsy to bring you only what’s worth your attention this year — 27 ideas ranging from about $1.50 to $277.
Inside you’ll find Whoville-inspired whimsy, texture-heavy maximalism, storybook theatrical setups, and a few off-palette retro rooms — plus budget and luxury versions of the same look, with direct product links so you can actually buy the thing. And stay until the end — we break down the most common mistakes that can ruin these looks.
Whoville-core went mainstream for a simple reason: bent-top trees and character ornaments read as handmade rather than store-bought, and people are decorating for photos they actually want to post.
📌 Save this to Pinterest for later — you’ll want to revisit these ideas.
1. A Crooked-Top Evergreen in a White Urn
That crooked top is the entire idea. Straighten it and you’re left with a perfectly nice little evergreen in a white urn — pleasant, forgettable, exactly like every tabletop tree on the block. The bend is what makes people stop and smile. Everything else in this arrangement is support staff: the red-and-white patterned bow tied at the base, a single red ball hanging off the crook, pinecones tucked low, and a wooden cutout tree with snowflake details standing guard beside the urn. Lose the bend and you lose the story.

Want that droop to actually hold? Fresh and faux tips both drift back toward vertical within a day or two. Tape a 12-inch length of 9-gauge aluminum wire along the leader branch, bend it slowly to about 30 degrees, then hide the wire under the ribbon bow. Keep the arrangement around 18 to 24 inches tall, and make sure the urn is no more than a third of that height — a 10-inch pot under a 20-inch tree reads as a miniature, not a mistake.
2. Snow Mounds, Log Fencing, and Multicolored Lights
Themed walk-through displays are having a moment — the kind of scene where you don’t just look at a tree, you step into a story. Nostalgia-driven decor has pushed past generic red-and-gold into full character territory, and multicolored lights, once written off as dated, are back because they read as childhood rather than tacky. A low log fence and faux snow mounds turn a corner of the room into a set piece instead of just a decorated tree.

Three things are doing the heavy lifting. First, the faux snow creates a continuous ground plane, so your eye reads one world instead of three separate objects. Second, the low log border gives you a threshold to cross, which makes the display feel like an event. Third, the multicolored string lights sit against a mostly white-and-green base, so the color has somewhere quiet to land. Put those same lights on a dark, busy backdrop and the whole thing turns to visual soup.
3. Four Striped Whoville Figures on Weathered Wood
- Four striped character ornaments: $28–$48 total
- Weathered gray wood tray or board: $12–$35
- Two small greenery picks: $8–$16
- Gold hanging string, if you swap in your own: $5
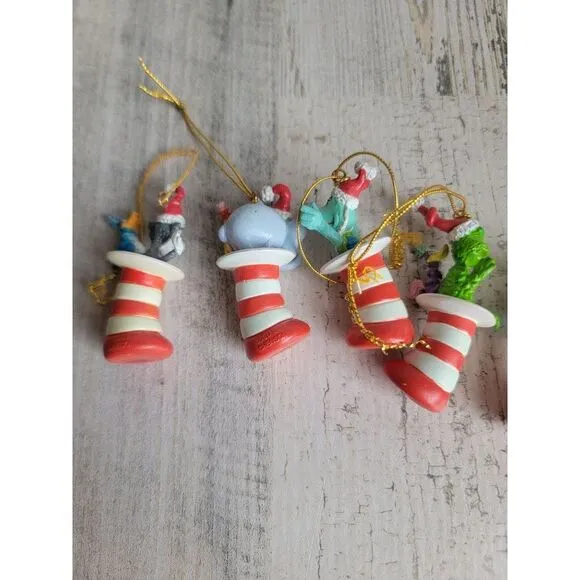
Total: $53–$104 for the whole vignette.
Budget alternative: hit a dollar store for plain wooden peg figures at $1.25 each, paint red-and-white stripes with craft paint, and skip the tray entirely — a thrifted cutting board works just as well for under $5.
Place these on weathered light gray wood, not a white shelf and definitely not a dark walnut one. That cool gray neutral is what lets the bright red and lime green pop without turning the corner into a candy shop. Keep the group tight too: four identical figures lined up with 1.5 to 2 inches between them read as a collection, while scattering them six inches apart just looks like you ran out of shelf.
4. A Grinch Figurine Dressed as a Lit Christmas Tree
Run the numbers and this figurine is basically a color formula: 50% bright green for the head and tree-branch body, 35% Santa red on the hat brim, sleeves, and shoes, 10% white fur trim, and 5% multicolor bulbs strung across the branches. Keep those proportions and you can swap freely — deep emerald instead of bright green for a moodier version, or gold accents instead of multicolor for something dressier. Break the formula by adding a fourth dominant color and the piece starts looking like a discount bin find.
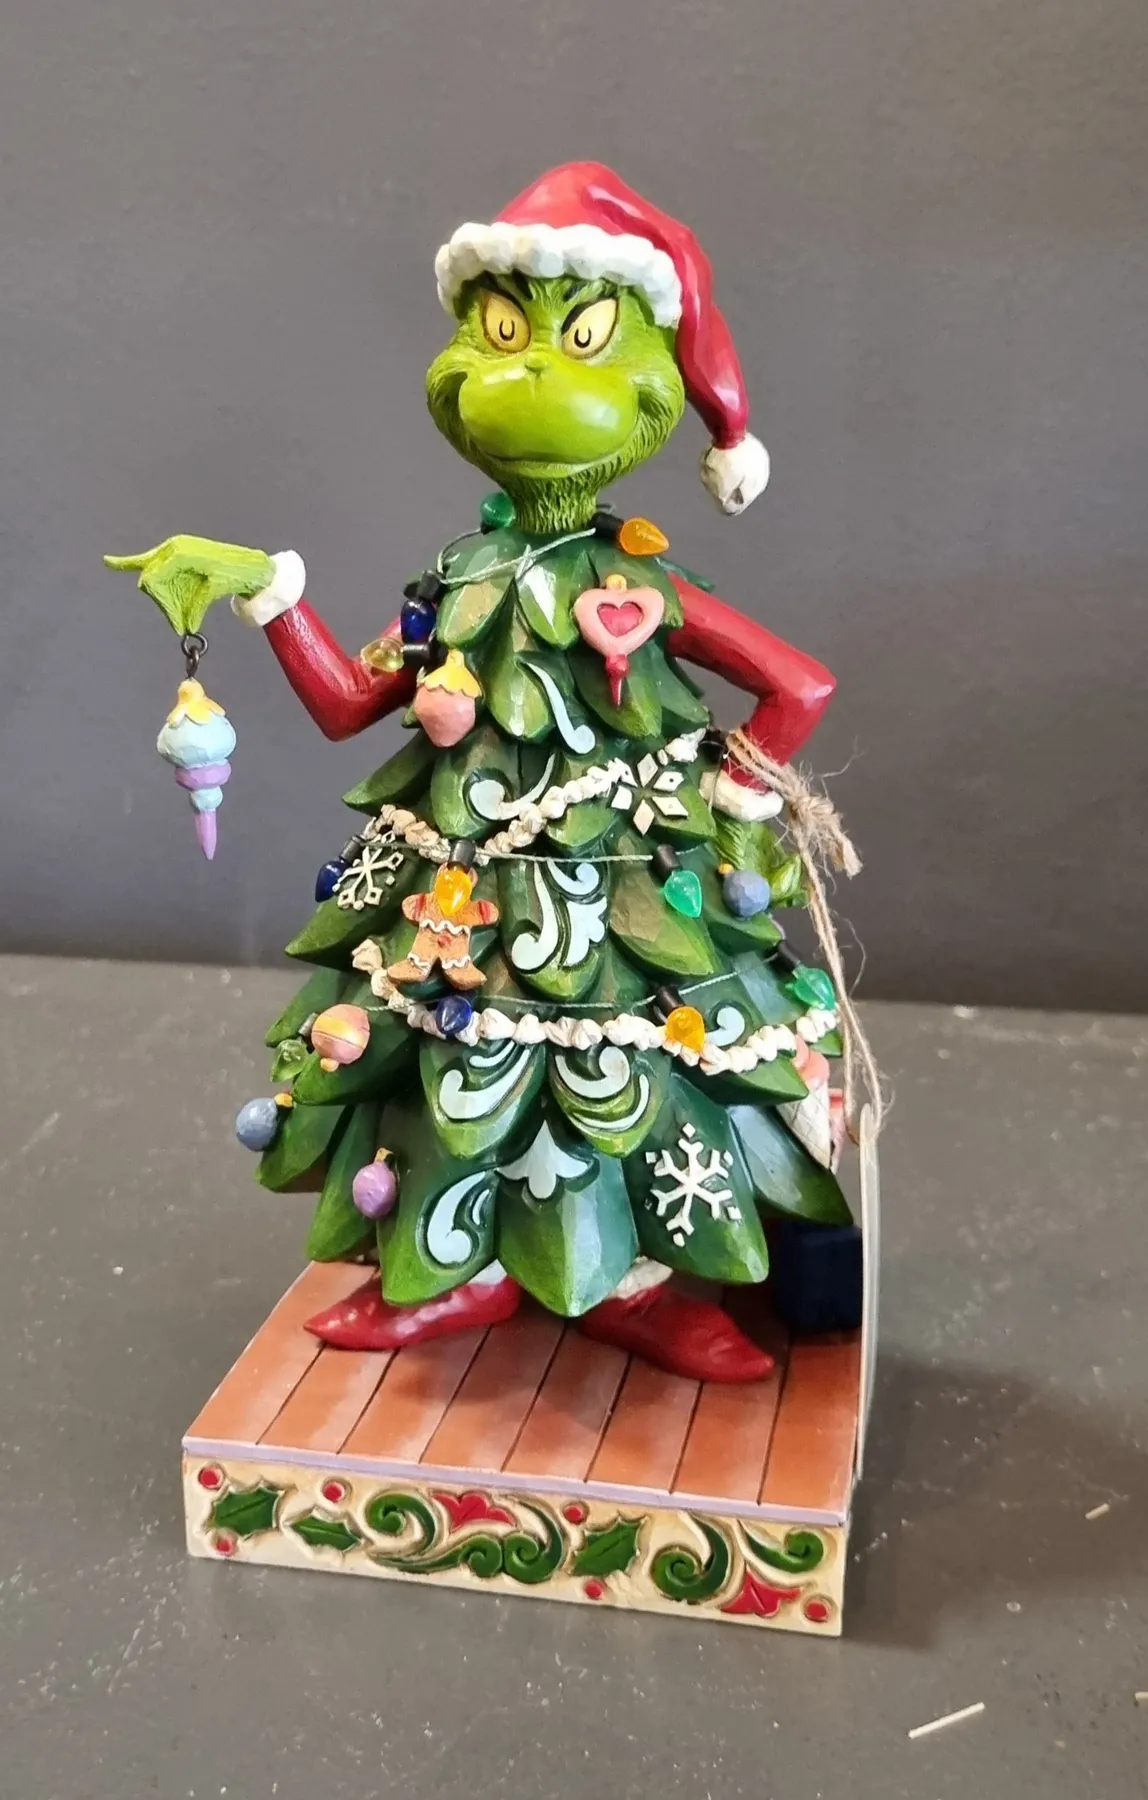
That painted plank base is doing more than you think — it turns a figurine into a display piece.
- Cut a 1×6 pine board to roughly 10 inches long.
- Sand the edges, then wipe the dust off with a damp cloth.
- Paint a floral scroll border in red or gold craft paint, keeping the pattern to the outer inch so the center stays open.
- Let it dry two hours, then brush on matte sealer.
- Attach felt pads to the bottom so it doesn’t scratch the table.
About 45 minutes of real work plus drying time, and roughly $12 in materials.
5. Lime Green Tree with a Plush Hand Reaching Out
Two honest warnings before you buy. Lime green artificial foliage shows dust and every fingerprint more than any other tree color, so plan on a quick microfiber wipe every couple of weeks. And that plush hand is going to be irresistible — kids will pull it, dogs will investigate it, and it will end up on the floor at least once. Wire it to an interior branch with two green zip ties instead of draping it, and anchor the base if the tree is tall enough for a toddler to reach the upper limbs.
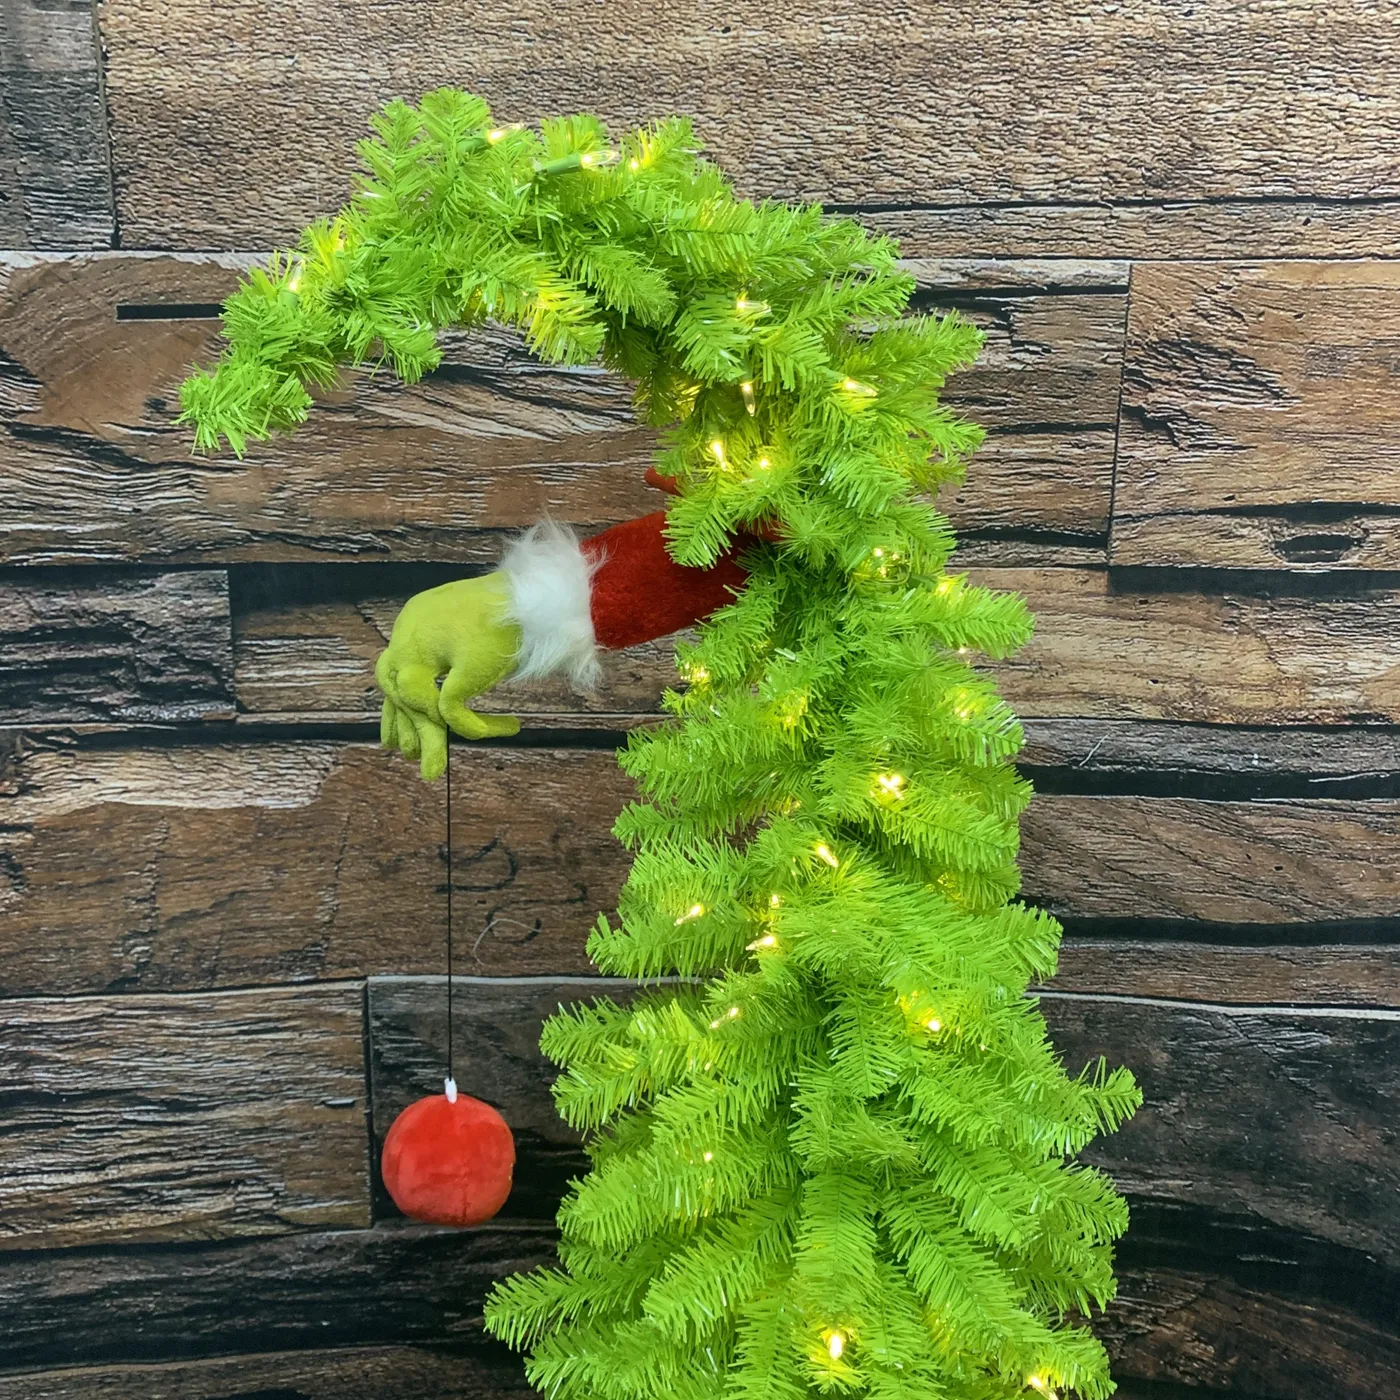
The contrast is the point. You’ve got organic chaos at the top — the branch kinks sharply sideways — sitting right next to a crisp, obviously artificial plush forearm in a red sleeve with white fur trim. Real against fake, messy against tidy. Warm white string lights soften the acidity of that lime green, and the horizontal wood plank wall behind it gives all that brightness something brown and grounded to lean against.
This one wants a tight corner, not a big room. Plan on roughly an 8-by-10-foot nook or the end of a hallway, with the tree topping out around 5 to 6 feet so the bend stays in your sightline. A plank accent wall behind it does the backdrop work for free. If you’re working with a taller ceiling and want something that fills the space, see Idea #14 — same crooked silhouette, more vertical drama.
6. Oversized Striped Baubles and Giant Candy Props
You don’t need a specialty boutique for this one. Grab a six-pack of oversized striped shatterproof balls at Walmart for about $12, red-and-white peppermint picks from Dollar Tree for $3, and a pack of candy-cane curls at Target for $6. Bent wire picks can be DIY’d from floral wire and spray-painted gold for around $8 total. Where the money actually goes is the elongated character hat topper — but a rolled piece of red-and-white felt over a foam cone gets you 90% of the look for under $10.

Oversized ornaments only work in odd-numbered clusters, and placement matters more than quantity. Group them in threes — one large 6-inch ball with two 4-inch ones tucked around it — and set each cluster on the outer edge of a branch, never buried inside. On a 7-foot tree, five clusters is plenty. Load on fifteen and the oversized pieces stop registering as oversized, which was the entire reason you bought them.
7. Tabletop Tree with a Drooping Blue and Silver Tip
Formula: 55% forest green base, 25% royal blue, 15% silver, 5% white berry accents. The blue is what makes this feel wintery instead of Christmasy, and the blue-and-white patterned bow at the base ties the whole thing together. Swap royal blue for copper and the arrangement turns warm and vintage. Swap it for black and gold and you’re in elegant New Year’s territory. Keep the silver metallic at roughly 15% either way — that’s the shine ceiling before things get glitzy.

Built for a surface, not a floor. This arrangement runs about 22 to 24 inches tall and wants a console or entry table at least 36 inches wide and 14 inches deep — anything narrower and the drooping tip hangs off the edge. It’s the right call for a hallway, a powder room counter, or an apartment where a full tree simply won’t fit. Give the curved tip at least 6 inches of clearance from the wall so the droop reads in silhouette instead of flattening against the paint.
8. A Glass Character Ornament Framed by Two Cone Trees
It’s the flanking pair — a dark green textured cone on the left and a pale sage ribbed cone on the right, holding the little glass figure between them like bookends. Take them away and you have one cute ornament sitting on a shelf. Put them back and suddenly you have a composition: two different greens, two different surface textures, and one glossy red-and-white focal point that’s the only thing in the frame catching real light.
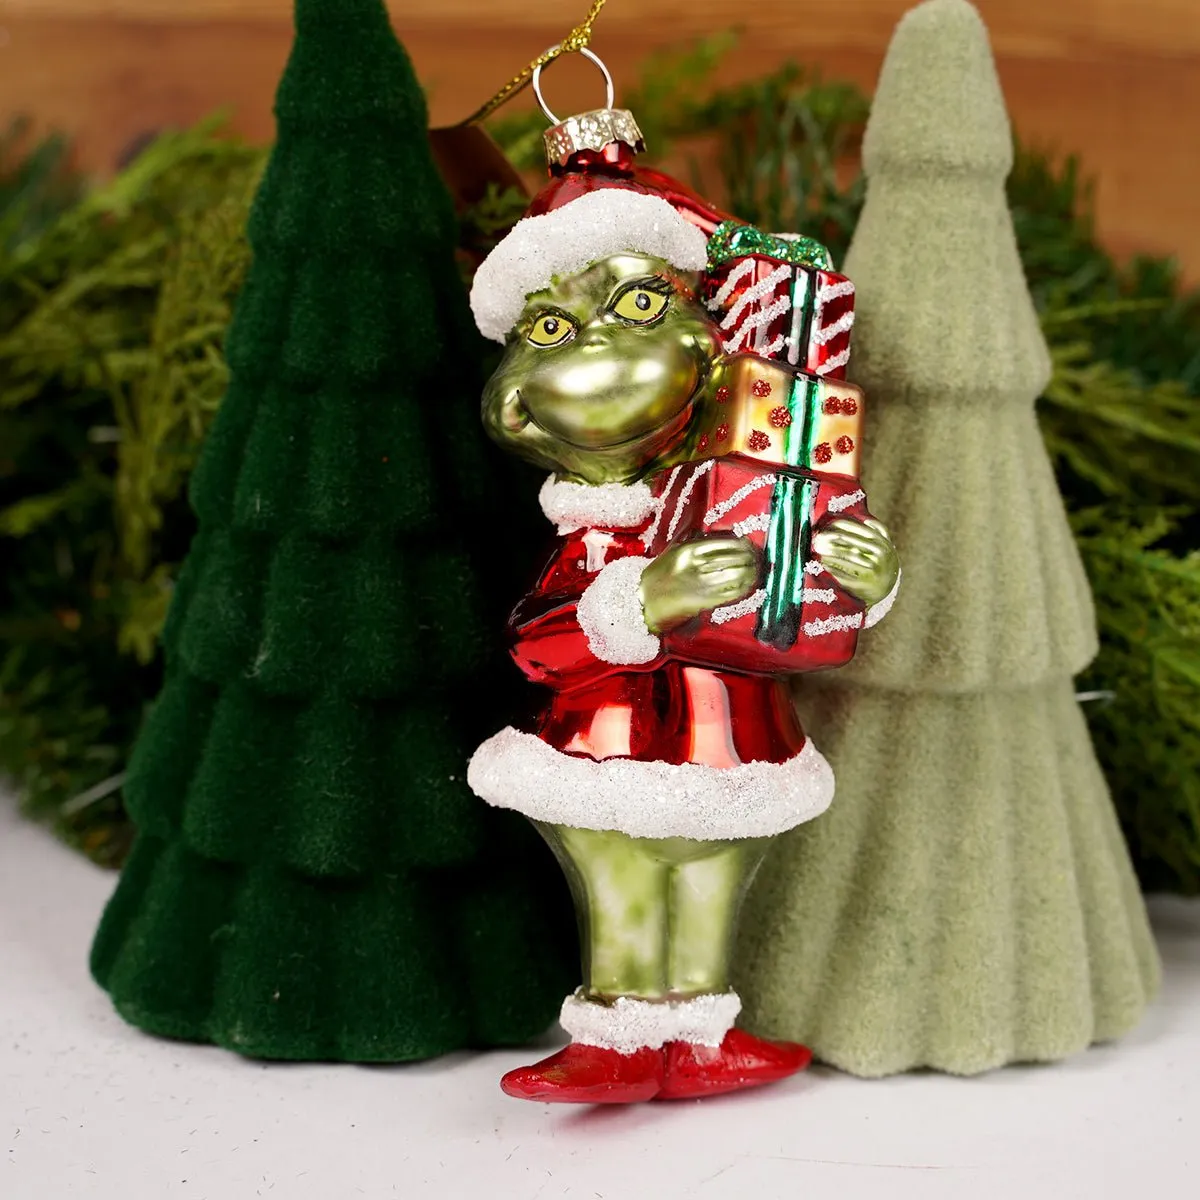
Building this trio takes ten minutes and almost no skill.
- Find a level surface with something green behind it — pine picks, a wreath, a potted evergreen.
- Set the darker cone first, then the lighter one, leaving a 4- to 6-inch gap between them.
- Place the glass ornament dead center, slightly in front of the cones.
- Step back three feet; if the figure doesn’t read instantly, nudge the cones closer together.
Cost: nothing if you already own the pieces, about $30 if you’re buying the two cones.
9. Swirl Ornament and Bead Garland on a Green Swag
- Large red-and-white swirl ornament: $8–$14
- Mixed evergreen swag or picks: $18–$40
- Red bead garland, 9 ft: $6–$12
- Gold glitter leaf picks, set of 6: $10–$18
- Pinecones, bag of 12: $6–$12

Total: $48–$96 for a mantel or doorway swag.
Budget alternative: skip the mixed greens and buy one $8 bag of faux cedar picks, then layer in free pinecones from a local park and a $5 strand of red beads from Dollar Tree.
On a swag, gravity is your friend. Place the single largest ornament at the lowest point of the curve — the drop — and let smaller pieces climb upward on both sides. Use three sizes only: 2-inch, 3-inch, and one 4-inch hero. Anything bigger looks like it’s falling. Thread the bead garland through the branches rather than draping it in front, so it glints from inside the greenery instead of sitting on top like a necklace.
10. Furry Green Picks with Tiny Red Berry Centers
Those fluffy green picks read as flowers, not foliage — and that’s the trick. Your eye already knows how to process blossoms scattered through branches, so the tree feels fuller and softer without adding a single ornament. Then there’s the tiny red berry at each center, which is repetition at its most effective: dozens of small red dots leading your eye around the tree in a loop. Warm string lights tucked behind them make the fuzz glow at the edges.

Texture-maximalism is the current mood. After years of sparse trees with a dozen ornaments, people are leaning hard into layers you can feel from across the room — chenille, faux fur, flocking, beaded picks, all piled onto one tree. The candy cane picks and glittery red baubles here nod to the same nostalgic, storybook energy driving the whole Whoville look, just turned up loud enough to read from the doorway.
Make the furry picks yourself for about 60 cents each.
- Cut a 6-inch length of green chenille stem.
- Wrap a 4-inch strip of faux fur or bulky green yarn around the middle five or six times.
- Pinch the center and twist the chenille stem to lock it.
- Fluff the loops outward into a flower shape.
- Hot-glue a 6mm red bead at the center.
- Twist the stem onto a branch and bend the tip forward.
About 3 minutes per pick; a dozen takes 40 minutes and $8 in supplies.
11. A Painted Character Cutout Wrapped in Colored Lights
A few things will quietly ruin this. Multicolored LED bulbs get warm enough over six hours to soften cheap acrylic paint, so seal the cutout with two coats of polyurethane before it goes up. Extension cords need a GFCI outlet and a drip loop, even when they’re near a door. And painted plywood edges drink moisture — that white trim line will wick it in a humid room, so prime the sides too. If you’re strapping it to a live tree, use coated wire, not string.
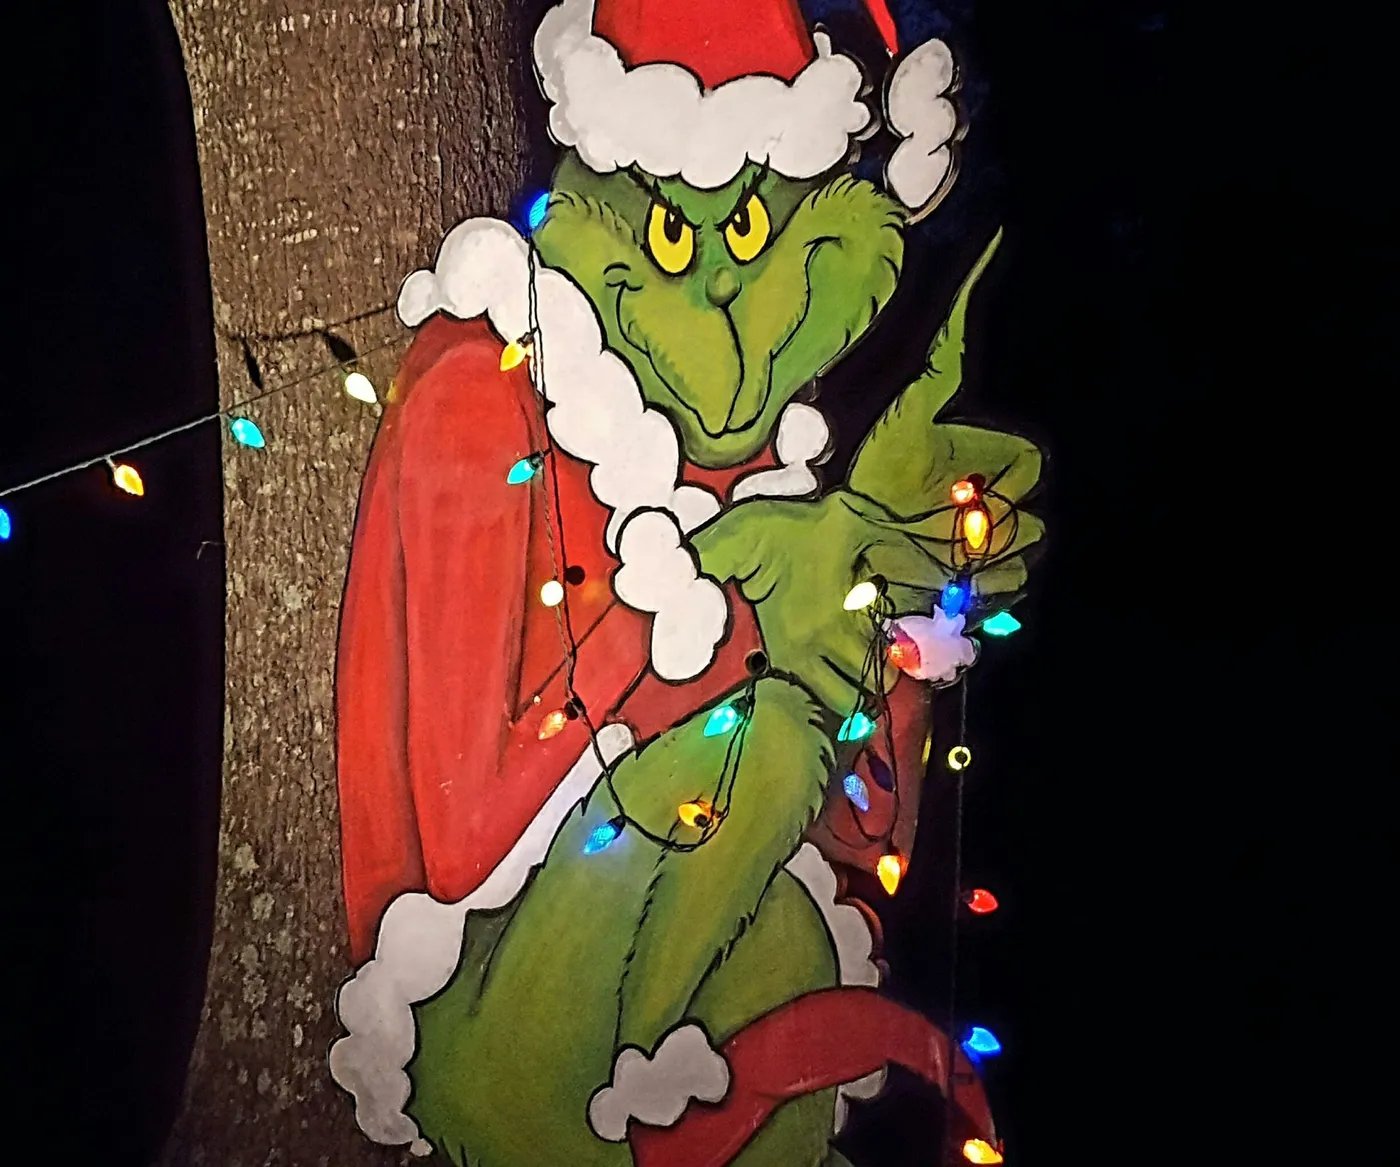
Total cost to DIY: about $24. A half sheet of 1/2-inch exterior plywood runs $16, a jigsaw you probably know someone who owns, and two $2 bottles of craft paint in lime green and bright red. Trace a silhouette from a printout, cut wide of the line, then sand the edge to refine it. A 100-bulb multicolored strand is $6 after the holidays. Custom-cut versions from a maker run $85 to $150 for the same effect — nice, but not six times nicer.
12. A Crocheted Green Hand on Top of the Tree
Making the hand is easier than it looks.
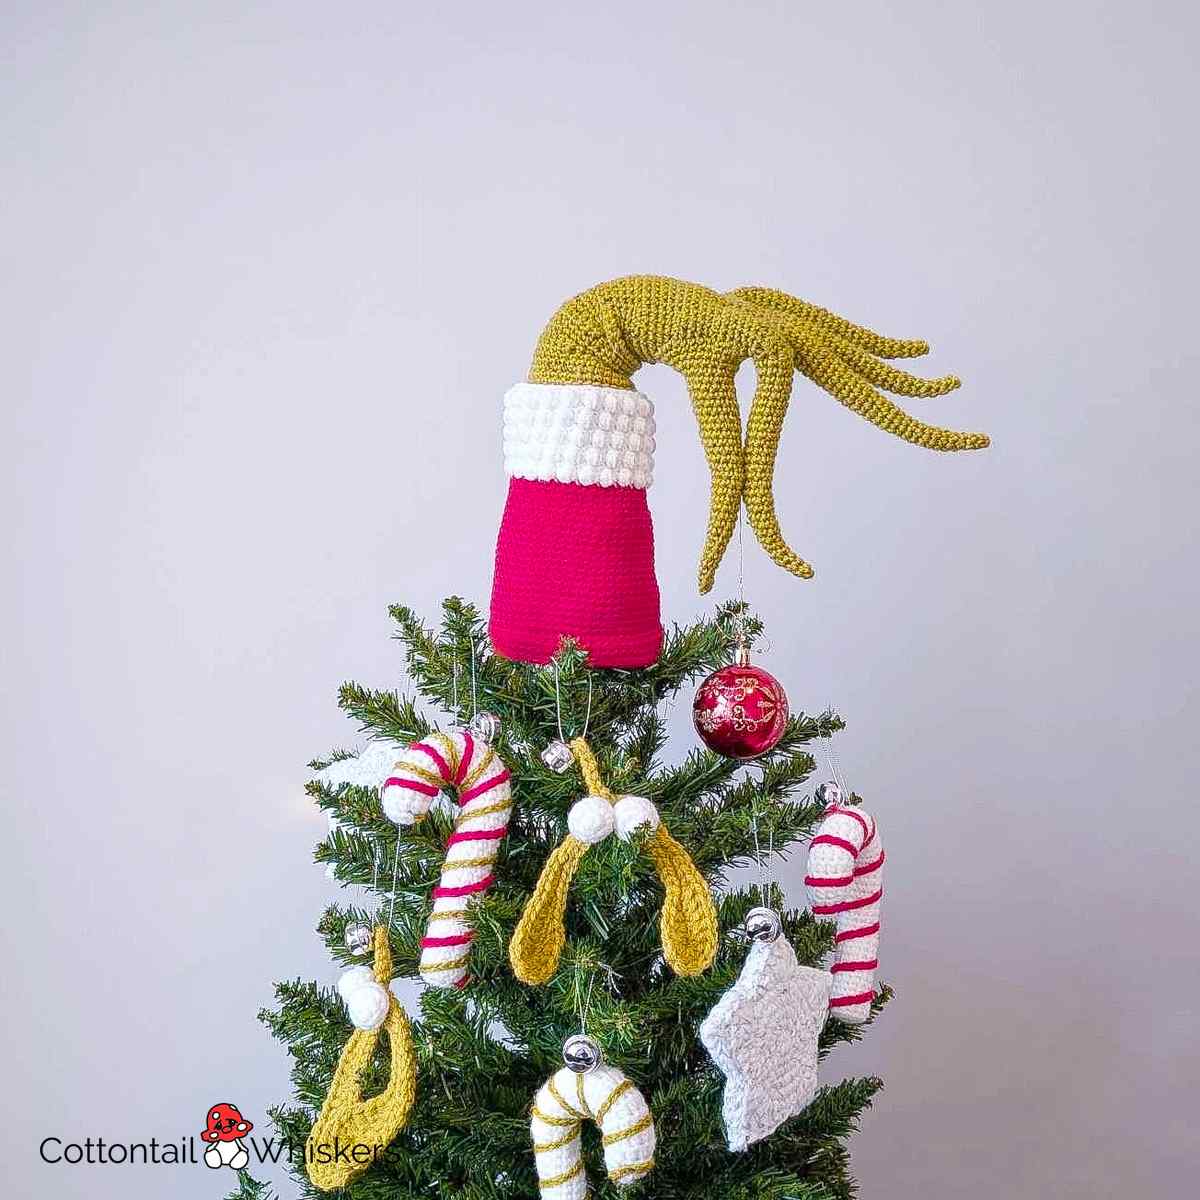
- Chain four stitches in chartreuse worsted yarn and join into a ring.
- Single crochet in the round for five rows to build the palm.
- Divide into four finger sections of three stitches each; work each finger eight rows, then slip-stitch closed.
- Stuff lightly with polyfill and attach the hand to a red-and-white Santa hat cuff.
- Slip the cuff over the tree’s top branch — no wire needed.
About two hours for a confident beginner, roughly $6 in yarn.
Yarn is a dust magnet, and the topper is the first thing anyone touches. Plan on a gentle hand wash in cool water once a season — squeeze, don’t wring — and air-dry flat so the fingers keep their shape. Store it in a cotton bag with a cedar block rather than a plastic bin, which traps moisture and invites mildew. If you’d rather skip the upkeep, see Idea #16 for a wooden version that just needs a swipe with a dry cloth.
13. Character Ornaments and ‘Special Delivery’ Baubles
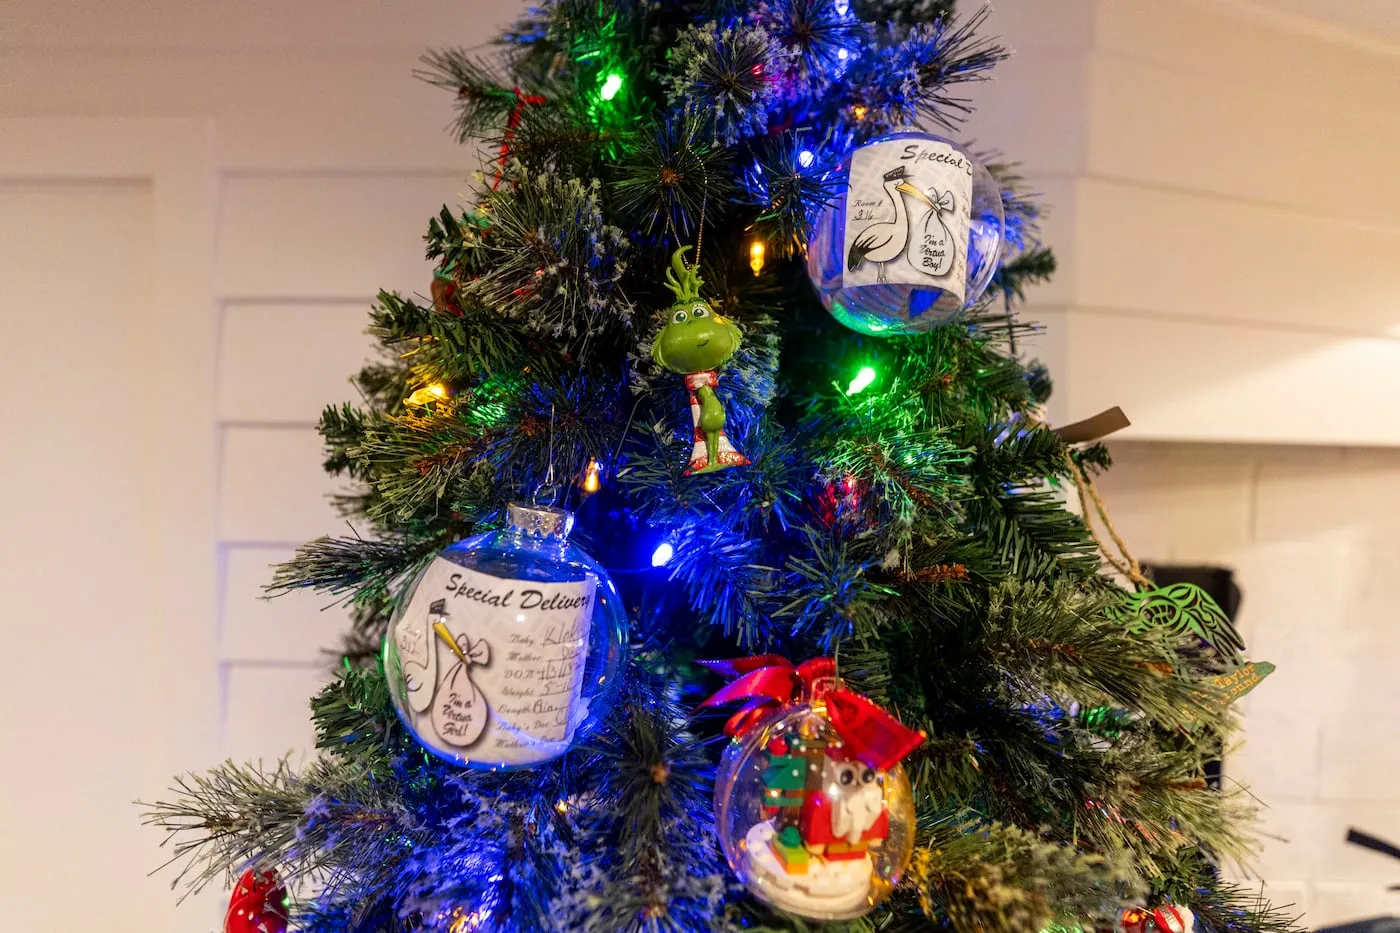
This mix wants a real tree, not a tabletop one — clear fillable ornaments with birth announcement cards inside only work when someone can stand close enough to read them. Give it a 6.5- to 7.5-foot tree with at least 12 inches of clearance above the top, and reserve the lowest 18 inches for sturdy pieces so kids and pets can grab without breaking anything. In a room under 120 square feet, a full-size tree with this much detail starts to feel crowded; a 4-foot version on a table works far better.
Run through this before you hang a single thing:
- Measure the tree’s widest branch spread — you need 30 to 36 inches of floor space around it.
- Sort ornaments into three piles: sentimental, filler, and breakable. Breakables go above 4 feet.
- Test your light strand in the outlet first; half a dead strand means restringing later.
- Count your hooks. Figure 6 to 8 ornaments per foot of tree height.
- Decide where the tree plugs in, and whether that outlet is switched.
14. A Curved-Top Whoville Tree on a Bare Wall
The formula here is 60% lime green, 25% candy red, 10% white, and 5% gold. That white slice matters more than its size suggests — it’s the pause between the two loud colors, showing up in the striped picks and the ornament bands. Swap gold for silver and the tree gets cooler and more wintery. Swap the lime for a deep emerald and you’ve got a classic tree with an eccentric silhouette, which is honestly the safer long-term buy if you’re not ready to commit to the whole bit.
The curled wire sprays. They’re thin spirals tucked between branches, and they exist purely to echo the tree’s curved top — the same shape repeating at a smaller scale, over and over, all the way up. Without them, the curved silhouette looks like a fluke. With them, the whole thing feels designed. They cost about a dollar each, and you can bend them by hand around a pencil in seconds.
15. Flocked Tree, Hand-Drawn Backdrop, Red Cloth Garland
Everything in this scene reads as illustration on purpose. The backdrop is plain white with loose black outlines drawn right on it, which flattens the depth so the heavily flocked tree pushes forward like a page from a book. The draped red fabric garland does the job a painted swoosh would — big, matte, unmistakably handmade. Nothing here is precious, and that’s exactly why it works. A glossy, store-perfect background would fight the charm.

- Heavily flocked 4-ft tree: $55–$120
- Red fabric for the swagged garland, 3 yd: $18–$40
- Matching wreath: $25–$55
- Paint pens for the backdrop: $8–$14
- Red and silver ornaments, set of 24: $24–$48
Total: $130–$277, most of it reusable every year.
Budget alternative: fake the flock with a $12 can of spray snow on a thrifted $15 tree, and paint your backdrop on the back of a roll of kraft paper.
Storybook staging is the quiet trend underneath a lot of the loud holiday decor right now. Instead of buying more objects, people are building scenes — backdrops, thresholds, themed corners — and photographing them. It’s part nostalgia and part the fact that a homemade backdrop reads instantly as effort rather than money.
16. A Wooden Character Ornament with a Painted Name
If you’re putting names on ornaments, size the lettering at three-quarters of an inch minimum in a bold sans serif. Script fonts look gorgeous in the design file and turn into an unreadable squiggle from twelve feet away. Hang personalized pieces on the outer third of the branches, never tucked against the trunk, because custom ornaments are the ones people walk up to the tree to find. Pair them with a red-and-white felt ball garland — the matte texture keeps painted wood from looking like a flat sticker.
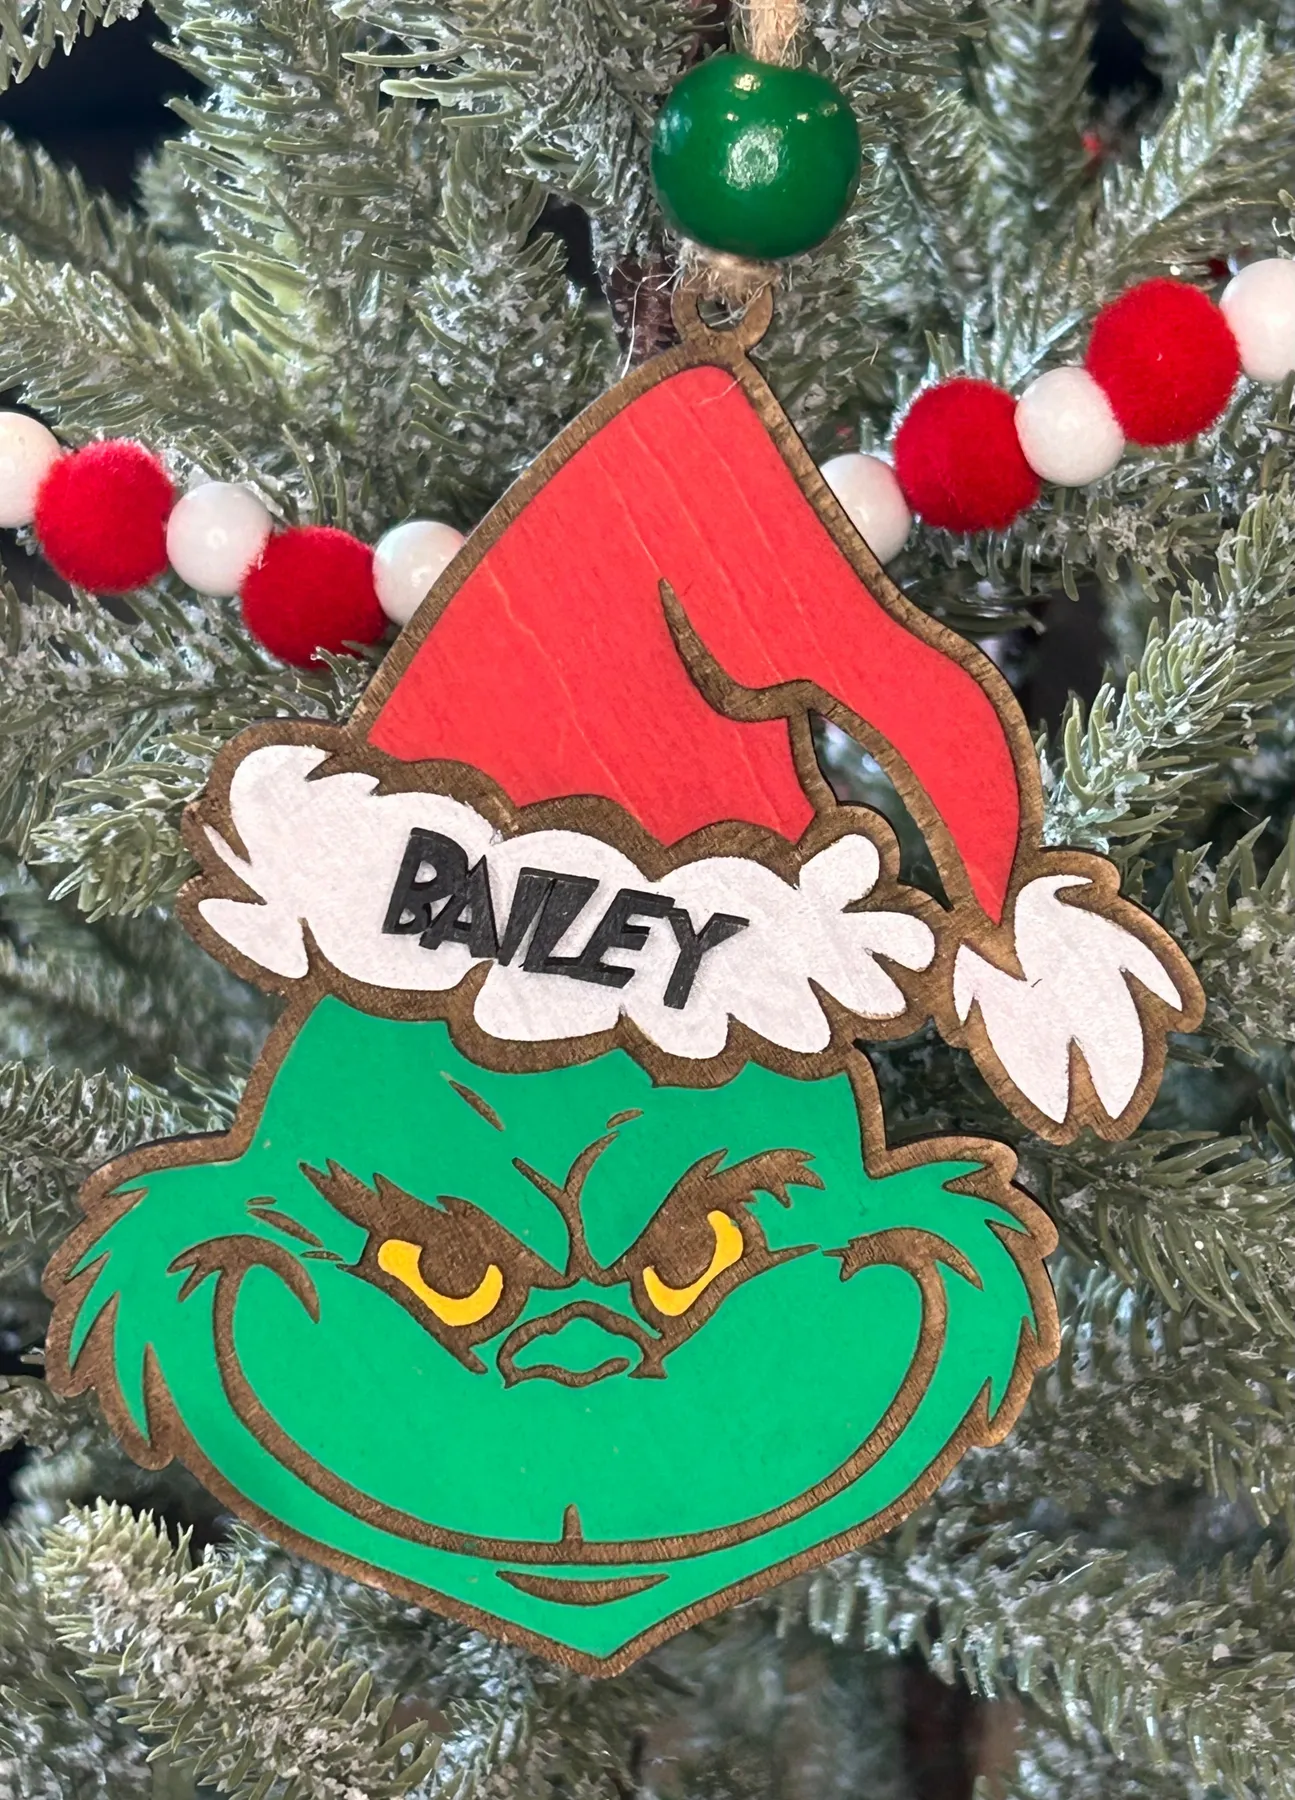
Make a batch in an afternoon.
- Draw your character shape on 1/4-inch birch plywood and cut it with a scroll saw.
- Sand both faces with 220-grit, then wipe clean.
- Paint the body green, the hat red with a white brim, and the eyes yellow; let each color dry 30 minutes.
- Write the name in black paint pen, or cut vinyl if you want crisp edges.
- Drill a 1/8-inch hole at the top and thread with twine.
About 45 minutes each and roughly $8 in materials. Compare with Idea #17 for the batch-production version.
17. Personalized Face Ornaments Hung on Striped Twine
Prices for personalized character ornaments swing wildly. Custom shops charge $14 to $26 each. A cutting machine plus vinyl gets you to about $4 per ornament if you already own the machine. The cheapest route that still looks handmade: plain wooden character blanks for $1.50 each at a craft store, names written with a fine-tip black paint pen, hung on red-and-white striped baker’s twine at $3 a roll. Six ornaments, under $15 total.
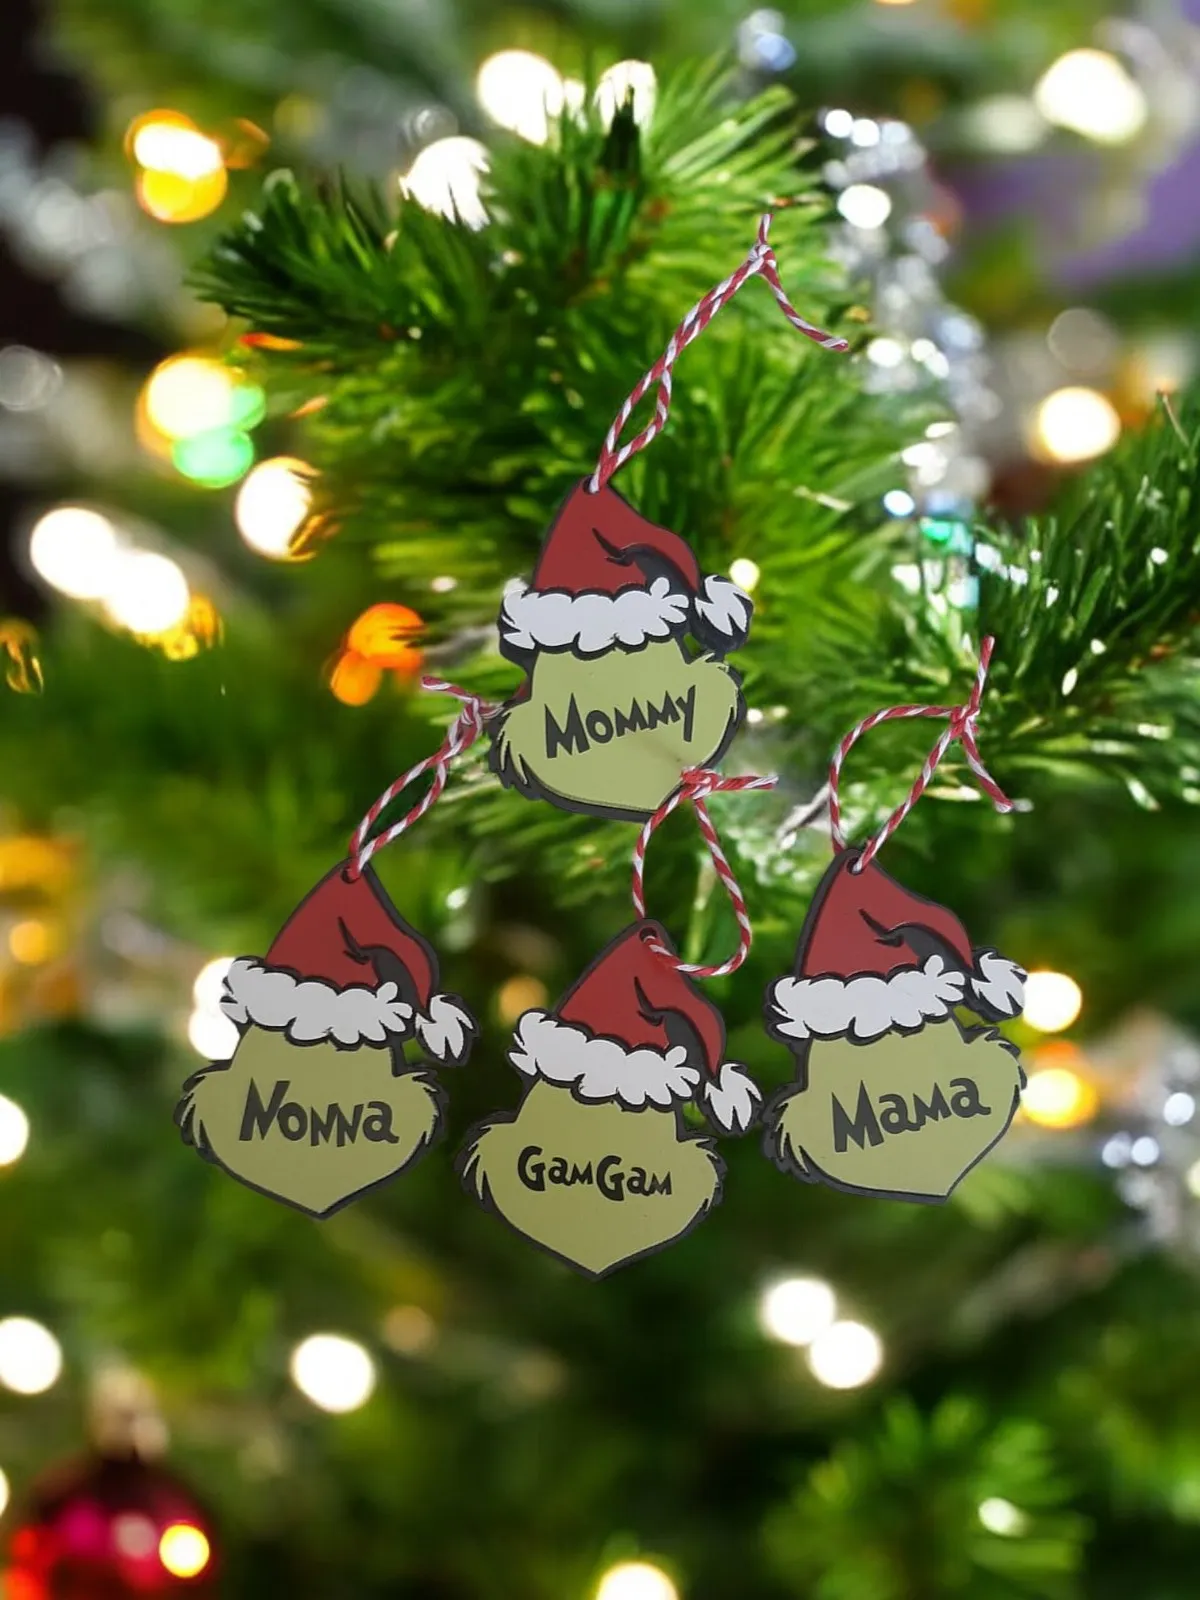
Check these off before you commit to a set:
- Measure branch depth — anything thicker than 1/4 inch won’t sit flat on a branch.
- Collect every name, and spell it twice. Misspelled ornaments don’t get returned.
- Pick one font for the whole set so the tree reads as a collection.
- Order two extra blanks for the pets, the new baby, or the guest who shows up.
- Check your twine color against the tree — red-and-white disappears on a candy-themed tree.
18. A Figurine, a Carved Mini Tree, and a Gold Wire Cone
Tabletop vignettes have a sweet spot. This one wants a surface 36 to 48 inches wide at 30 to 32 inches high — a sideboard or console — so the figurine, the carved tree, the sack, and the lit wire cone can spread out without crowding each other. Keep the group to a 20-inch footprint, and leave at least 8 inches between the tallest piece and the bottom of any window trim. In a narrow entry, drop to three pieces; see Idea #7 for a scaled-down arrangement that fits a 14-inch-deep console.

A lit gold wire cone against a sunny window is beautiful for about two weeks, then the finish starts to dull, and painted reds fade unevenly when they sit in direct light all winter. Rotate the group a quarter turn every couple of weeks. Also check the wire tree’s bulb — most are incandescent and get warm enough to leave a faint scorch on wood after a full season. A felt pad underneath solves it completely.
19. Grinch in a Tiered Tree Costume with a Decorated Base
Formula for a figurine that reads as a tree costume: 45% bright green, 30% bright red, 15% white, and 10% multicolor ornament accents. Notice the red nearly matches the green in weight — that near-even split is what makes it feel like a costume rather than a green blob with trim. Push red to 40% and the piece tips toward Santa. Drop it to 15% and you’ve got a plain tree with a face stuck on it.
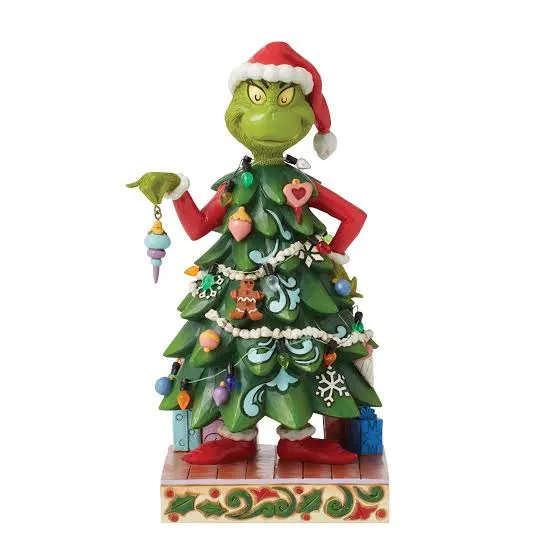
Resin and ceramic pieces like this are low effort, not zero effort. Dust with a soft dry brush every few weeks — a cloth snags on sculpted garlands and snaps small ornaments. Keep it out of direct sun, because painted reds on resin fade toward orange within two seasons. Store it in its original foam if you still have it, since the decorative base trim chips when it rattles around a box with anything metal.
20. Two Curved Bottlebrush Trees Topped with Gold Stars
The tinsel pom poms. Two curved green bottlebrush trees alone would be charming but a little plain — the kind of thing you’d find at any vintage shop. The multi-colored poms scattered across them turn the pair into something loud and slightly retro, like a 1970s ornament blown up to tabletop size. The rustic gold stars on top are the compromise that keeps the whole thing from tipping fully into kitsch.

Bottlebrush trees are some of the cheapest items in holiday decor. Plain green ones run $3 to $8 at Target, Walmart, or any craft store, and bags of multi-colored tinsel poms are about $4 for 100. A little hot glue and 15 minutes gets you two custom trees for under $25. Resellers charge $38 to $60 for near-identical pairs — charming, but you’re paying for someone else’s glue gun.
Two things will annoy you. Glued poms pop off, so always use hot glue rather than craft glue and keep a few spares in the box. Bottlebrush also sheds fine green bristles onto whatever it sits on, so put a small tray or coaster under each one and keep them off light-colored tablecloths. They’re not for high-traffic spots — a shelf at eye level beats a coffee table every time.
21. A Boxwood Wreath and a Character Sign on a Chair Back
Hang it on the top third of the chair back, not the middle. On a standard dining chair, that puts the wreath’s center about 6 to 8 inches below the top rail, which keeps it clear of anyone’s shoulders and stops it sagging into the seat cushion. A 10- to 12-inch boxwood wreath is the right size for a chair back; anything larger swallows the frame. Skip the nail entirely — a wide satin ribbon looped over the top rail holds everything without a single hole.
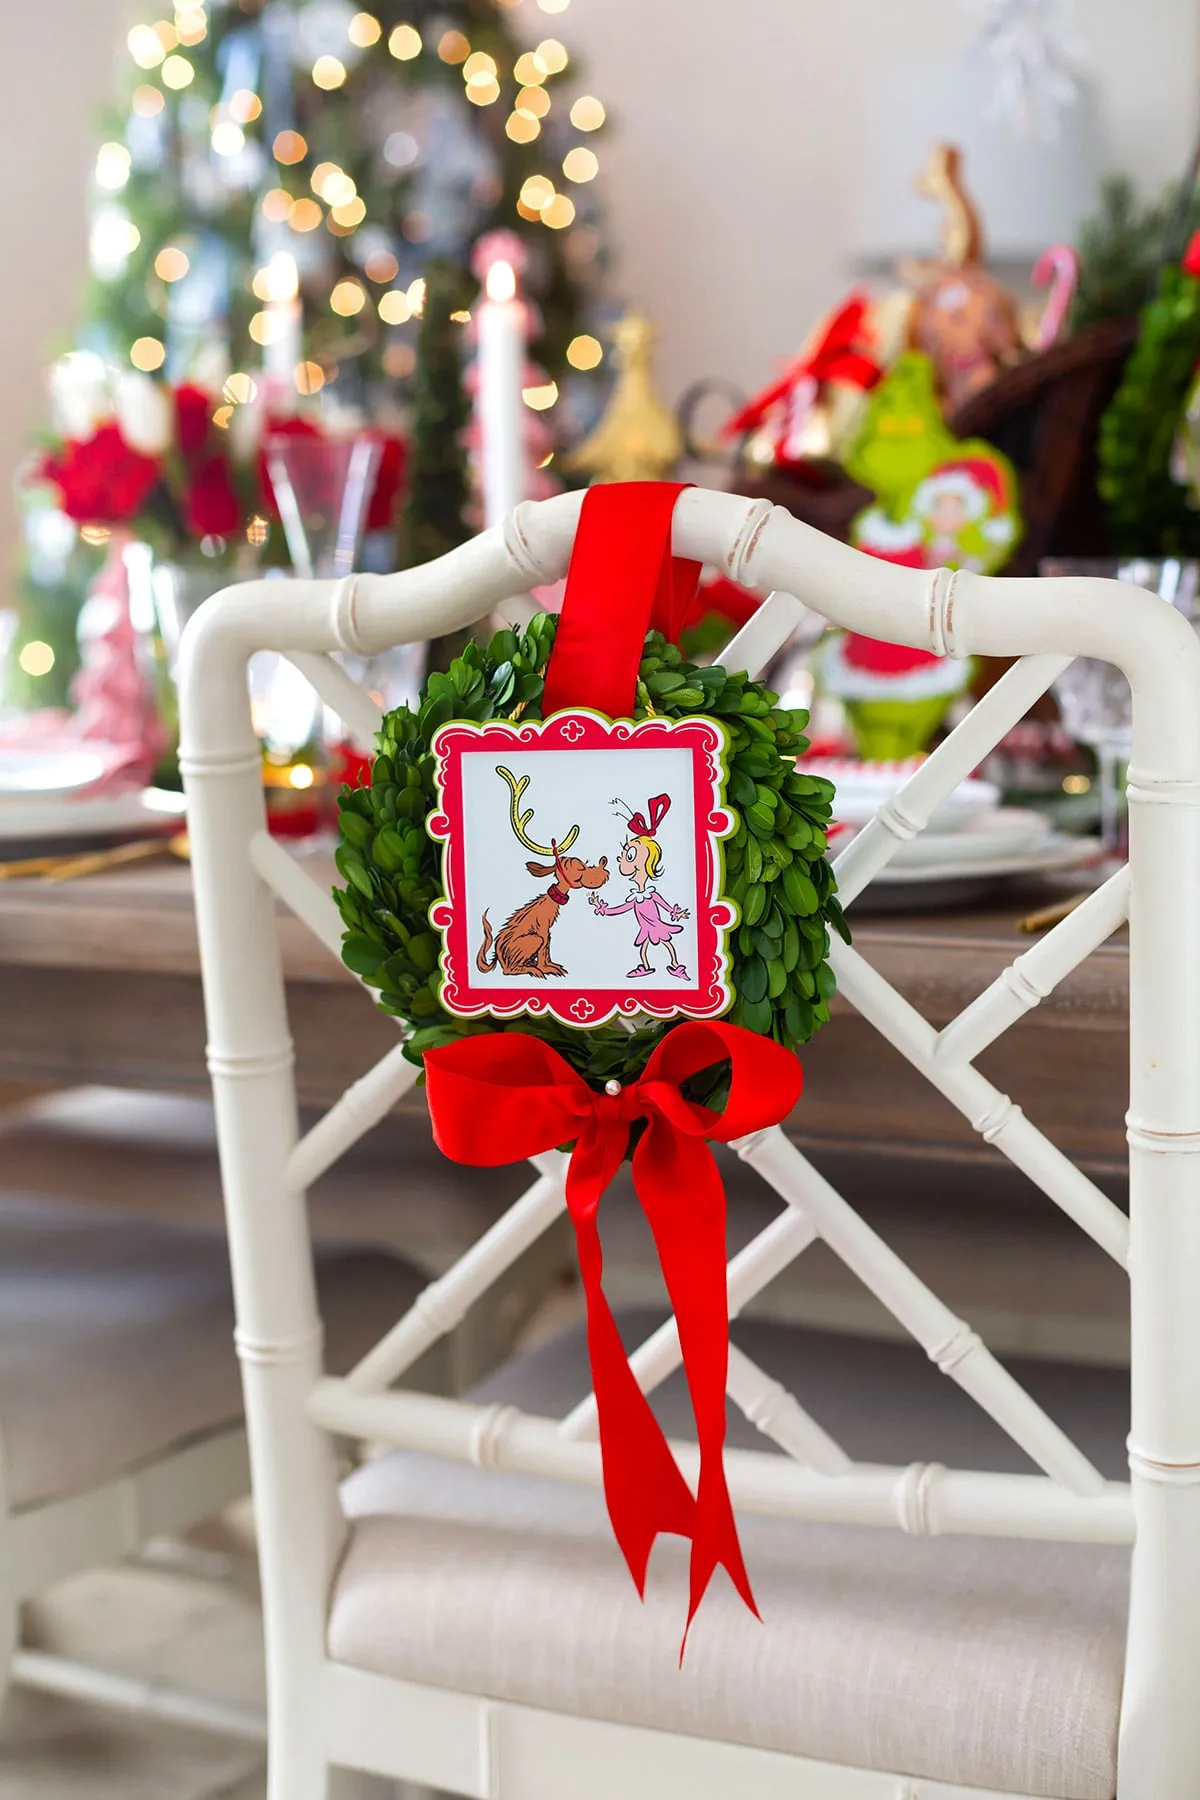
Chair backs run 17 to 20 inches wide, so a 10- to 12-inch wreath fills roughly two-thirds of that, which is the proportion you want. The ribbon should drop 14 to 18 inches from the top of the rail; longer and the sign sits below the sightline of anyone standing. This works in any dining room, but it’s especially good in a small one where a full centerpiece would fight for table space. Seating eight or more? Put wreaths on just the two end chairs so the table doesn’t look like a parade.
22. A Figurine Ornament Hanging Over a Stack of Tiny Gifts
Weight is the issue with figurine ornaments. Anything over about four ounces will pull a branch out of shape overnight, and it can bend the wire hook into a slow-motion swan dive. Hang heavy pieces on the thickest interior branches, close to the trunk, and use a metal hook rather than a ribbon loop — ribbon loops slide. Resist the urge to put this at the front of the tree, where it’ll get brushed every time somebody walks past.

- Sculpted character ornament: $10–$22
- Red-and-white baker’s twine, 100 yd: $4–$7
- Miniature wrapped gift boxes, set of 12: $8–$16
- Warm white string lights, 100 count: $12–$24
Total: $34–$69 to build the little scene on your branches.
Budget alternative: wrap tiny boxes yourself from scrap wrapping paper and empty matchboxes — twelve of them for about $2.
23. A Plush Character Holding a Stocking by the Fire
Three layers, one glance. The wooden table and the plush figure sit sharp in front, the lit tree blurs in the middle distance, and the glowing fireplace with hanging stockings softens the deepest layer. That’s classic foreground-midground-background staging, and it’s why the scene feels like a room instead of a product shot. The chartreuse green against all that warm brown and orange firelight is the other reason — complementary colors, both slightly muted by low light.

Build the same vignette on your own console.
- Clear off a 36-inch table or console and wipe it down.
- Place the main figurine one-third in from the left edge, not centered.
- Keep 10 to 12 inches behind it empty so the background reads as depth.
- Put your light source — tree, lamp, or fireplace — behind and slightly to one side.
- Add one small object to the right, like a stocking or a bowl of pinecones, to balance the weight.
Fifteen minutes and zero dollars if the pieces are already yours.
24. A Tree with a Plush Head, Arms, and Legs
Verify these before you commit to the full character build:
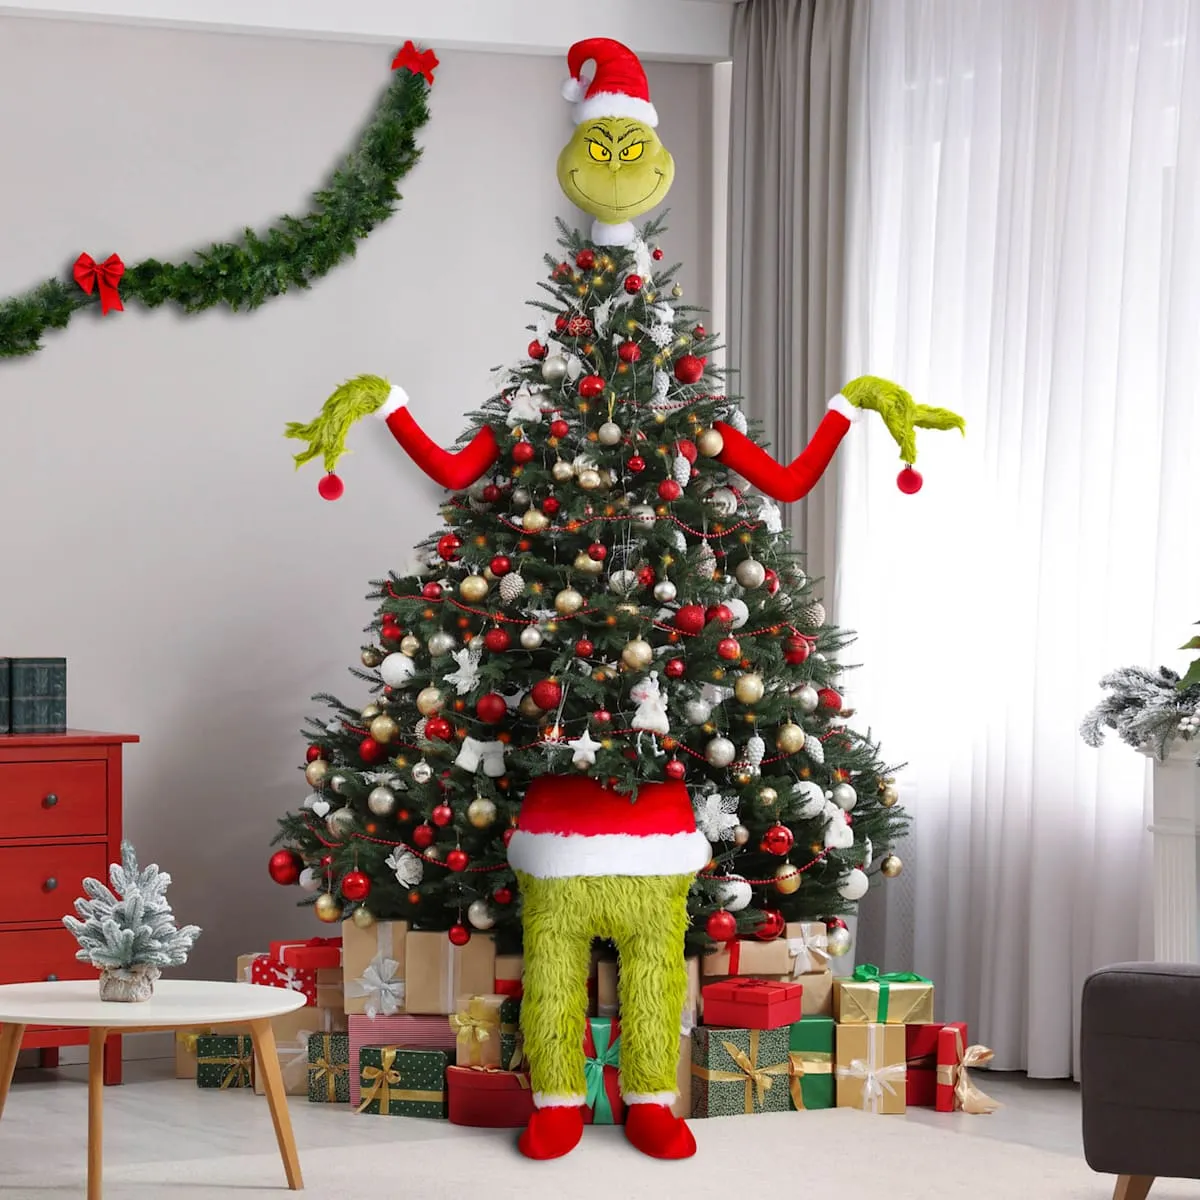
- Measure ceiling height minus topper height. A plush head adds 8 to 12 inches.
- Check that the base is heavy enough for arm attachments, which pull sideways.
- Confirm your ornaments are shatterproof; this setup draws kids straight to the tree.
- Test the topper’s weight on the top branch before you decorate the rest.
- Measure your rug — presents need a 24-inch radius at the base.
The legs. Anyone can plop a plush head on top of a tree and call it a day; that’s a costume for the top half. Tucking furry green legs underneath so they emerge from the bottom branches is what makes the whole tree read as a character standing in your living room. It’s the difference between a themed tree and a scene. Same logic as Idea #5, where one plush arm changes how you read the entire tree.
25. Pink Tree, Teal Chair, and Olive Patterned Wallpaper
This room runs on 40% pink, 25% teal, 20% olive, 10% gold, and 5% red. The olive wallpaper is the quiet hero — it’s a green, so it belongs to the holiday palette, but it’s muted enough that the pink tree doesn’t have to compete with it. Swap the pink tree for a traditional green one and the room still works. Swap the olive wall for white and the whole thing goes flat and cartoonish. Want the same energy with less commitment? Keep the wallpaper and trade the pink tree for a pink garland.
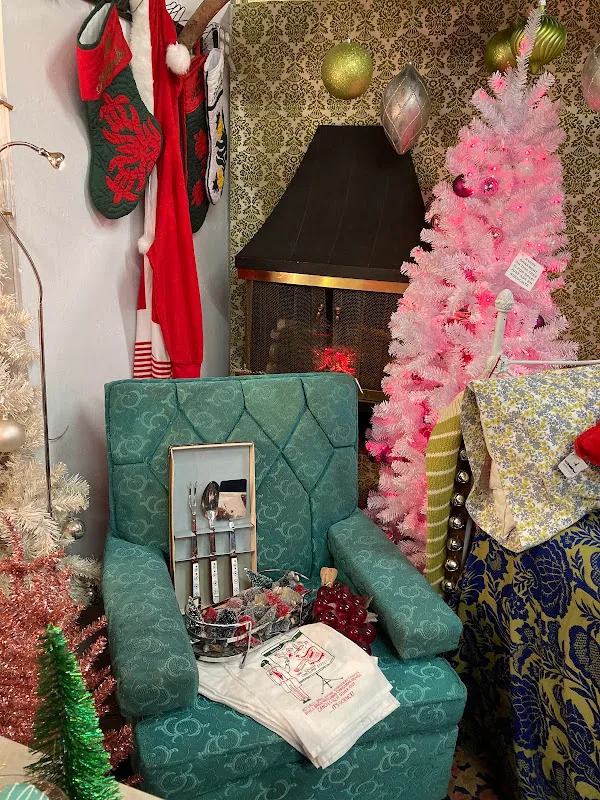
Off-palette Christmas trees — pink, teal, black, even lilac — have moved from novelty to mainstream, mostly because people are decorating for the room rather than for the holiday. A pink tree in a teal-and-olive space looks intentional. The same pink tree in an all-beige living room looks like a mistake. That’s the real shift: color as room-fitting rather than tradition.
26. Flocked Branches and Oversized Peppermint Swirl Balls
Shatterproof peppermint swirl ornaments in the 6- to 8-inch range cost $4 to $9 each at Walmart, Target, and At Home, and they’re almost always cheaper in a multi-pack. Flocked branch picks run $3 to $6. A faux snow blanket for the base is $10 to $18, or you can use a $4 bag of pillow stuffing. Set it up on a windowsill or a low cabinet and you’ve built a display for under $60. Compare with Idea #9, which uses a single swirl ornament at a much smaller scale.

In a window display, use 5 to 7 oversized swirl balls and nothing smaller. Mixing in normal-size ornaments makes the big ones look like accidents. Vary the hanging heights by 3 to 4 inches so the eye travels in a zigzag, and hang the largest ball slightly off-center — dead center reads as a bullseye. If the window faces the street, put the biggest pieces at eye level for someone on the sidewalk, roughly 4.5 to 5 feet off the floor.
27. A Costumed Character Decking a Pre-Lit Red-and-White Tree
A pre-lit tree simplifies things until it doesn’t. If yours has warm white LEDs, they’ll make red ornaments glow and white ones look cream — lovely, but not the crisp red-and-white balance here. A cool-white tree reads sharper and a little colder. Decide early whether you want multicolored lights anywhere, because mixing warm white and multicolor on the same tree makes both look wrong. And if kids are involved, keep the bottom third in shatterproof ornaments. Check our mistakes section below before you commit.

Two rules are carrying this setup. First, the ornament palette is strictly red and white — no exceptions, no gold filler — which makes the tree look styled rather than accumulated. Second, the painted forest backdrop with its single illustrated owl gives the eye a place to land that isn’t the tree, so the tree itself doesn’t have to scream. That’s the whole trick with character decorating: give the theme somewhere to sit.
Your Whoville Corner Starts With One Crooked Branch
Start with one thing — a bent tip, a plush hand, a single oversized swirl ornament — and let the rest follow. The best character trees aren’t the most decorated ones; they’re the ones that make someone stop in the doorway and smile. Pin the ideas you love most so they’re waiting for you when the boxes come down from the attic. 🎄