
You know that feeling when you’re 40 pins deep into Grinch decorations, your cart already has seven kinds of green ribbon in it, and you still can’t tell which version will actually look good in your own living room?
We spent serious time browsing Etsy, Dollar Tree, Walmart, and Target — and sifted through hundreds of real projects from real homes — to bring you only what’s worth your hot glue gun this year. Everything here lands between $4 and $410, so whether you’re making one punch needle ornament or a full Whoville front door, there’s a version that fits your budget and your square footage.
Inside you’ll find 31 ideas: layered ribbon wreaths, knitted dolls, mesh faces, ceramic trees, tray vignettes, and a few big yard moments — with budget and luxury versions compared side by side.
In 2026, the Grinch look has shifted away from flat green-and-red and toward handmade texture: punch needle, knitted yarn, layered mesh, burlap. And stay until the end — we break down the most common mistakes that can ruin these looks.
📌 Save this to Pinterest for later — you’ll want to revisit these ideas.
1. A Rocking Chair Corner With Two Pines
The framed Grinch print leaning on the floor beside the larger tree is doing more work than any ornament in this corner. Propped instead of hung, it reads as collected rather than staged, and it fills the dead zone between chair and tree without a nail in the wall. Hang it and the whole corner snaps into something flatter and more predictable. Try a slightly oversized frame with a wide mat — small art gets swallowed alive in a corner vignette.
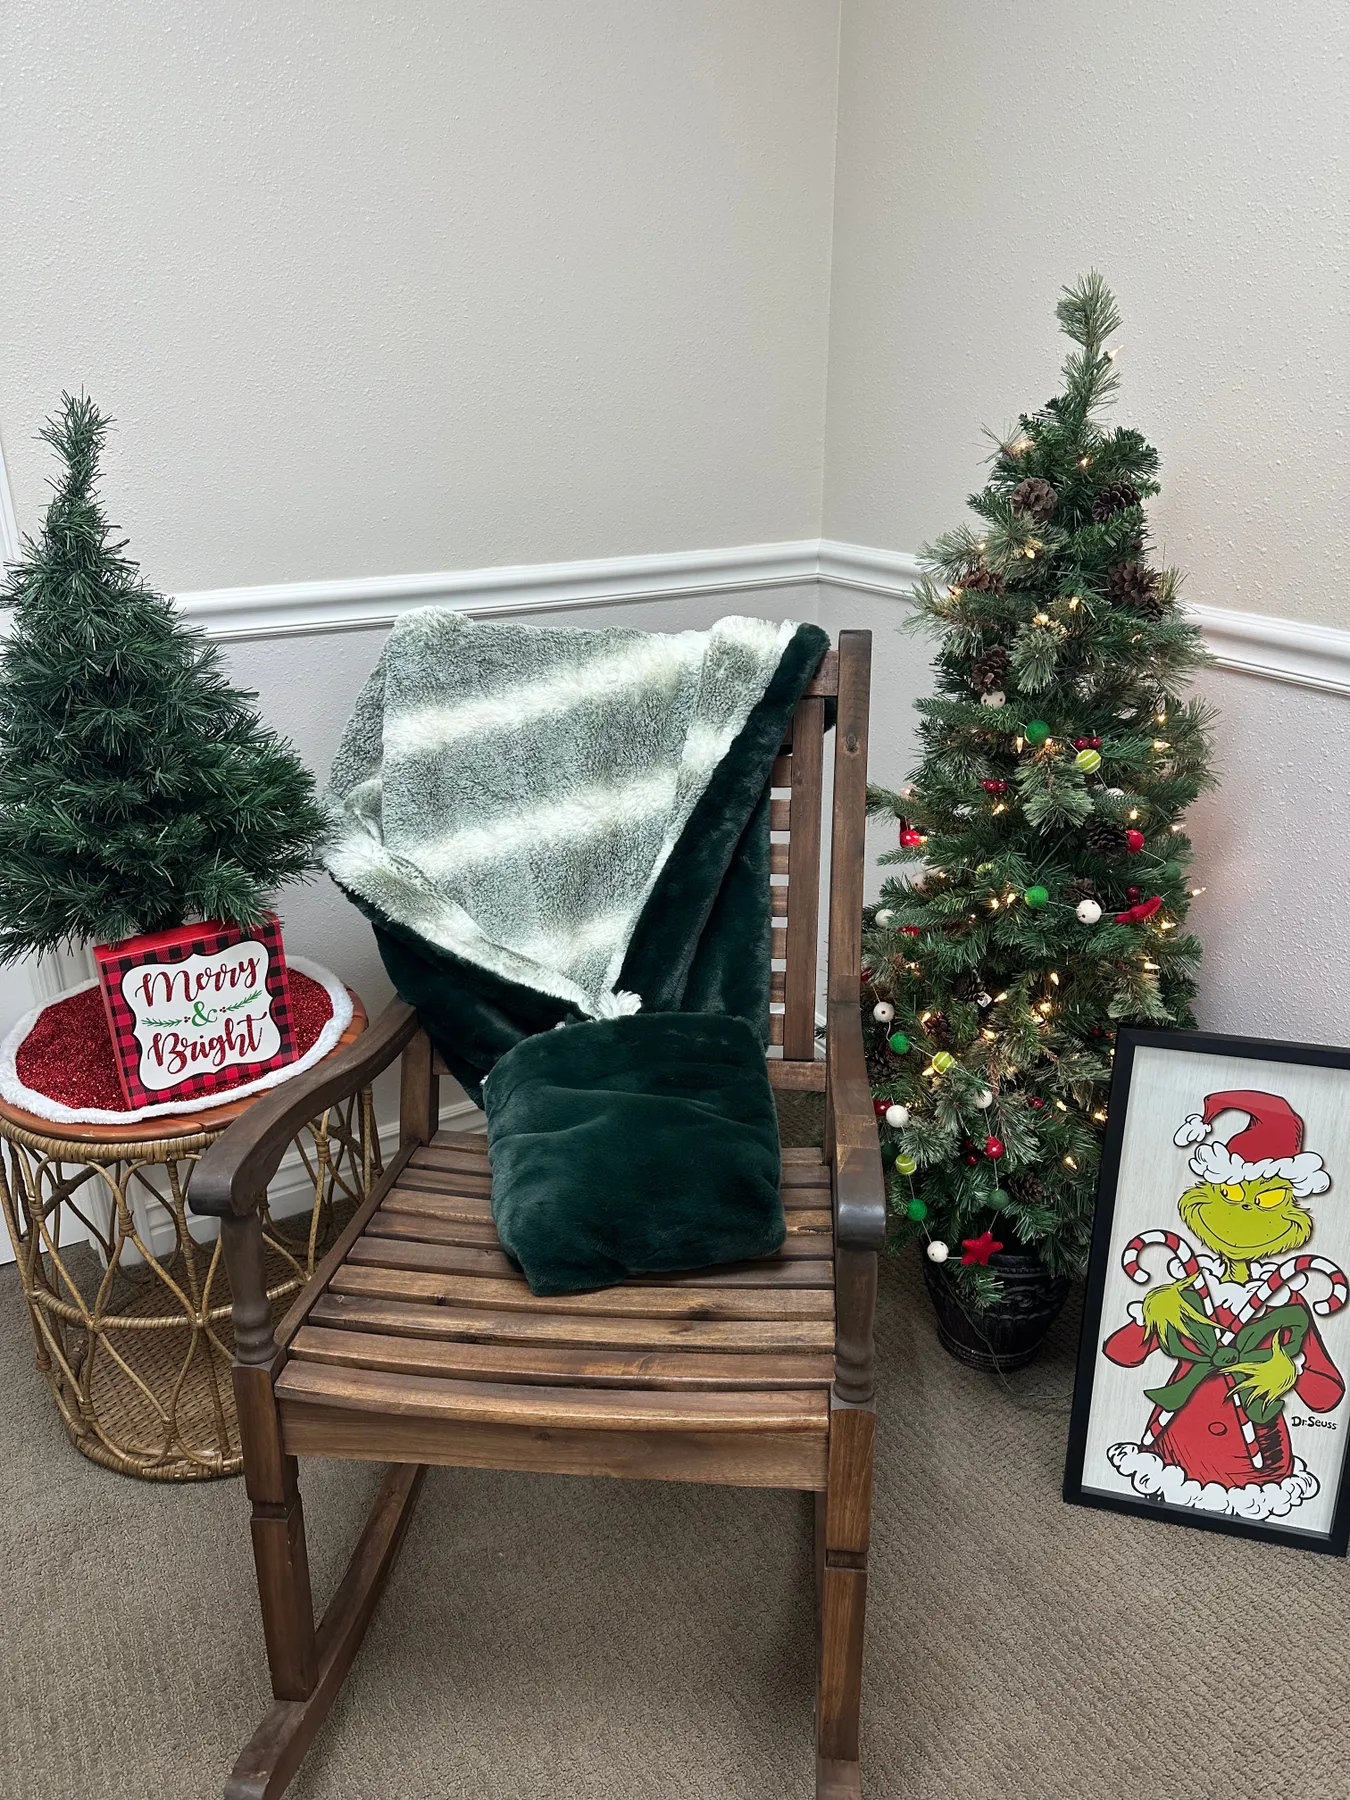
Two trees flanking one chair works because they are different heights: a taller one behind the felt ball garland, a smaller one opposite. Keep the gap between them roughly 4 to 6 inches wider than the chair so light passes through and the corner doesn’t become a solid green wall. Drape the striped faux fur throw so one corner pools on the cushion and the rest falls about 12 inches down the chair back. Even draping looks like a showroom; bunching looks like laundry.
2. Layered Ribbon Wreath on a Warm Wood Door
Three things keep this wreath from turning into a craft-store explosion. The ribbon loops step down in size from the outer ring toward the center, creating a spiral your eye can actually follow. The plush Grinch head sits dead center and slightly forward, so it acts as the wreath’s face. And the layered sign is the only piece with hard edges and readable text — everything else is loops and softness. Contrast, hierarchy, repetition. That’s the entire trick.
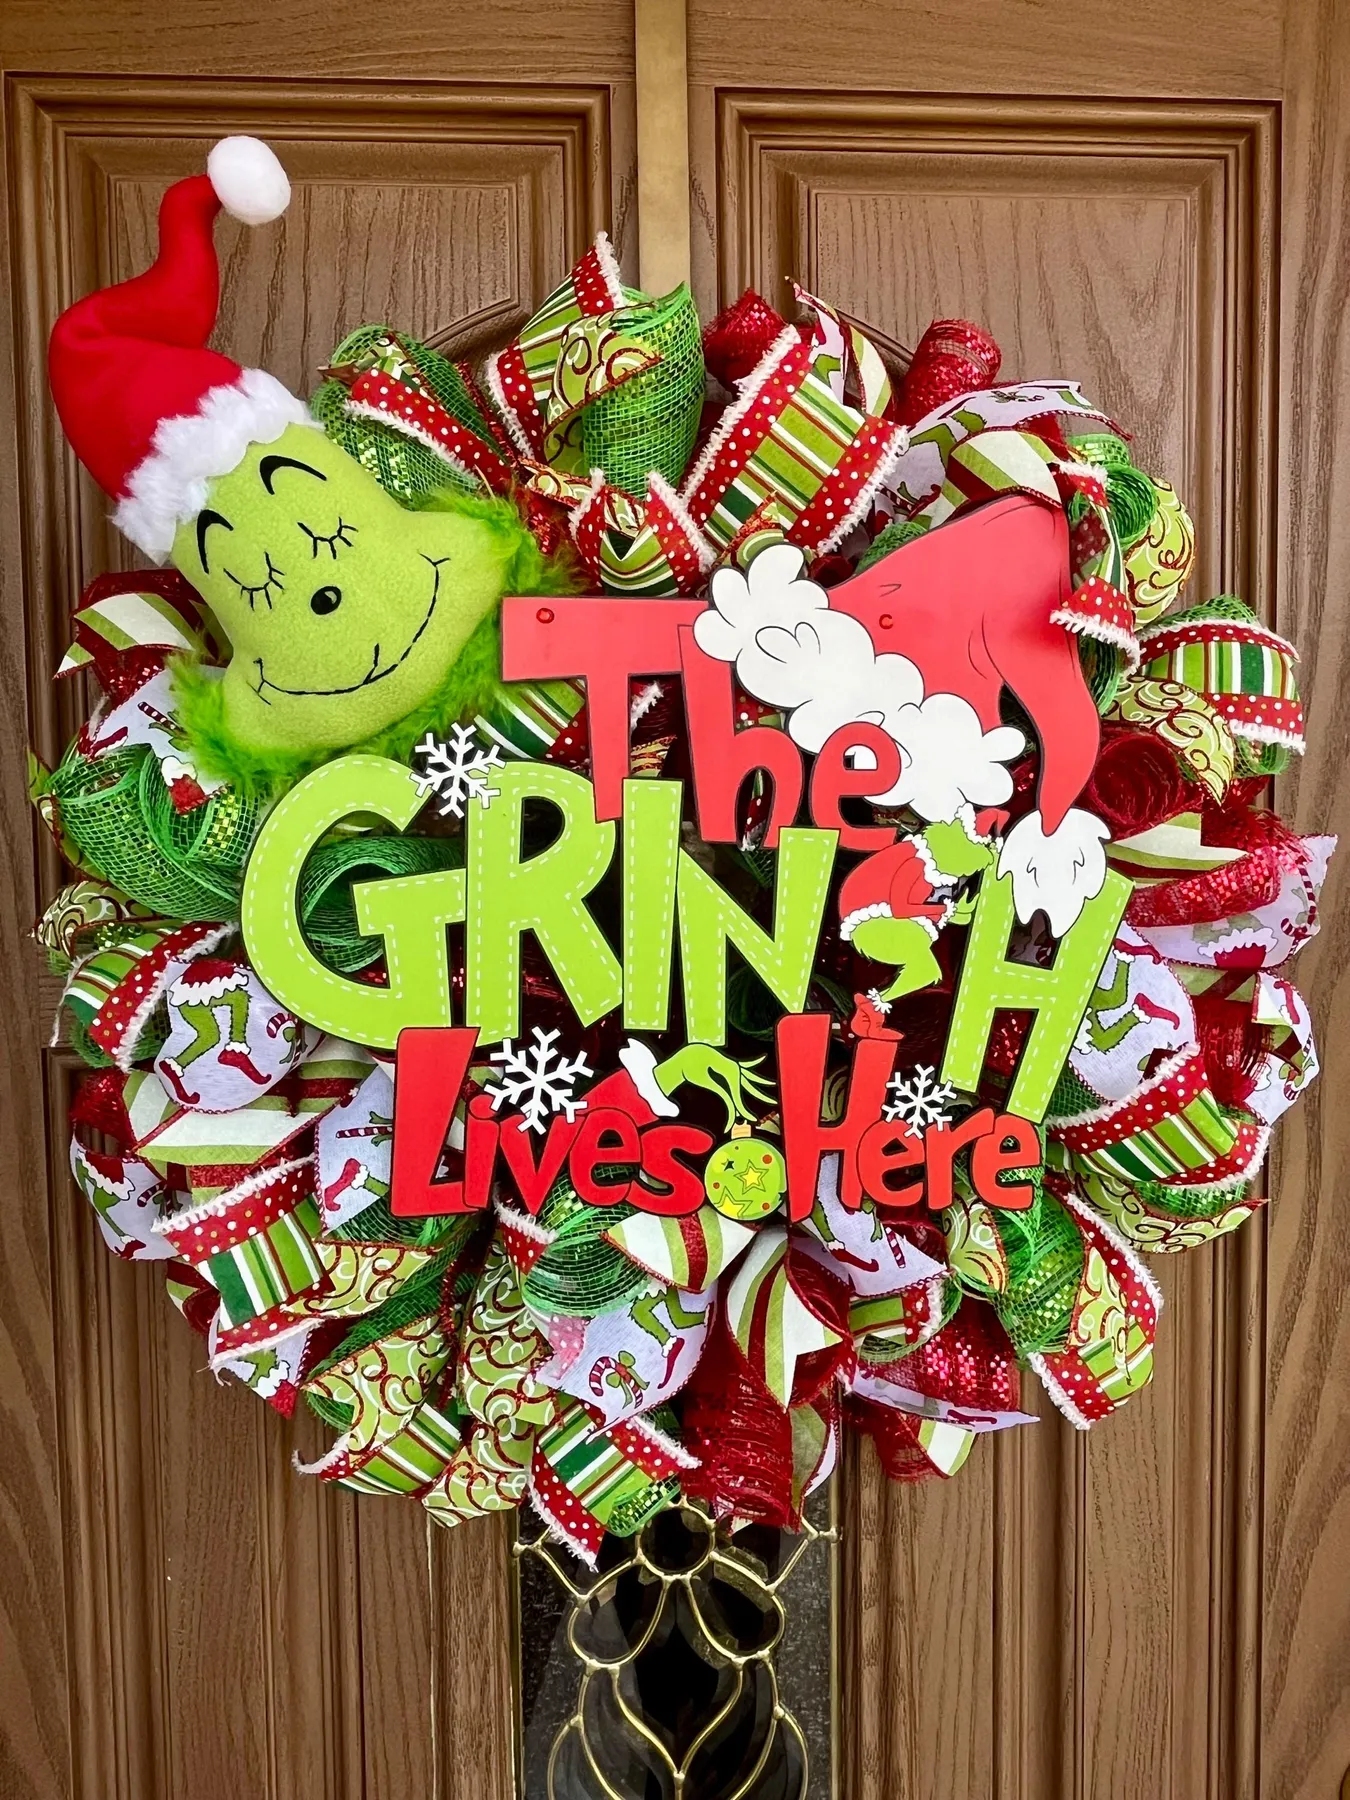
You don’t need a boutique haul to get this look. Start with a plain grapevine or wire form from Dollar Tree at about $5, then add four rolls of patterned ribbon from Walmart at roughly $3 to $5 each, and a Grinch head ornament from Target for $8 to $12. Reuse ribbon scraps from last year for the loop fill. You land around $35 total, versus $90 to $140 for a made-to-order version. Set that layered sign at the bottom center instead of dead middle and it reads just as big.
3. Fireside Flocked Tree With Red Plaid Cushions
Those scattered string lights across the floor look magical in a photo and are a genuine tripping hazard in real life. With little ones on floor cushions and a cat weaving through, switch to battery strands and tuck them behind the fireplace screen. Also check your flocking: cheap flocking sheds white dust onto carpet for months. Rub a small section with a damp cloth before you buy anything, and if it comes off on your finger, keep walking.

The palette here is simple math — 60 percent cream and warm wood, 30 percent red and forest green, 10 percent brass and firelight. Hold that ratio and you can swap red plaid for burnt orange and the flocked tree for a bare branch tree; it still reads cozy. What breaks it is adding a fourth color. The pajamas, the stockings, and the tree ribbons are all in the same two reds. Pick your two, then repeat them everywhere.
4. Dark Pine Wreath Holding a merry GRINCHMAS Banner
- Wrap a 24-inch wire wreath form with dark green garland in 6-inch bunches, twisting each stem tight so nothing slips.
- Clip the Grinch cutout to the center with floral wire, set about half an inch forward so it casts a small shadow.
- Hot glue red and green ball ornaments in odd-numbered clusters of three, varying the sizes.
- Weave two plaid ribbon loops behind the character with the tails hanging past the bottom edge.
- Zip-tie the banner ends to the outer wire ring.
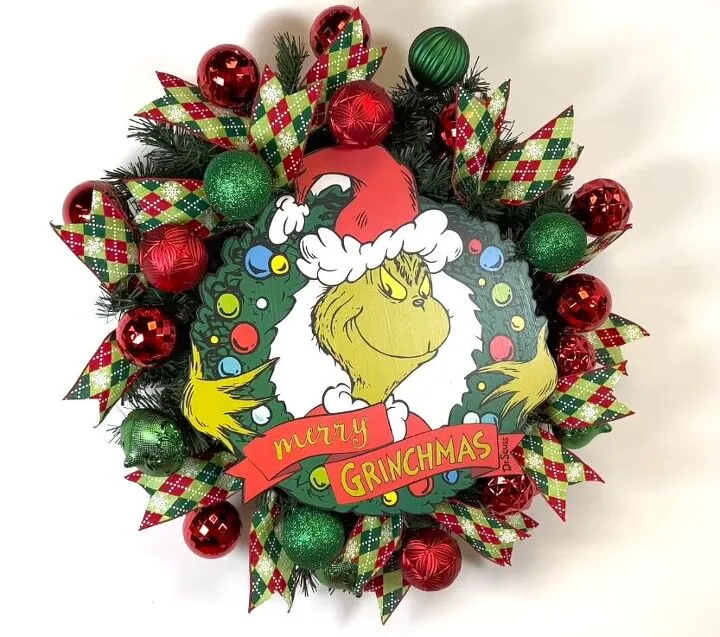
Time: about 90 minutes. Materials: $45 to $70.
The banner is the piece that makes this feel like a character instead of a craft project. It hangs below the cutout at a slight angle, so it looks like he’s actually holding it mid-air — that tiny tilt is the difference between a prop and a scene. It also gives your eye a horizontal break inside a very circular, very green composition.
5. Ribbon and Mesh Wreath With a Grinch’s Lair Arrow
Layered deco mesh wreaths exploded on Pinterest years ago and never really left, but 2026 is the year they stopped being purely pastel and started telling a story. People are treating a wreath like a tiny stage set: a character, a sign, a punchline. The Grinch’s Lair arrow is the tell. It’s the same technique as Idea #11, just with more candy-cane stripes in the mix. This one has staying power because it’s built from reusable materials you can re-shape next December.
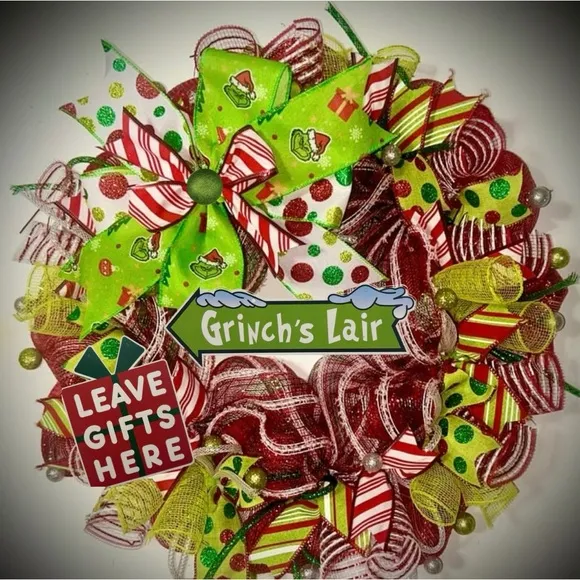
Mesh ribbons go shiny and cheap looking when they’re over-packed. Use 10-inch mesh cut into 12-inch lengths, roll each piece into a tight tube before you pinch it, and you’ll get the fat rounded loops you see here instead of flat squished strips. Set four anchor points first — 12, 3, 6, and 9 o’clock — then fill the gaps. Leave one empty half-inch of breathing room right next to the sign so the lettering stays readable from the sidewalk.
6. Warm White Light Spill From Tree to Inflatable
This kind of display needs a tree at least 15 feet from the house so the wrapped trunk reads as its own object rather than a wall of glare. On a standard suburban lot you have room; on a narrow city lot, skip the inflatable and wrap just the trunk — a lit trunk alone still reads as a moment. If your frontage is under 20 feet wide, this is genuinely too much. Compare with Idea #8, which uses painted cutouts instead of glow and works in much tighter spaces.
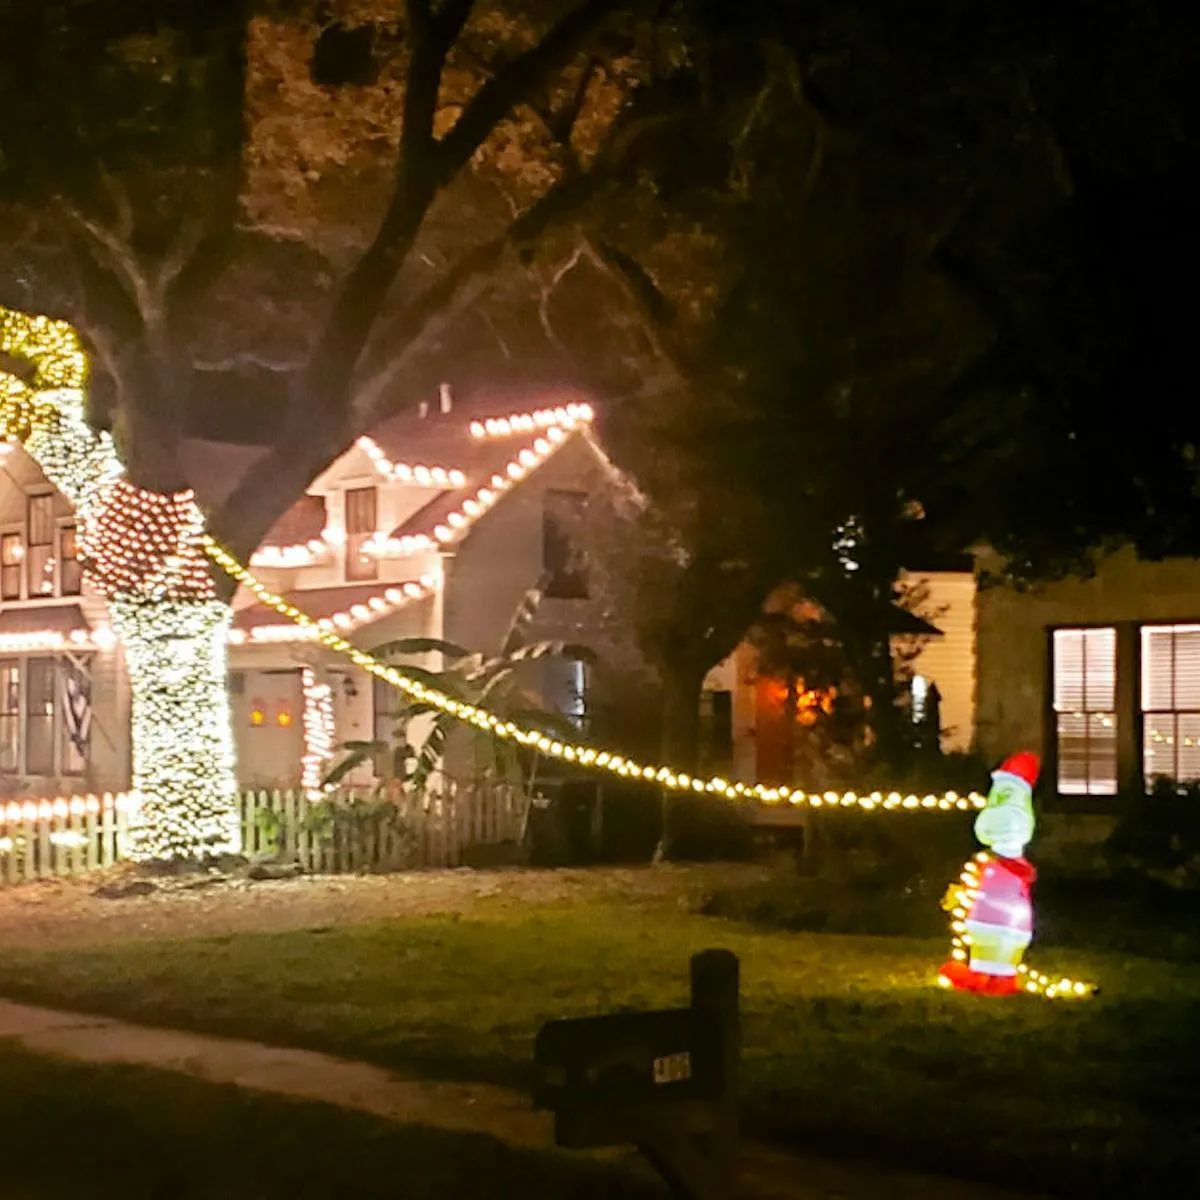
Two things nobody mentions: inflatables need a dedicated outdoor outlet within 20 feet, and they can run $15 to $30 a month in electricity if left lit overnight. That yellow strand connecting tree to character is also the weak link — one squirrel chew and the whole run goes dark. Use a single continuous strand instead of three coupled ones, and stake it every 18 inches. Wind will find the one spot you skipped.
7. Lime Green Legs Popping Out of the Wreath
- Build a 20-inch base of overlapping ribbon loops in red, green, and white, working clockwise so the pattern stays consistent.
- Bend 12-gauge floral wire into a U and push it through the plush legs about 2 inches up from the boots.
- Poke the wire through the center of the wreath, twist it behind the frame, and clip the excess short.
- Cinch the legs with a zip tie so the boots splay outward at about 45 degrees.
- Fill around the anchor with polka dot and glitter ornaments to hide the wire.

Time: 60 to 75 minutes. Cost: $40 to $65.
Angle and scale carry this whole thing. The boots sit wider than the leg anchor, which makes them look weighty — like something is genuinely hanging there. The glitter balls are all roughly the same size, so they read as texture instead of clutter. And the reds stay in one family: no orange-red mixed with a blue-red. Get that wrong and it looks like a discount bin rather than a joke you’re in on.
8. Painted Wood Cutouts Making a Quiet Point
The heart — pink and red together, oversized, held out in front — turns this from a yard prop into something with feeling. Everything else could belong to any Grinch display on the block. The quote alone would land a little heavy-handed; the heart gives it a wink. Keep it matte, not glossy. Sealed gloss reflects porch light and you lose the pink-red blend that makes it look hand-painted instead of printed.
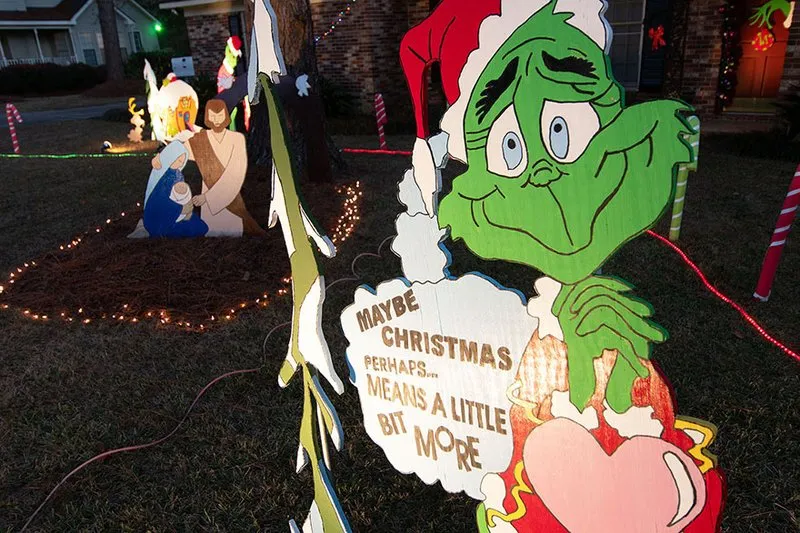
Painted wood cutouts last about three to five seasons outdoors before the edges swell and the paint crazes. Seal front, back, and every cut edge with two coats of exterior polyurethane, then reseal every other year. Store them flat, wrapped in a breathable cotton sheet rather than plastic, somewhere dry. Pine straw bedding is fine, but it holds moisture after rain — lift the pieces onto small treated blocks so the bases aren’t sitting wet all winter.
9. Red and Plaid Mesh Wreath With a Center Grinchy
The formula: 55 percent red mesh, 25 percent plaid mesh, 15 percent ornaments, 5 percent black accents. That black matters far more than its percentage — it’s the only cool tone in an entirely warm composition, which is why the characters pop off the red instead of melting into it. Swap the red for burgundy and you lose the cartoon energy. Swap the plaid for solid green and you lose the messiness that makes a mesh wreath feel handmade, like the one in Idea #12.
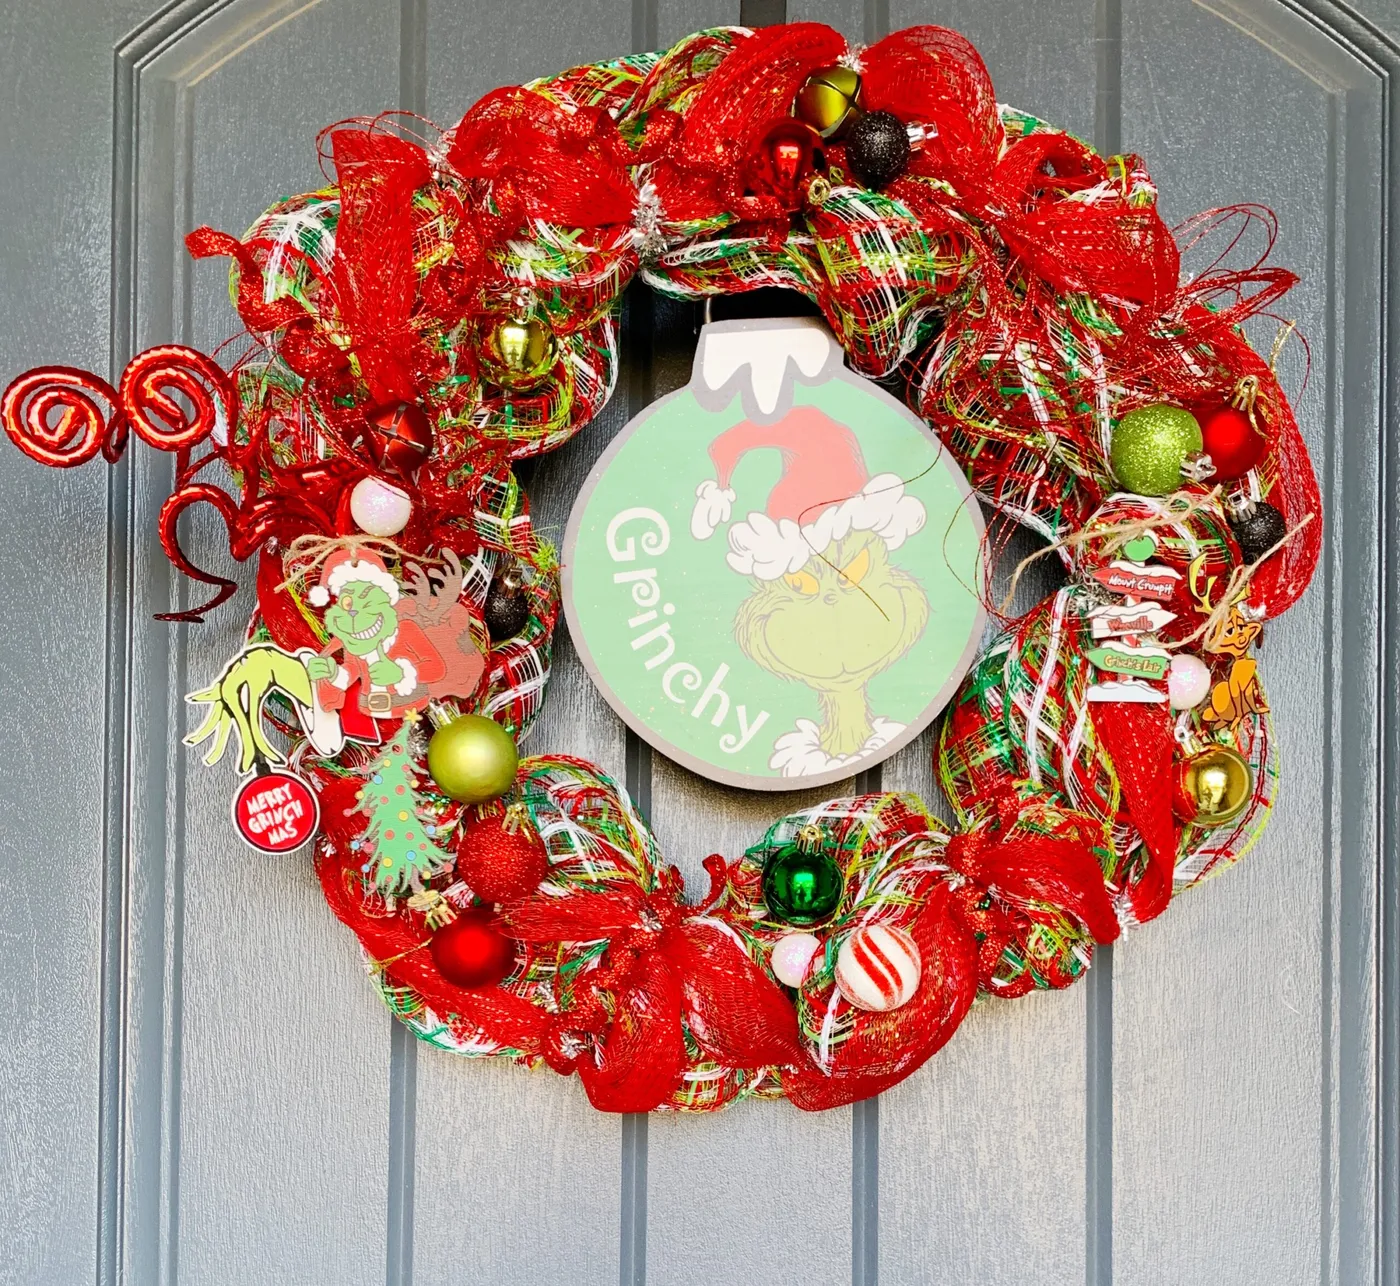
Curly glitter picks are the cheapest way to add height to a wreath, and most people cut them too short. Leave at least 8 inches of stem and bend it into a wide S before tucking it in — you want a curl that arcs an inch or two above the outer ring. Four picks, placed around 10, 2, 5, and 7 o’clock, will give you the silhouette. More than six and the wreath looks like it’s wearing a hat.
10. Life-Size Cutout Standing In for a Tree Topper
- Standing cutout, printed board or painted plywood: $35 to $120
- 7-foot artificial tree: $90 to $250
- Green mesh ribbon, three rolls: $18 to $30
- Ornament set with Grinch face balls and candy canes: $30 to $70
- Clip-on white snowflakes: $12 to $20
Total: $185 to $490

Want it cheaper? A $12 foam board print mounted on a tomato stake plus a Dollar Tree ornament run gets you the same vignette for around $75.
A 5-foot cutout beside a 7-foot tree works because the cutout catches your eye first and the tree supports it. Go bigger and it starts competing with the doorway; go smaller and it vanishes into the branches. With ceilings under 8 feet, drop to a 4-foot cutout and a 6.5-foot tree — the ratio holds. For apartments under 400 square feet, skip the standing piece entirely and go tabletop, like Idea #30.
11. Stink Stank Stunk Ribbon Wreath
The word ribbons are the whole point. In a wreath made almost entirely of loops and mesh, text gives your eye somewhere to land — and “Stink Stank Stunk” is funnier than any ornament could ever be. The arrow sign does the same job vertically, pulling the composition off-center so it doesn’t feel symmetrical and stiff. Everything else is filler: pretty filler, but filler. If you only buy two things, buy the word ribbon and the sign.
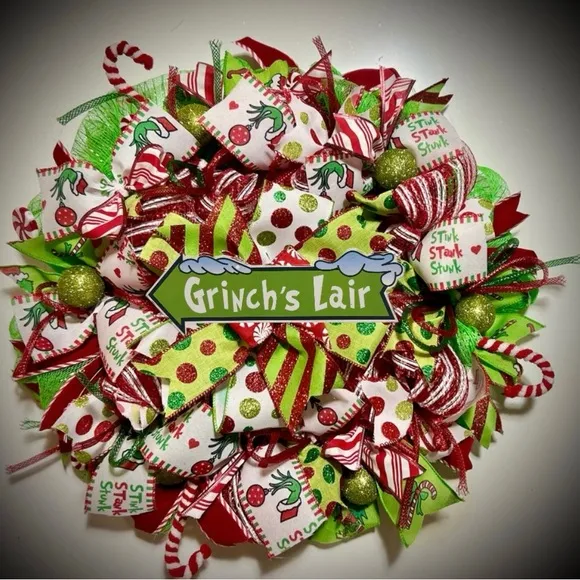
- Cut 6-inch squares of deco mesh and pinch them into puffs around a 20-inch form — you’ll need about 40.
- Anchor the arrow sign at the 4 o’clock position with wire, angled up and out.
- Thread the word ribbon loosely through the loops so the lettering sits on the surface.
- Add three glitter lime spheres in a triangle: one high, two low.
- Fluff every puff outward with your fingers before hanging.
Time: about 2 hours. Cost: $50 to $80.
12. Plaid Mesh Wreath With a Sheer Ribbon Lift
That sheer iridescent ribbon is doing the heavy lifting, and it’s the piece people always skip. It costs about $6 a roll and adds a lighter value between the saturated reds and greens — without it, plaid mesh goes muddy at ten paces. Run two full loops of sheer ribbon for every five plaid puffs. Also, keep the character cutout about 2 inches above center. Dead-center placement makes any wreath look like a plate with a face on it.
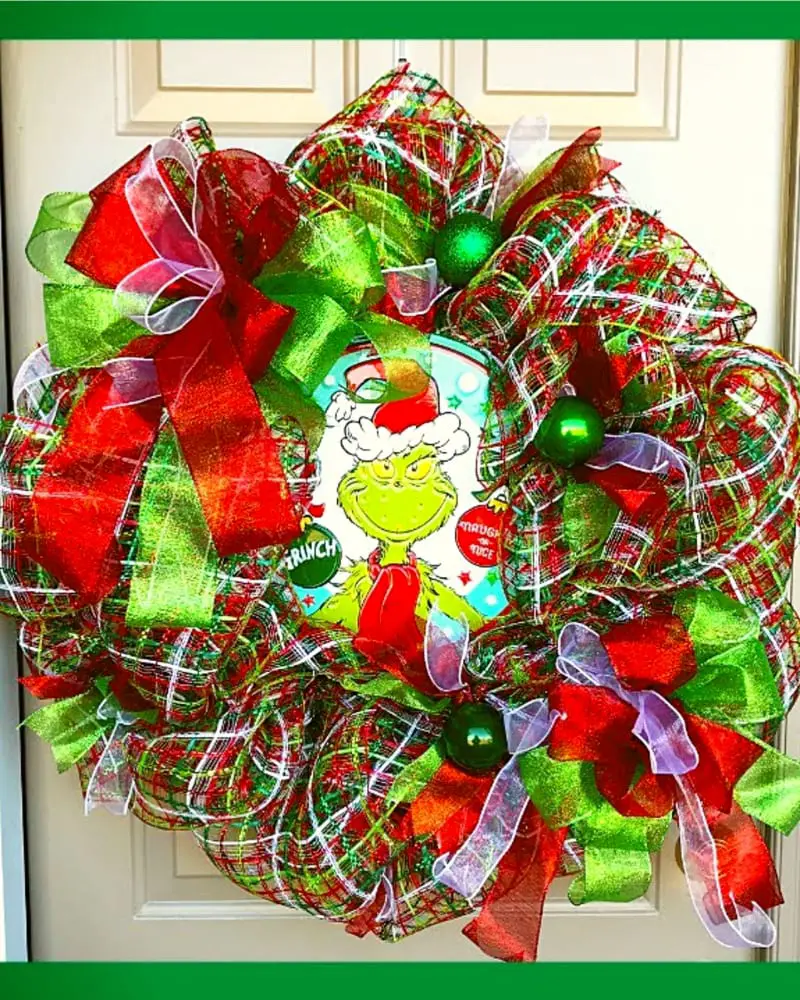
Read this one as 50 percent plaid mesh, 20 percent solid red, 20 percent solid green, 10 percent sheer. The plaid carries the pattern, the solids give your eye a rest, and the sheer keeps everything from going flat. Want a Whoville version instead? Swap plaid mesh for pastel pink and sky blue, keep the ratio, and the formula still holds. It’s the same skeleton as Idea #25 in an entirely different mood.
13. A Tiny Feast Scene Styled on a Red Cupboard
The turkey platter. Everything in this scene points at it — the figure’s posture, the dog’s upturned head, the little gifts stacked below. Take it away and you have two figurines near a decorated cabinet. Keep it and you have a moment from the story, which is why this reads as a vignette instead of merchandise. When you build a scene like this, decide what everyone is looking at, then place that object first and arrange around it.
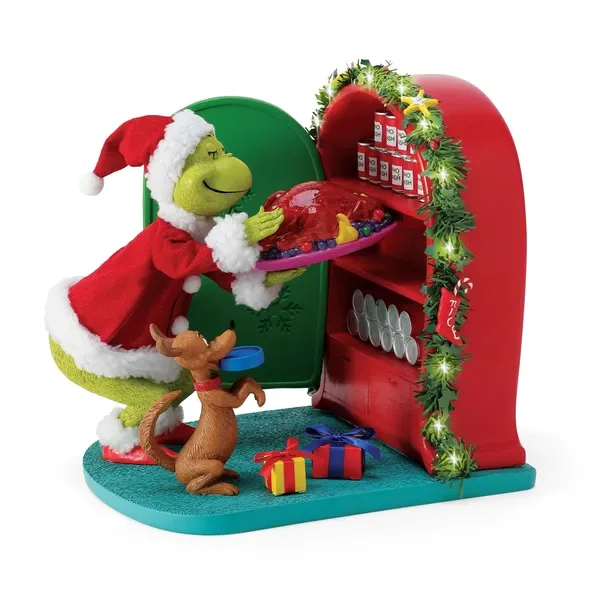
Garland wrapped around furniture will scuff it. If that cupboard is painted, use felt pads behind every clip and check for pressure marks weekly. Keep light strands off heat-sensitive finishes — LED only, unplugged when you sleep. That teal base under the dog is charming but it limits placement: on anything warmer than a cream or white wall, teal turns grey. Test it on your actual shelf before you commit.
14. Punch Needle Face Ornament for the Crafters
- Sketch a 4-inch circle on monk’s cloth with a water-soluble marker and stretch it tight in a hoop.
- Fill the face with light green yarn in short, even rows, working in one direction only.
- Add the yellow outline in three passes so it sits a millimeter taller than the green.
- Switch to black yarn for the eyes and mouth — punch, don’t embroider, so the texture stays consistent.
- Fold the raw edge behind, glue a felt backing on, and thread a black wire loop through the top.
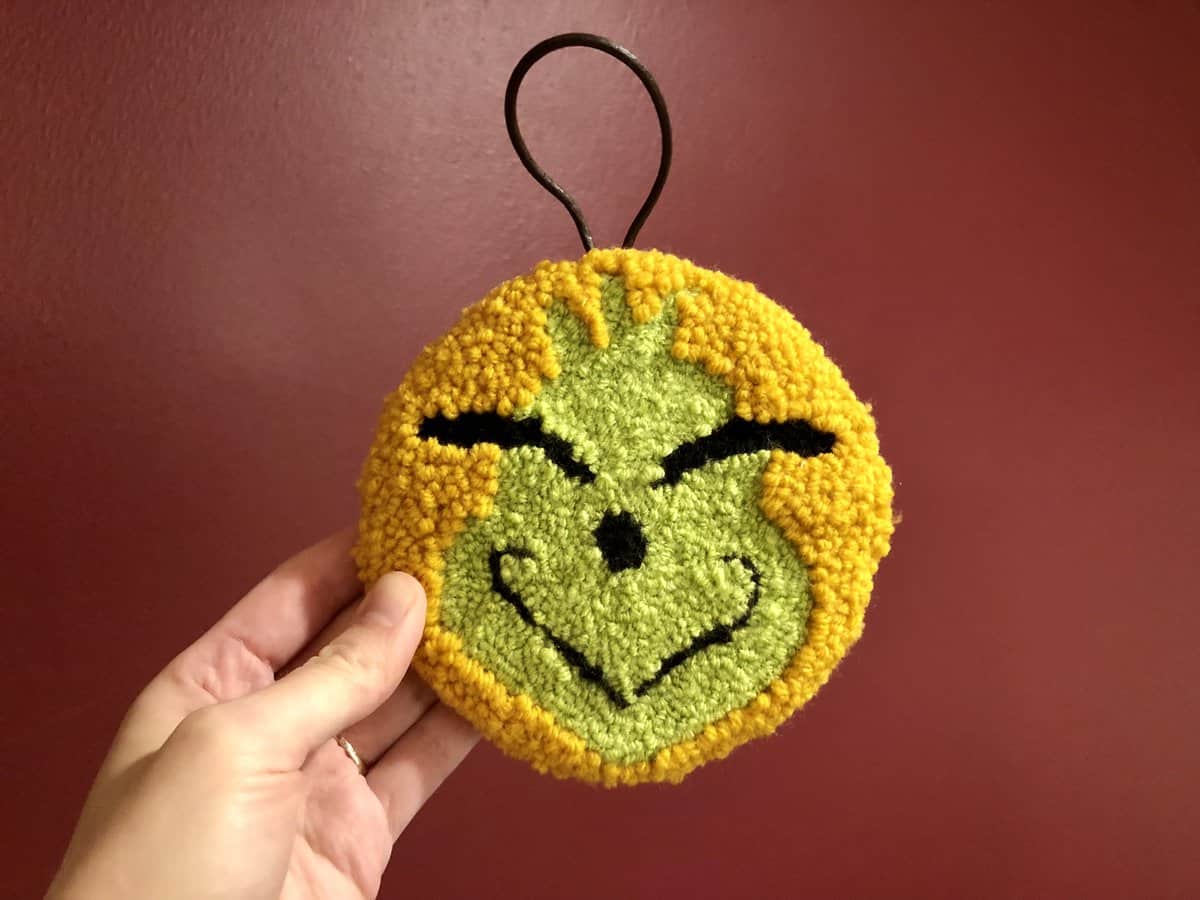
Time: 2 to 3 hours. Cost: $15 to $25 including yarn.
Punch needle tools run $15 to $40, and yarn is the cheap part — hit a thrift store or a buy-nothing group and you’ll find hooks and hoops for a few dollars. If you already knit or crochet, reuse leftover worsted; this face takes about 12 yards. A $5 kit plus a $3 hoop gets you the look. Make six in an evening and hang them as a garland, the way handmade pieces fill out the branches in Idea #19.
15. Knitted Grinch Doll in Striped Pajamas
Wool and snow don’t get along as well as the photos suggest. Wet wool holds water, stretches, and smells like a wet dog until it dries. If your doll lives outside, knit in acrylic or cotton and accept that you’ll re-block the hat every spring. If it comes inside, hand wash in cool water with a drop of wool soap, roll it in a towel, and dry flat — never hang a knitted doll by the hat to dry, or you’ll get a permanent dent.

At roughly 8 to 10 inches tall, this doll works on a railing cap, a windowsill, or a bookshelf edge, not on a mantel. Mantels need 12 to 18 inches of height to register from across the room. Above 6 inches, group them: three knit dolls in a row read as a collection, one reads as a leftover. A porch ledge at least 6 inches deep is the ideal home — protected from rain, visible from the walkway, and out of the cat’s reach.
16. Knitted Doll With His Hands Over His Face
This vignette is 45 percent white texture, 35 percent red and green, 20 percent pastel candle. That pastel fifth is the surprising part — lavender and pale pink shouldn’t work in a Christmas scene, but they soften the green so it reads cozy instead of sour. Keep the candles unscented, or you’ll have a Grinch doll that smells like a spa lobby. Swap the lavender for navy and the whole scene turns colder, sharper, and much more graphic.

The hands covering his face. That’s it. The striped pajamas, the knitted blanket, the red baubles — those are all standard holiday styling you could buy in one trip. The pose is what makes you smile, and you can recreate it with almost any cloth doll by bending the arms and propping them under the chin. Position it at eye level; a shy doll below eye level just looks like a broken toy.
17. GRINCH CAM Ornament on Silver Tinsel
Silver tinsel flattens everything next to it, which is exactly why the one green ornament on this tree owns the shot. If you’re doing a silver-and-green tree, follow a 1-to-4 rule: one colored ornament for every four metallic ones, and hang the colored ones in a loose diagonal band rather than scattering them evenly. Your eye traces the band and the tree looks designed. Scatter them randomly and it looks like the tree lost a fight.
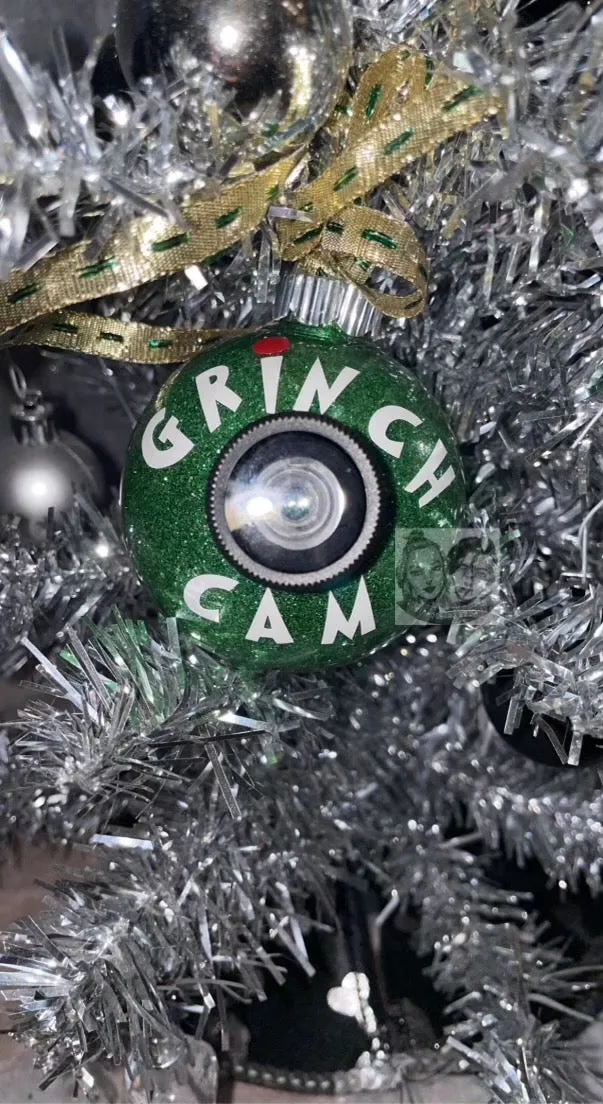
Camera-themed ornaments are quietly having a year — GRINCH CAM, ring-light baubles, tiny tripods. Partly it’s nostalgia for physical media; partly it’s that people now decorate with their whole personality instead of a tidy color scheme. This one works because it’s a joke that needs no explanation. Novelty pieces like this do age fast, so give them the front-facing branches and keep the heirlooms toward the back.
18. Whoville Miniature With a Sleigh and Snow
Scale lies everywhere in this display and it works. The sleigh is oversized for the houses, the characters are oversized for the sleigh, and nobody notices because the snow base anchors everything to one ground plane. That’s the trick with miniature villages: match the surface, not the objects. Textured snow also hides every seam, wire, and glue blob. Buy one bag of fake snow and sink all the bases a quarter inch into it.
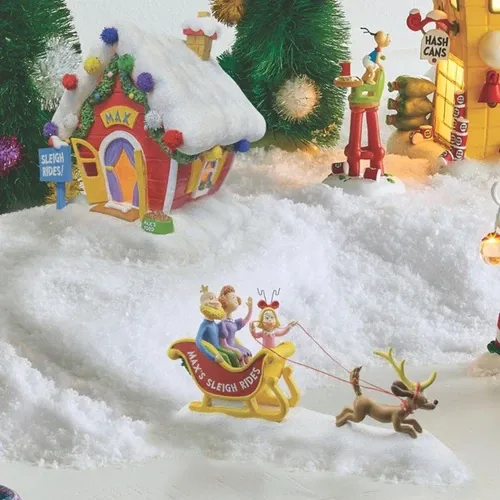
Miniature displays collect dust like nothing else, and fake snow yellows in direct sun. Keep the scene out of a south-facing window and plan on a soft makeup brush to dust the tiny figures monthly. Watch pets too — the reindeer and little characters are chew-sized. With a cat in the house, put the whole thing behind glass or on a surface at least 48 inches high, or the sleigh disappears under the couch by New Year’s.
19. Handmade Tree With Burlap and Pink Mesh Bows
This palette is doing something a little risky: brown burlap, pink mesh, and green pine. The burlap is a warm neutral that lets pink in without turning the tree into a birthday party — roughly 30 percent burlap, 20 percent pink mesh, 40 percent green foliage, 10 percent black glitter. Swap the pink for mustard yellow and you get a completely different, more vintage tree with the exact same bones.
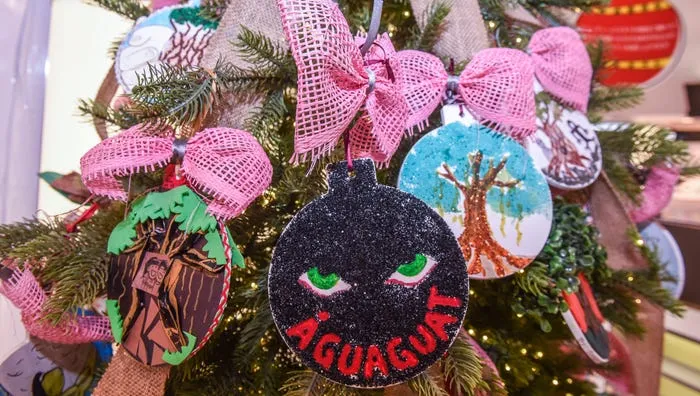
- Cut burlap ribbon into 10-inch lengths, fold each into a loop, and staple the ends behind.
- Pinch pink mesh into 6-inch puffs, twist the center, and fluff outward.
- Place the burlap loops first at roughly 12, 4, and 8 o’clock to establish a triangle.
- Tuck pink mesh between them, keeping two puffs between each burlap loop.
- Hang painted and glitter ornaments last, one per branch cluster.
Time: 75 to 90 minutes. Cost: $25 to $45 for ribbon and mesh alone.
20. Tiered Table Display Anchored by a Grinch Statue
This is retail merchandising scaled down, and it transfers to home surprisingly well. The rule: the statue should be at least twice the height of your tallest table tier. Here that’s a 4-foot figure against two 2-foot tiers. Shrink it proportionally — an 18-inch figure with 9-inch tiers — and you get the same composition on a console table. Under 12 inches total and it stops reading as a display and starts reading as clutter. That’s the line.
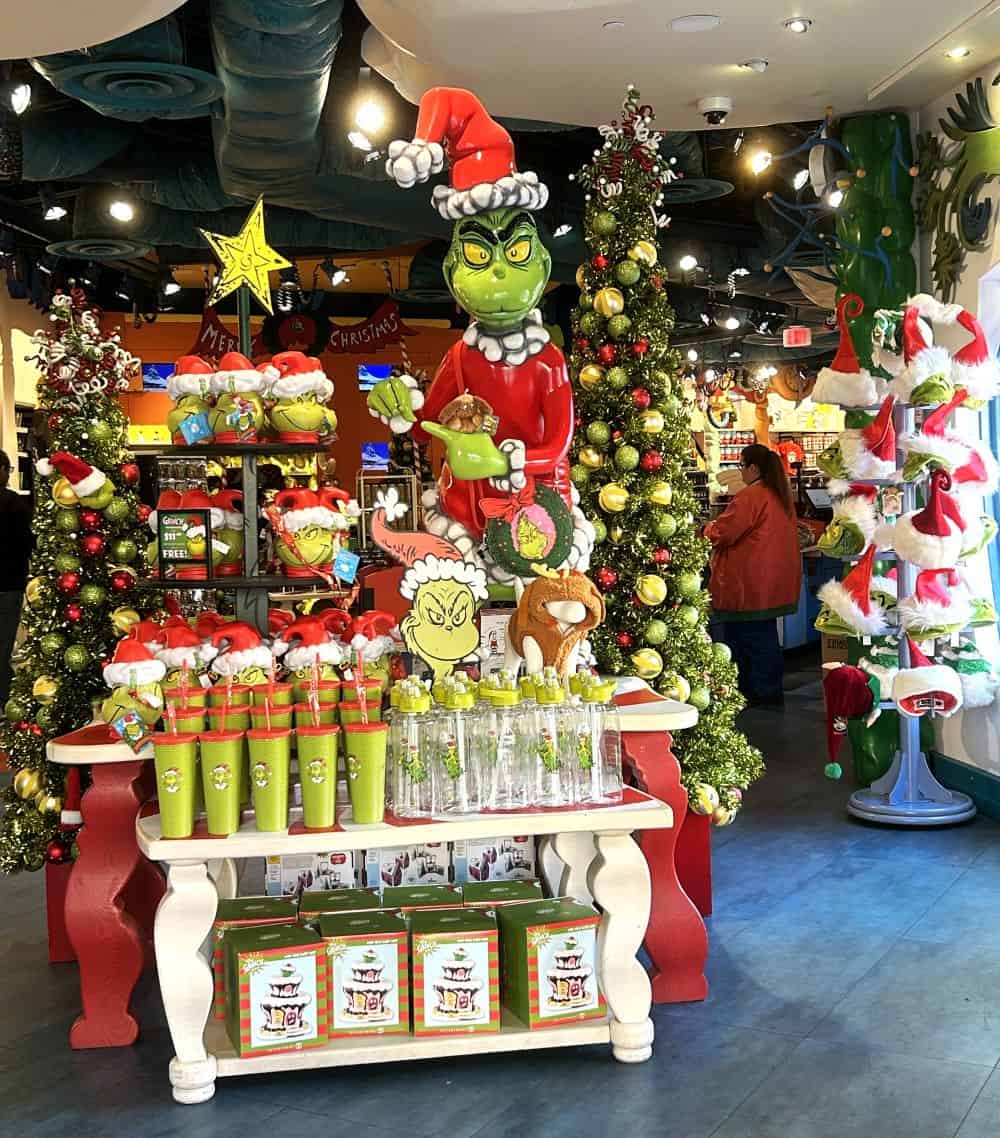
The multi-tiered table. Without it you’d have a pile of mugs on a flat surface. With it, the height changes let your eye move up and back down, which is the entire reason retail displays use risers. You can fake this at home with two cake stands and a stack of books under a tablecloth. Keep tiers no more than 8 inches apart, or the top one becomes a shelf for dust.
21. A Signpost for Mount Crumpit and Whoville
- Large painted Grinch cutout, 4 to 5 feet: $60 to $180
- Max cutout with antlers: $30 to $75
- Directional signpost with four arrow boards: $40 to $110
- Exterior paint, sealer, and hardware: $25 to $45
Total: $155 to $410
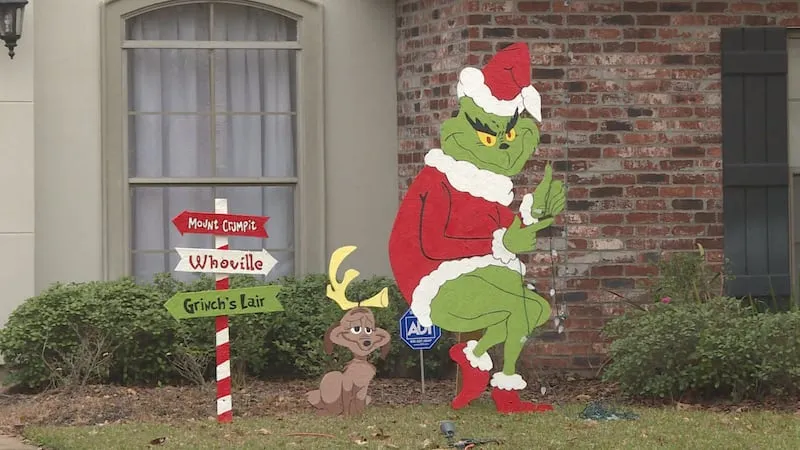
Cheaper route: trace the character shapes from a printed template onto a $20 sheet of exterior plywood, then letter the signs by hand with a $6 paint pen. You land near $70 and nobody on the sidewalk can tell.
Directional signs only read if the arrows disagree. Point one left, one right, one straight up — matching angles turn a signpost into a fence. Keep arrow boards at least 14 inches long so lettering stays legible from the sidewalk, and stagger heights by 3 to 4 inches per sign. Angle the whole post about 15 degrees away from the house so it catches evening light instead of silhouetting against the brick.
22. Lime Green Craft Cones, Mid-Paint
- Sand the cone surface with 220-grit so the acrylic grips — skip this and it flakes within a season.
- Wipe with a damp cloth and let it dry for 10 minutes.
- Brush two thin coats rather than one thick one; thin coats dry in 20 minutes, thick ones drip for hours.
- Dab instead of stroking at the tip where the cone narrows — foam brushes flatten out there and leave streaks.
- Seal with matte acrylic spray after a full 24-hour cure.
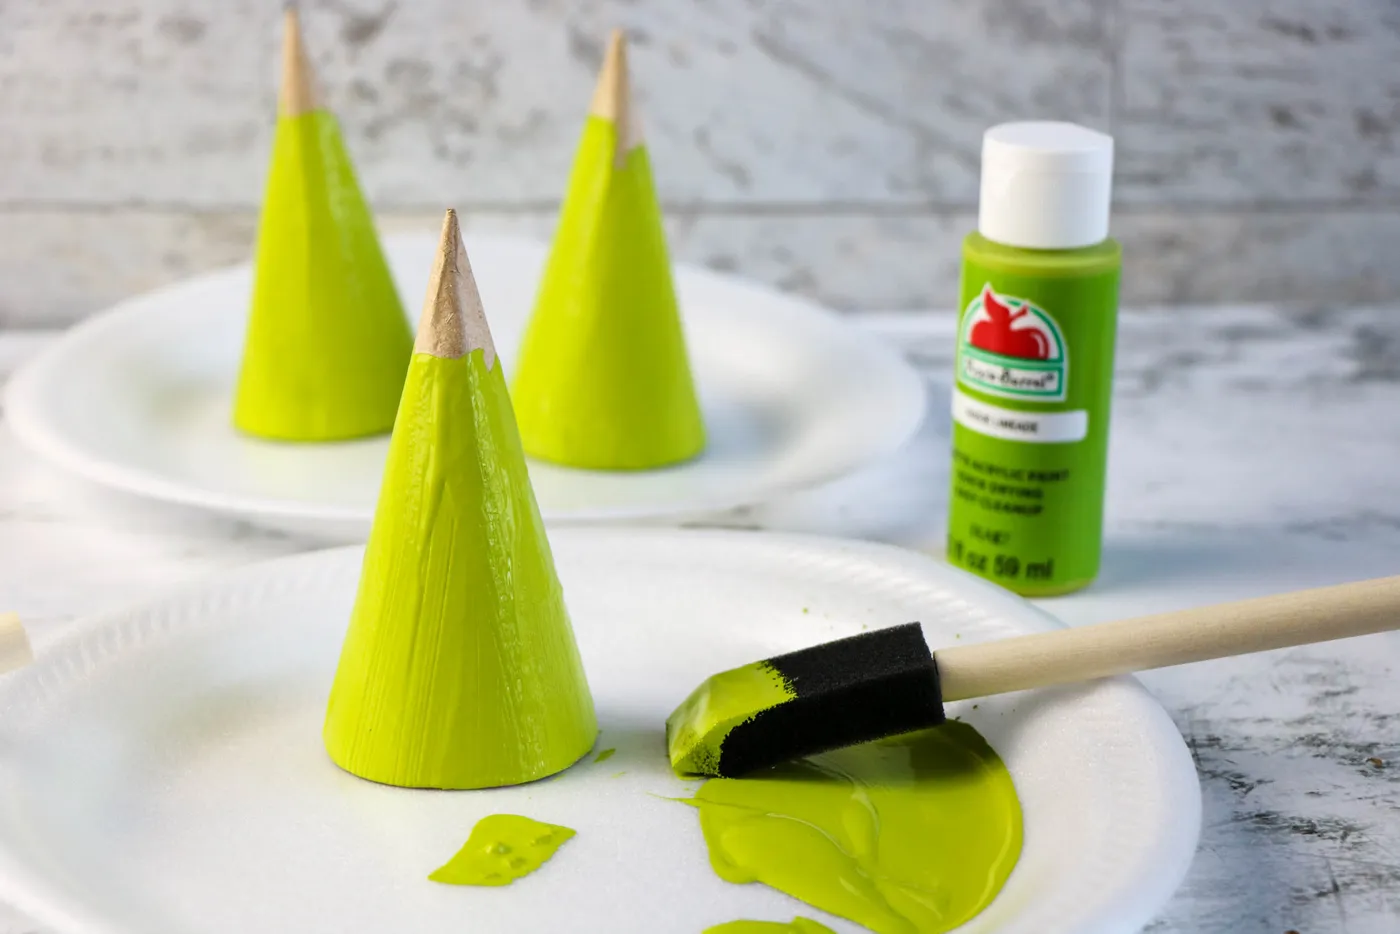
Time: about an hour active, plus drying. Cost: $8 to $15 for paint and cones.
- Check the cone material — foam needs a base coat or the green absorbs and dulls.
- Work on a disposable plate; acrylic stains countertops permanently.
- Have a second foam brush on hand, because they degrade fast with thick paint.
- Test the green against your wall color in daylight, not under kitchen bulbs.
23. Dark Wood Door Dressed in Lit Green Garland
Lit garland on a door looks incredible until the cords show. Run the extension down the hinge side, behind the garland, and secure it with clear clips every 12 inches — anything loose will slap the door in the wind at 2 a.m. Garland hangers that hook over the door top will scratch a dark stained finish, so use adhesive-backed hooks on the brick instead. And weigh your wreath before you hang it; a heavy one can pull a door’s weather seal out of alignment.
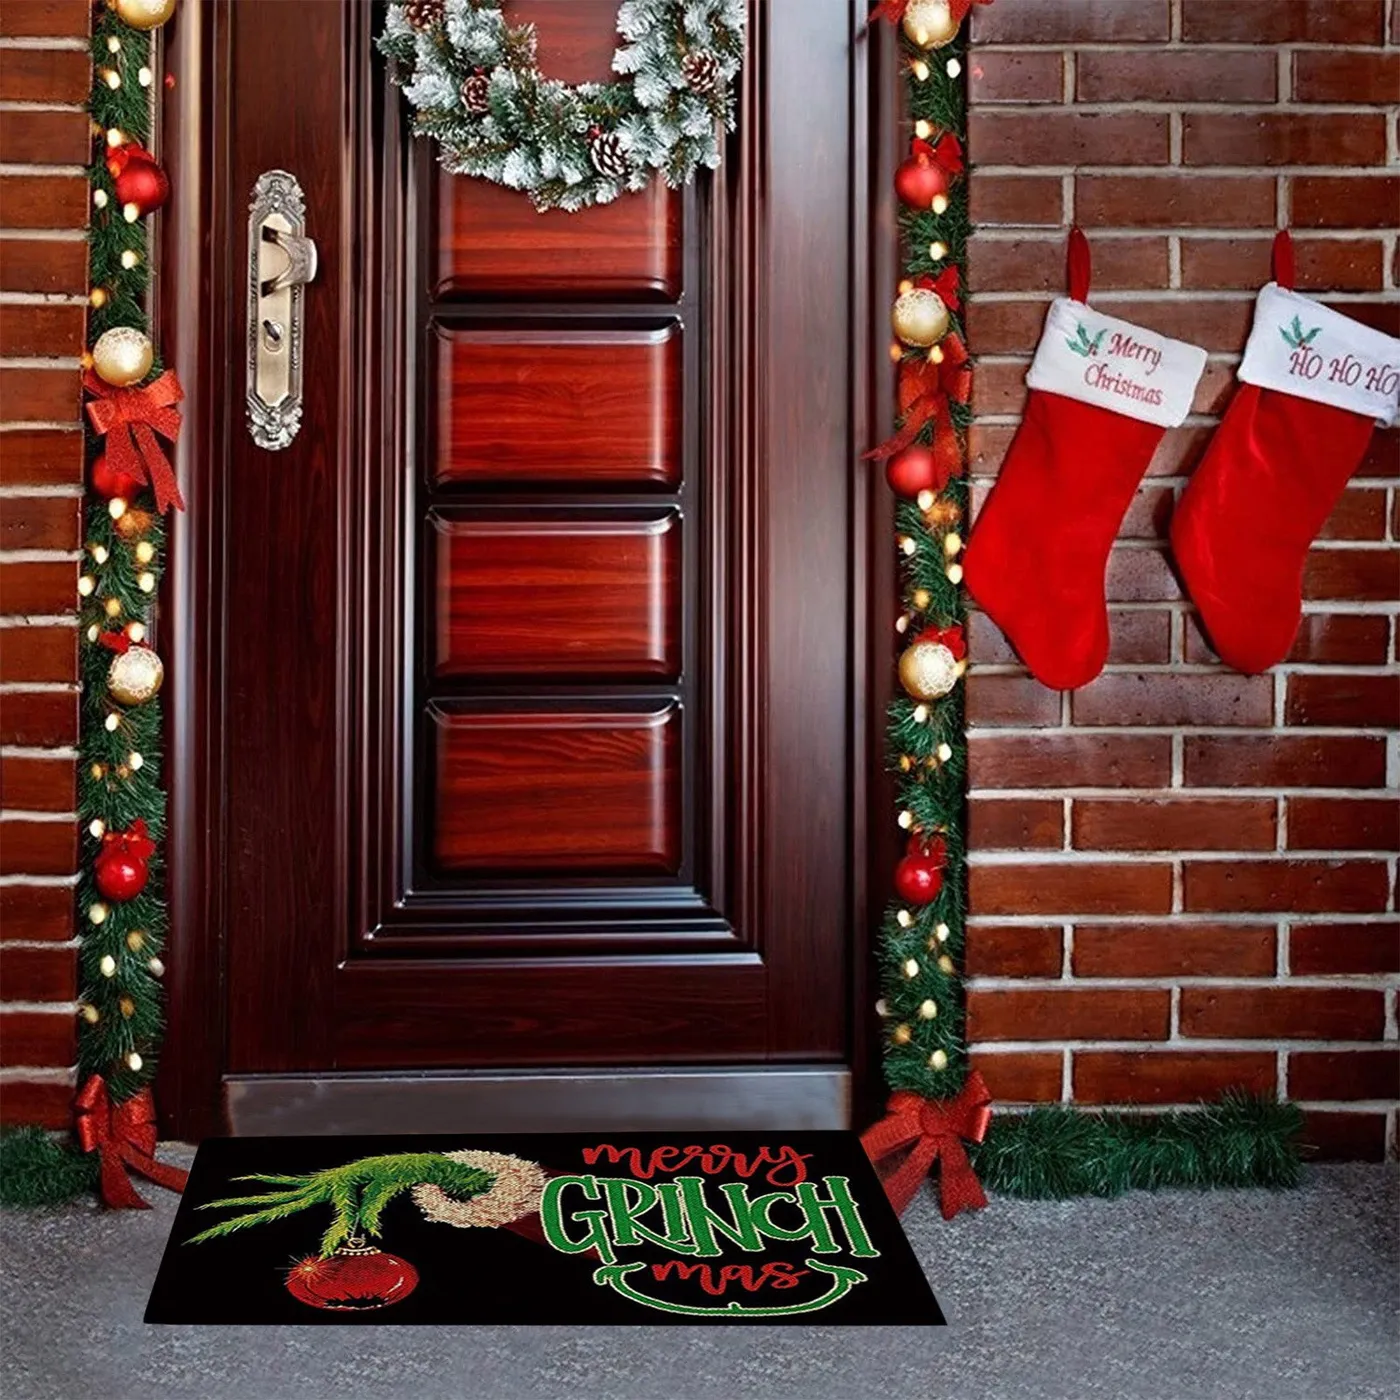
This entryway is 50 percent dark wood, 25 percent forest green, 20 percent red and gold, 5 percent black. The dark door is the reason the green garland reads so richly — on a white door, the same garland looks thin and washed out. If your door is light, bump the garland to a deeper pine with fewer bulbs. And keep the doormat in that 5 percent black zone; a red mat here would fight the stockings.
24. Jeweled Ornament in Emerald and Ruby Facets
Glitter is a commitment. On a hung ornament, expect a fine dusting of gold on the branch and the floor beneath within a month — set a small square of tissue under it if you care. Those faceted gems are glued, not set, so heat above 90 degrees can loosen them; keep this off radiators and out of sun-baked windows. If a gem drops, a dot of E6000 and 24 hours of rest fixes it. Regular superglue fogs clear stones.
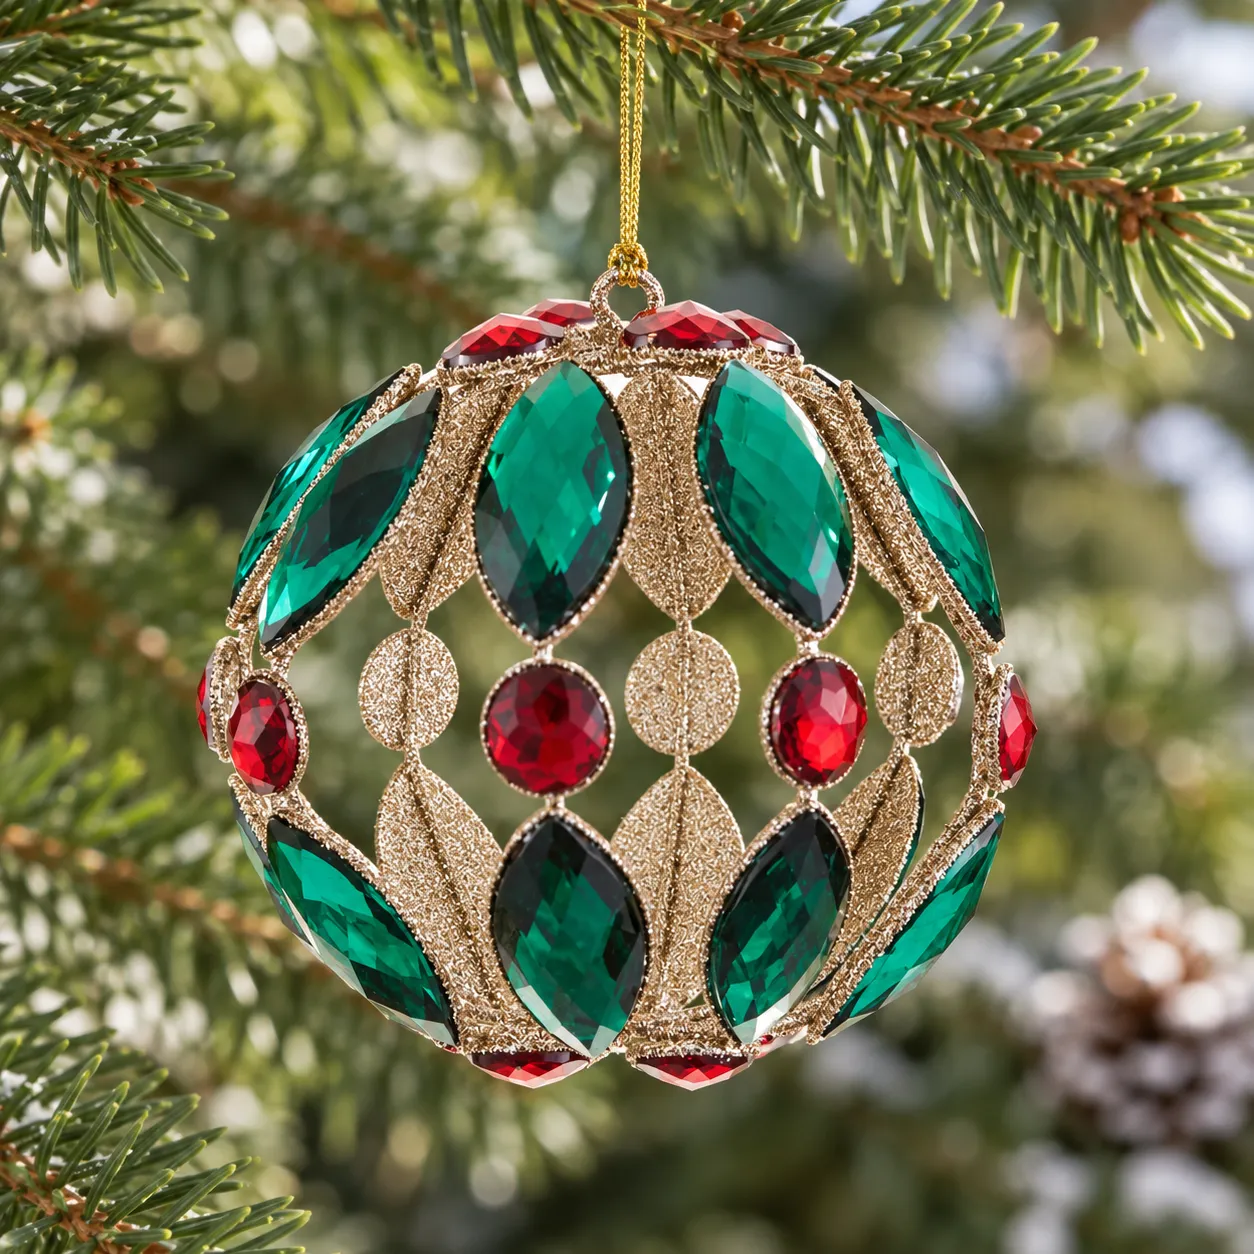
Jeweled ornaments work best as accents, never as a theme. Hang them at eye level and skip the top and bottom thirds of the tree — that’s where the eye travels and where fake gems look cheapest. Cluster three at varying depths so the light hits each at a different angle. Keep a matte ornament directly beside each jeweled one; that contrast is what makes the sparkle look expensive rather than loud.
25. Pastel Whoville Cutouts on Fabric Snow
Two things sell this: the houses lean, and the ground isn’t flat. Real Whoville architecture is crooked, so tilting each cutout 5 to 10 degrees makes them feel alive instead of laser-cut. The white fabric, draped in soft folds, catches warm light and reads as snow far better than batting, which puffs up and looks like a cloud. Keep one vertical element — that bare twig tree — or the whole composition floats off the floor.

Foam board and a dollar-store craft knife get you four house cutouts for under $25. Print your shapes at a copy shop for about $3 a sheet, trace, cut, and paint with leftover acrylics. For the snow, a $10 white flat sheet from Walmart, torn and draped rather than cut, beats anything in the seasonal aisle. Whole scene lands around $60 versus $250 to $400 for custom-painted plywood. Spend your money on paint, not material — the pastels are what sell it.
26. Glowing Inflatable With a Heart on Its Chest
An 8-foot inflatable needs about 5 feet of clearance on every side, or it looks wedged into the yard. On a 40-foot-wide lawn you can run two. On a narrow frontage under 15 feet, a 4-foot version on the porch step works better and won’t block the walkway. Keep it at least 3 feet back from the sidewalk edge, because anything closer gets touched. And check your HOA rules first — that’s where this conversation usually ends.
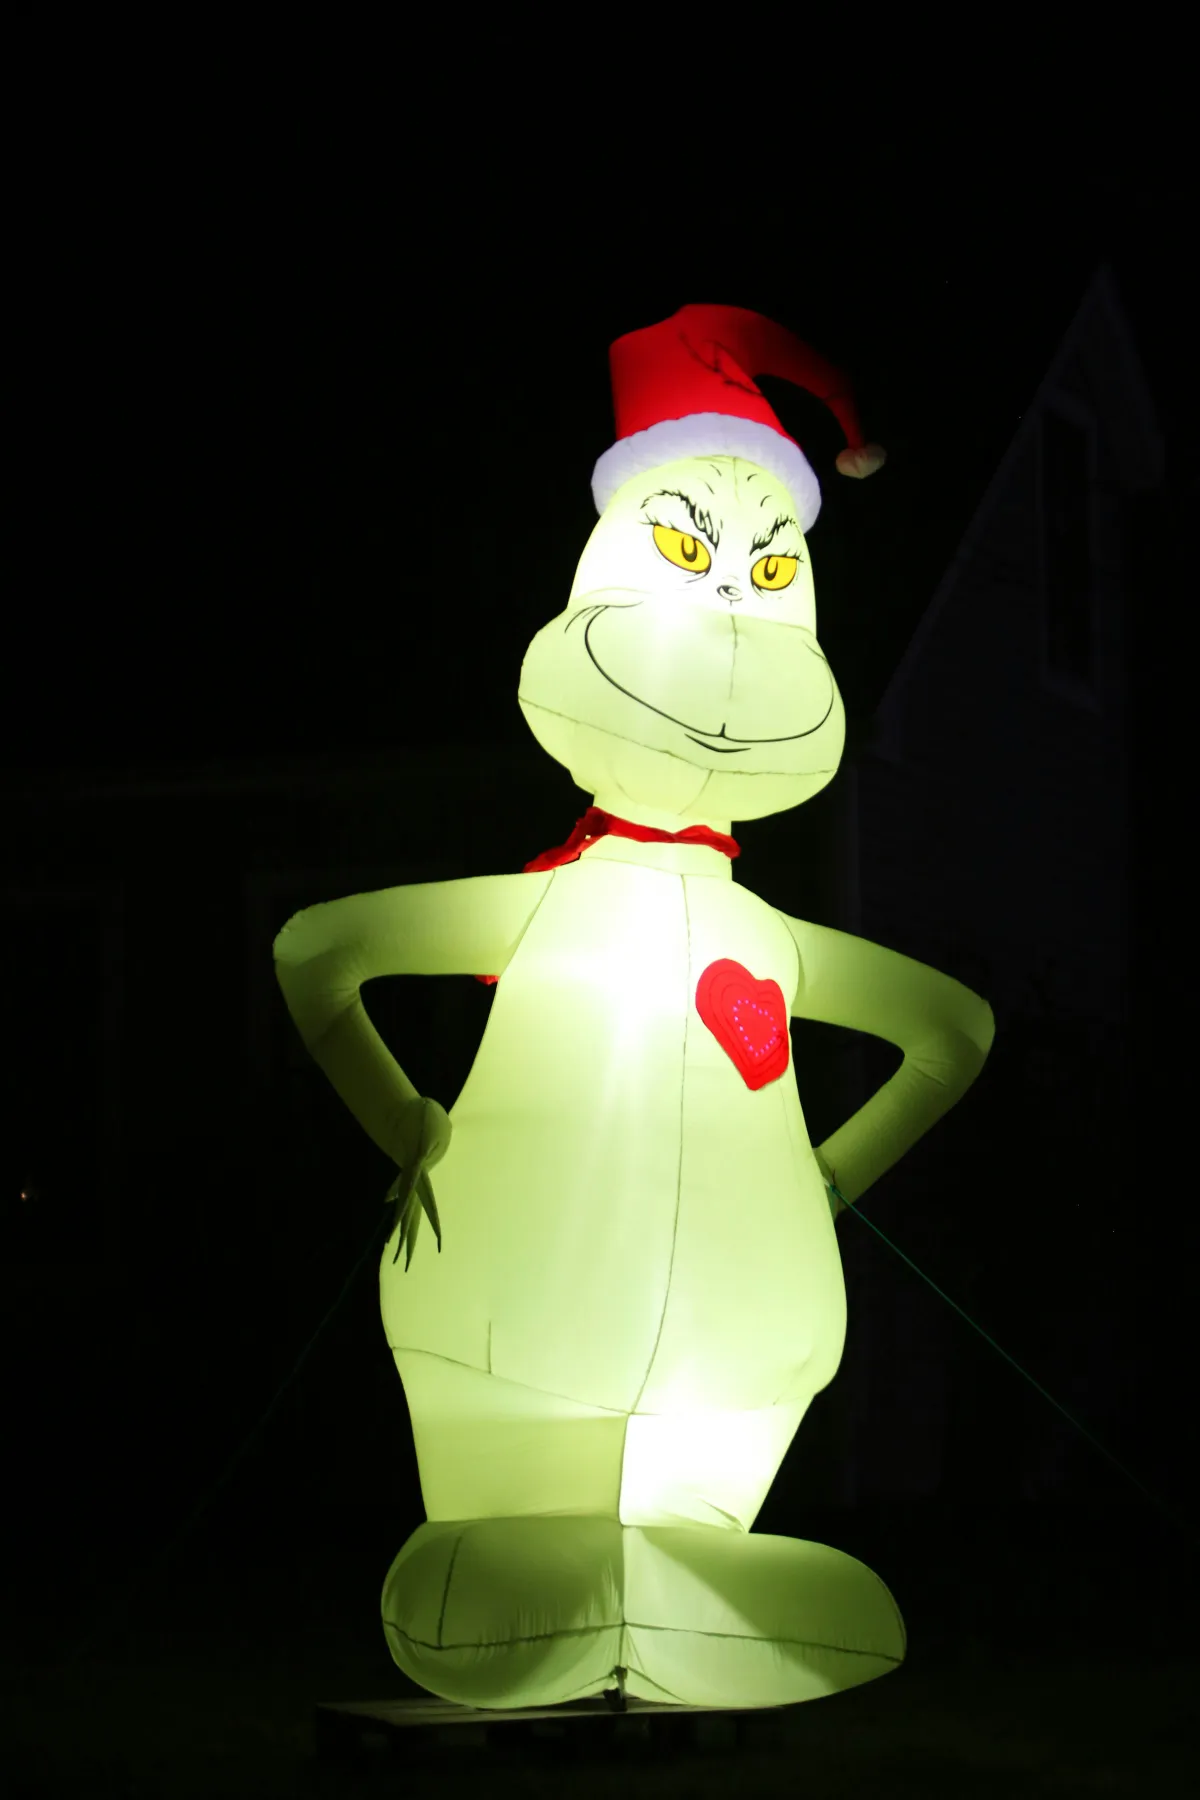
Big inflatables came roaring back around 2020 as people spent more on yard displays, and the 2026 versions are quieter and better lit than the originals: internal LEDs instead of a spotlight, sculpted faces instead of printed ones. The heart detail on the chest is the giveaway that this is a newer piece. Inflatables tend to cycle every six or seven years, and we’re near the top of this one.
27. Hanging Cutouts Above a Heap of Ornaments
The hanging flat cutouts above the ornament pile create depth a plain bowl of baubles never has. You’ve got shiny spheres at table level, matte paper characters at eye level, and a thin gap of wall between them — that vertical separation is the entire effect. Without the hanging layer, this is just a bowl of ornaments. Mount cutouts on 6-pound fishing line and use one clear pushpin per piece so nothing sags over the season.
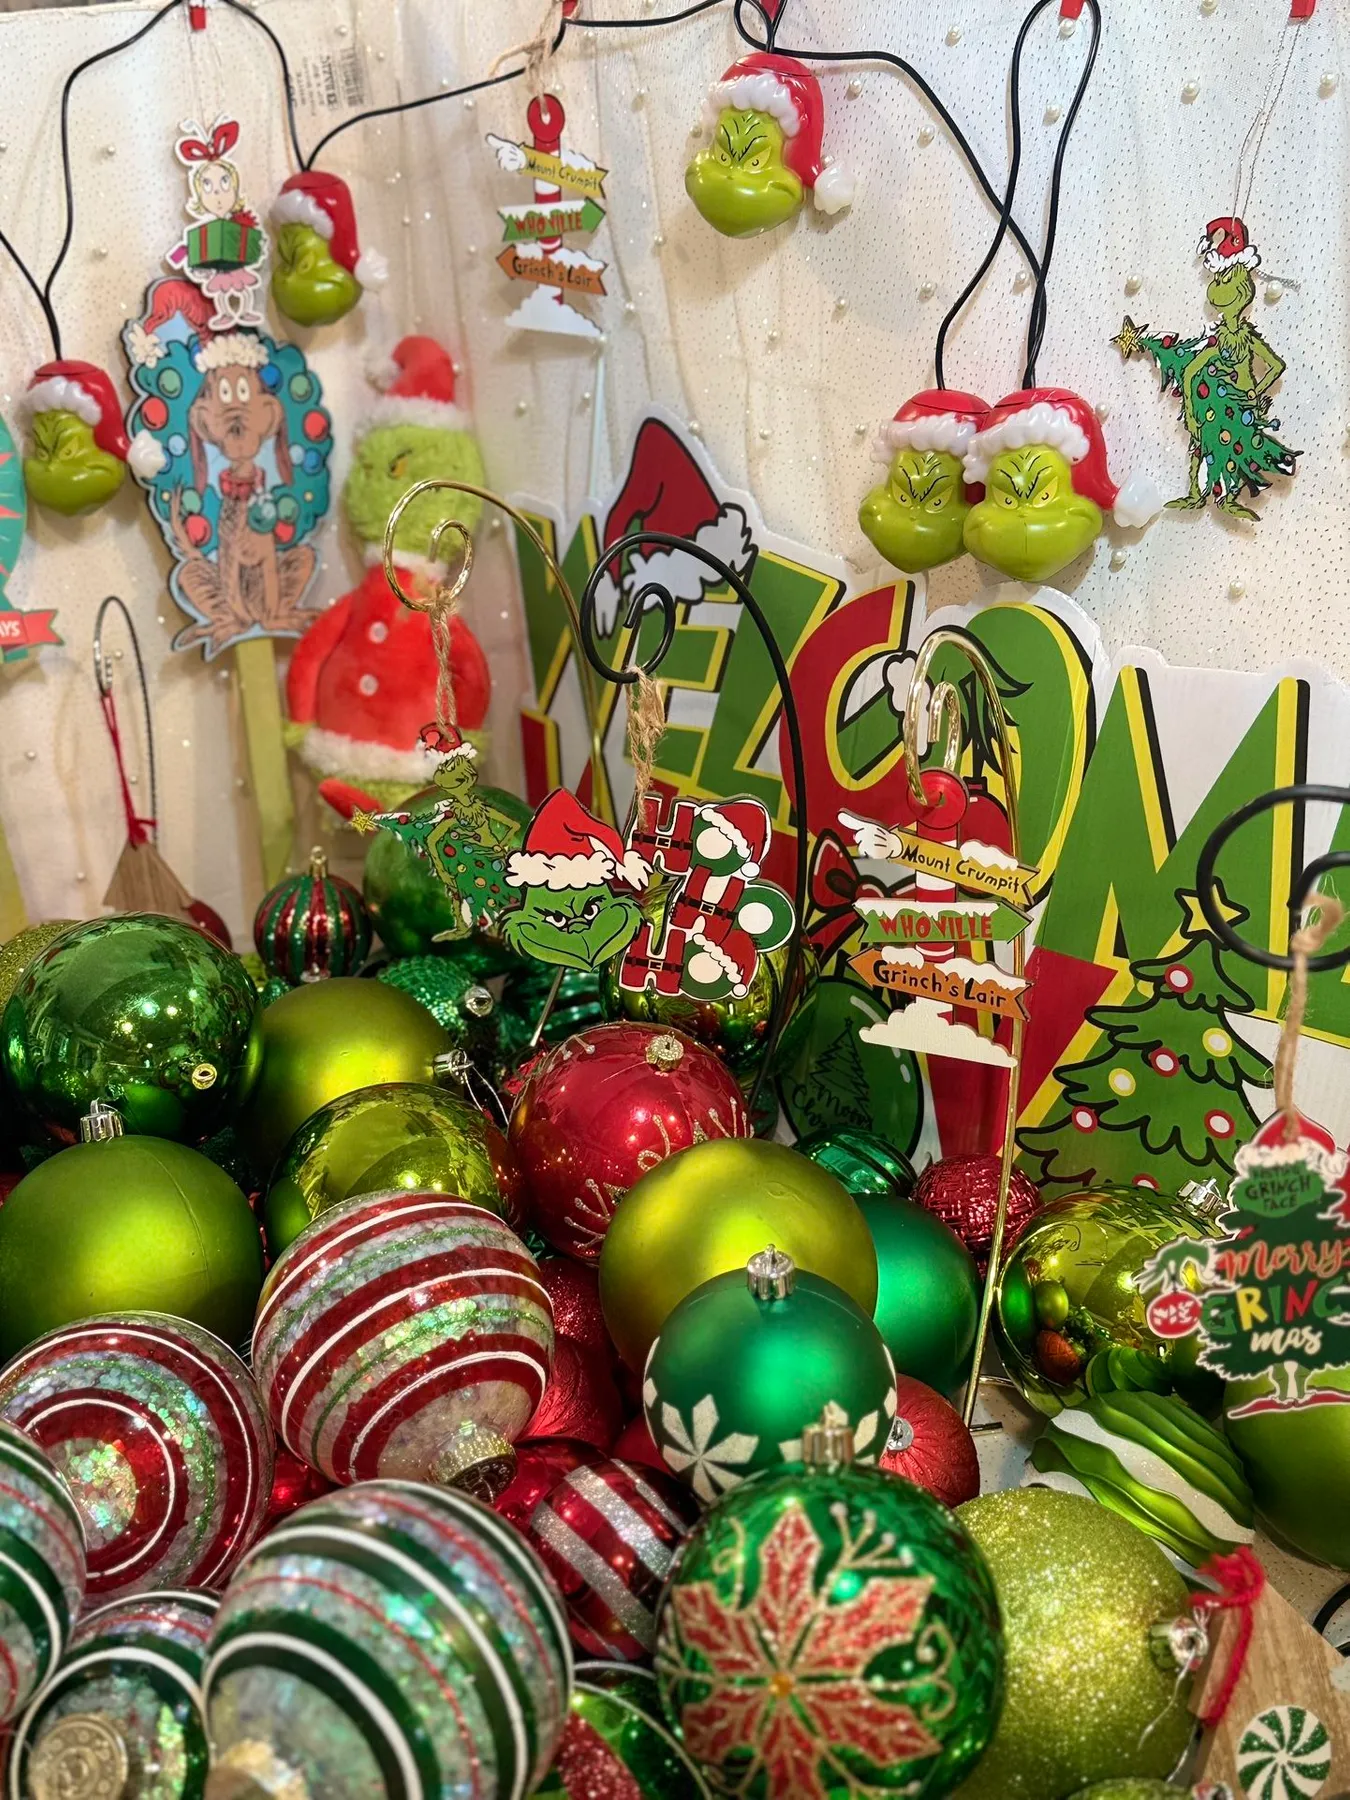
Count the mix: 40 percent solid red and green, 30 percent glitter, 20 percent stripe, 10 percent paper cutout. The stripes keep the solids from feeling heavy, and the cutouts carry the story. Replace the glitter with more solids and the pile goes flat and dark. Replace the stripes with glitter and it screams. Both swaps are cheap to fix — just keep roughly one-third of any ornament pile shiny.
28. Grinch Gnomes With Green Fur Beards
- Cut a 10-by-10-inch square of green faux fur and hot glue it around a 3-inch foam cone, fur pointing down.
- Roll a 12-inch tube of red felt into a cone for the hat and glue the seam.
- Glue a 1-inch white pom-pom to the tip and a strip of white trim around the hat’s base.
- Push a 1.5-inch foam ball through the fur for the nose — green, not flesh tone.
- Add a small red felt heart to the beard and set both gnomes on a round wood slice.

Time: 45 minutes each. Cost: $10 to $16 per gnome.
Faux fur is the one thing worth buying in a larger piece — a quarter yard runs about $8 and makes six gnomes. Cones, pom-poms, and felt come from Dollar Tree at $1.25 a pack. Batch them and you’re under $4 per gnome. Skip the pre-made kits; they’re $15 to $20 for the same materials with less fur, and the wood slice is what makes a pair look custom.
29. A Ceramic Tree Dressed in Whoville Characters
Small ornaments need short chains. If your hangers are longer than 2 inches, the pieces swing, tangle, and obscure the tree’s shape. Swap to 1-inch gold jump rings and hook them directly to the branch tips. Keep density even, too: roughly one character per inch of tree height, worked top to bottom, or the bottom goes bare. Muted palettes forgive a lot, but only when the spacing is regular.

A glossy ceramic tree is heavy and top-tippy, so it belongs on a solid surface, never a shelf edge, and never anywhere a cat can get a running start. Size up the felt pads — three under the base, not one. If it’s vintage, check for lead glaze before letting kids handle it; a $12 home test swab takes five minutes. Reproduction trees are widely available if the original feels too fragile to display.
30. Two Tiers, One Grinch, Zero Floor Space
- Set the tallest item — the mug — on the top tier’s back edge, not the center.
- Place the quote blocks at an angle, propped against each other, so the words stay readable.
- Fill the front of each tier with glitter spheres in odd numbers: three up top, five below.
- Tuck three curly picks behind the spheres, leaning outward, to break the horizontal line.
- Wind polka dot ribbon loosely around the handle and let the tail drape past the bottom tier.
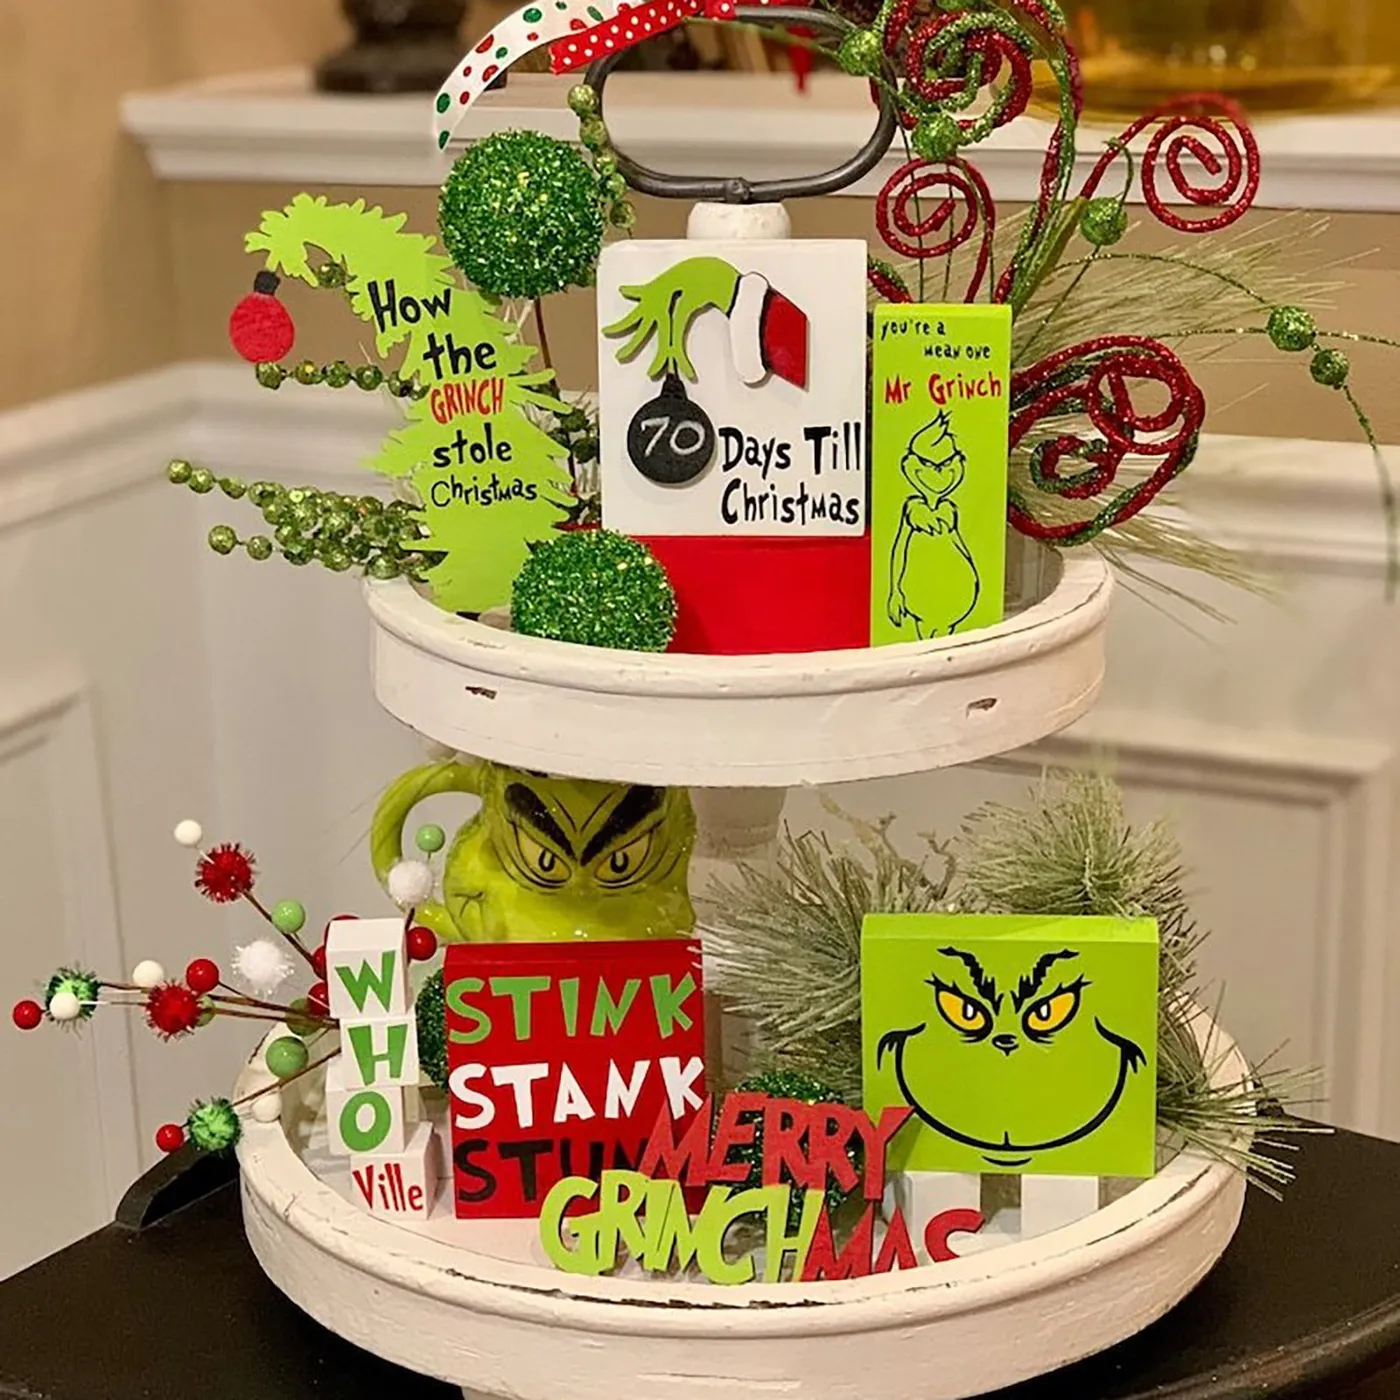
Time: 20 minutes. Cost: nothing if you already own the pieces.
Everything here is either vertical or leaning, which is why a two-tier tray on a coffee table reads bigger than it actually is. Compare with Idea #13 — same styling logic on a much larger piece of furniture, entirely different footprint. Keep the tray’s outer rim visible all the way around. The moment items touch the edge, a vignette looks crammed instead of styled.
31. Mesh Grinch Face With Pipe Cleaner Features
The palette is three colors and one texture: shimmering green, a yellow-and-red eye, and tan burlap. That tan is the sleeper — it reads as a nose rather than fabric because it’s the only matte surface in a wall of shine. The same principle works on a wreath bow or a table runner. Aim for 80 percent shimmer, 20 percent matte. Flip the ratio and the face stops being a face and becomes a green blob.
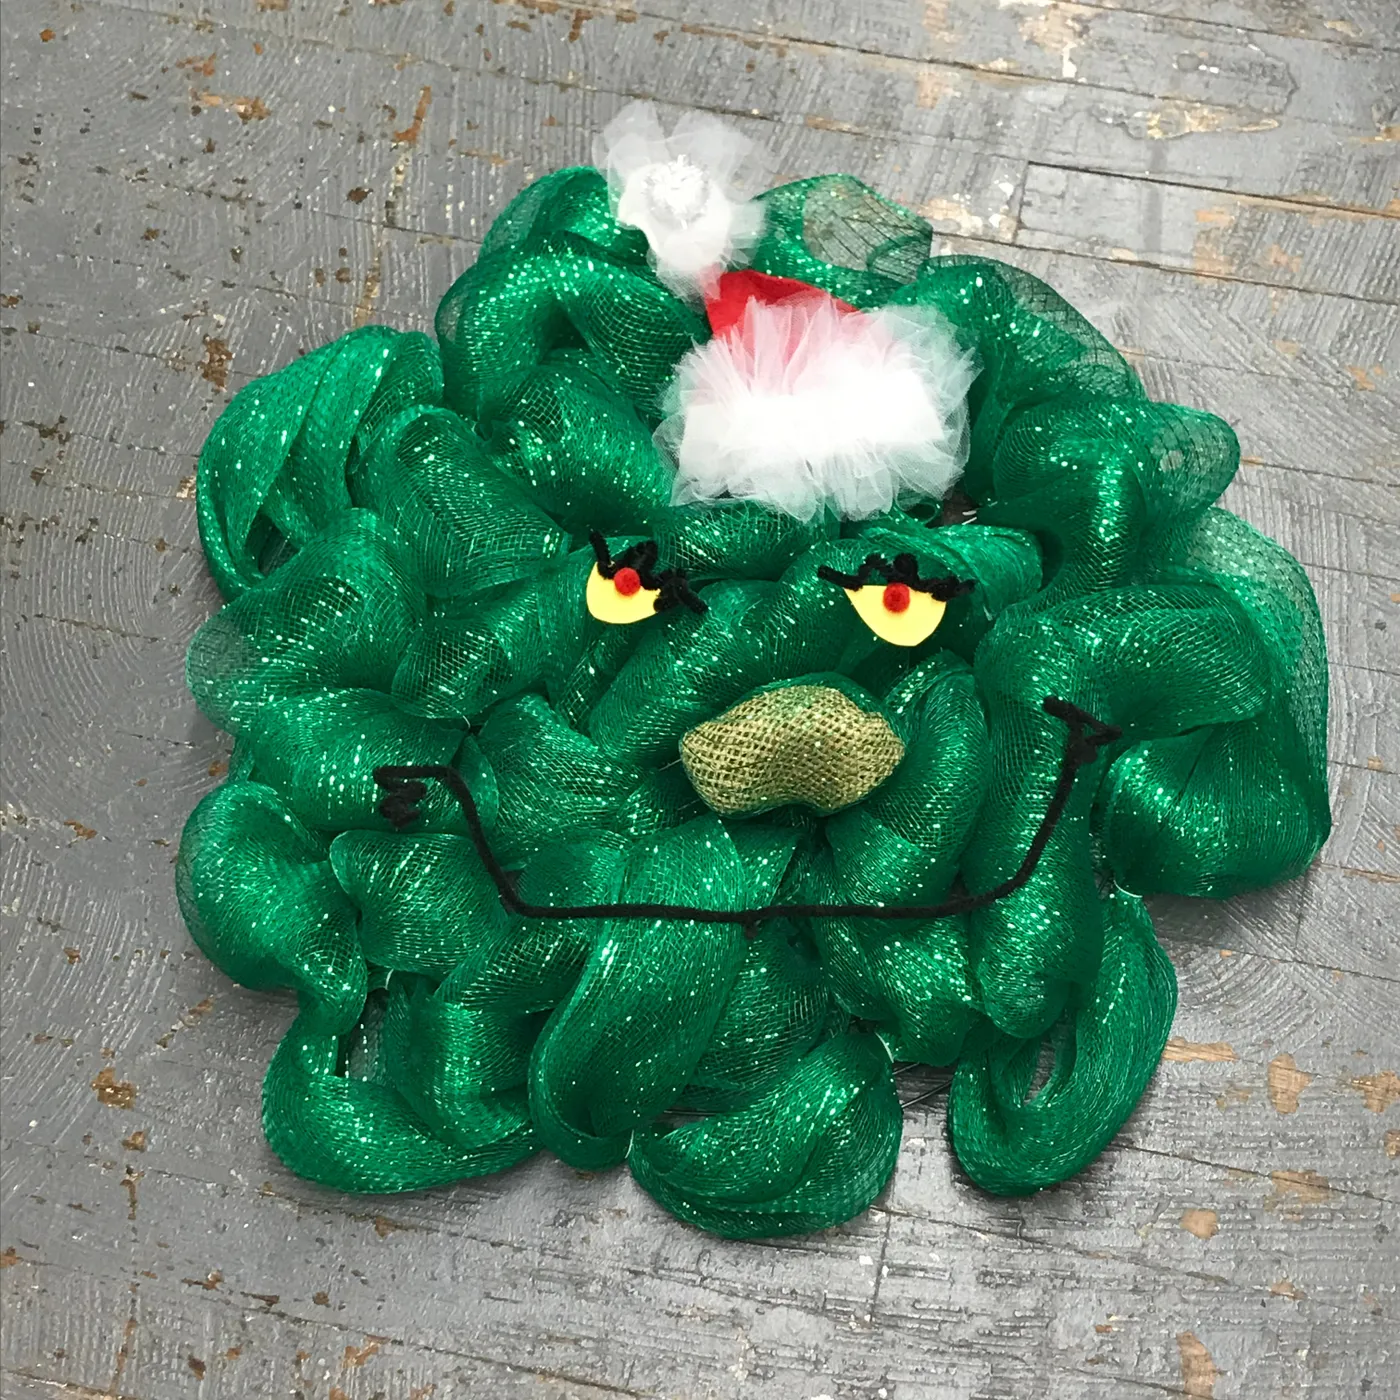
The black pipe cleaner mouth is what gives this face its expression. It’s a $1 item doing the work of a sculpted feature, and it curls up at one corner — that’s the smirk. Swap it for felt and you lose the wire tension that makes the whole thing look drawn rather than built. Keep the mouth about one-third the width of the face; anything wider and it becomes a frown.
Your Greenest Christmas Starts in the Craft Bin
Every one of these ideas started as a small pile of ribbon, yarn, or plywood on someone’s kitchen table — which means the version living in your head is genuinely buildable this weekend. Pick one, keep your greens honest, and let the rest of the block wonder how you did it.
📌 Pin your favorites now so they’re waiting for you when the craft bin comes out.