
Most Christmas window box guides get it wrong — they hand you a pretty photo and skip the part where your window width, your climate, and your actual budget decide everything. We spent real time combing through Etsy, Target, Wayfair, and Lowe’s to pull the window box ideas worth one of your December Saturdays, from a $12 coir liner trick up to a $480 lit arrangement. After filtering through hundreds of options, we narrowed it down to 21 ideas that actually deliver — rustic foraged greenery, traditional red-and-green formality, galvanized farmhouse troughs, and warm-white illuminated displays. In 2026 the whole category has moved past “extra garland” into full exterior vignettes, and warm-white LED window boxes are one of the season’s fastest-rising searches. And stay until the end — we break down the most common mistakes that can ruin these looks. 📌 Save this to Pinterest for later — you’ll want to revisit these ideas.
1. Weathered Grey Box, Red Berries, and Unexpected White Blooms
A 30-inch window box holds about five to six fir stems, and the trick is the angle: lay them at roughly 45 degrees with the cut ends toward the back, so the tips fan out and overlap the box lip instead of standing straight up like little soldiers. Tuck red berry clusters in groups of three at the front third, then place the white blooms about two-thirds of the way across — never dead center. The curly twigs go in last, angled toward the glass so they silhouette against the window rather than disappearing into the greenery.
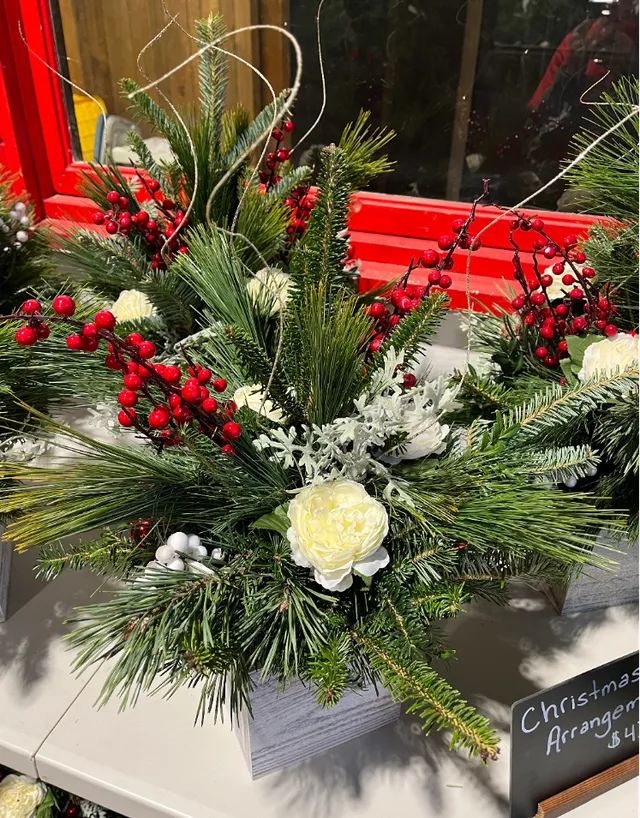
Three things are doing the heavy lifting here. First, contrast: that pale, weathered grey wood is the only cool, quiet surface in a box full of saturated forest green and stop-sign red, which makes the color read brighter without adding more of it. Second, the white blooms are acting as light — in a shaded window box they bounce the same way a mirror would. Third, the curly twigs break the rounded silhouette of the evergreens, so the arrangement has an outline worth looking at from the street.
2. The Cottage Sill Vignette: Garland, Brass Candle, Santa Doll
Call it sill-scaping: the return of the layered window sill as a decorating moment, not just a place to drop a garland. The brass candlestick, the white taper in its clear glass hurricane, the slightly kitsch Santa doll in red with green shoes — this is the nostalgia-forward, granny-chic Christmas that’s been building on Pinterest for several seasons and shows no sign of cooling in 2026. What makes it stick is that it’s cheap to build from things people already own, and it photographs beautifully against an olive-green wall.
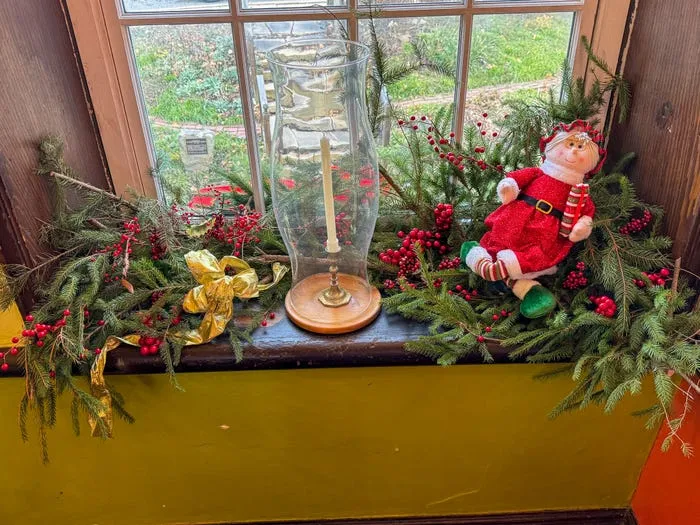
Take away the hurricane lamp and candlestick and this sill is just another pine garland with berries. The lamp is the only vertical element and the only warm light source, so it’s carrying both scale and glow at once. Aim for the candle holder to be about a third the height of your window opening, so it feels deliberate rather than leftover. It also gives the eye a pause point between the garland’s density and the Santa doll’s busy little silhouette.
3. Blue Berries and a Wire Star Against Red Brick
The formula is 50% evergreens, 25% silver and white, 15% blue berry accent, 10% warm light. That last 10% is what keeps the cool blues from reading cold — warm white bulbs, not pure white, and plenty of them. Swap the blue berries for burgundy and you get something more classic; swap them for pale grey-green eucalyptus pods if your house is grey. The silvery foliage stays in every version, because it’s the neutral that holds the blues and the greens together.
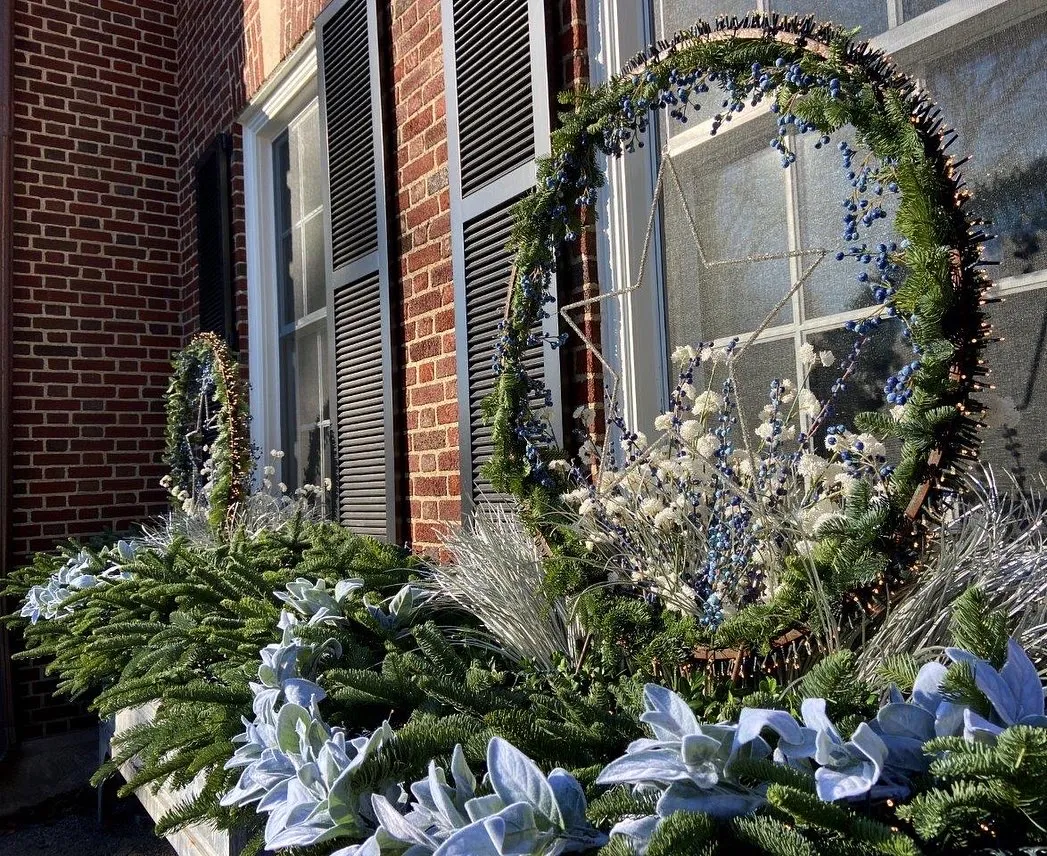
Hang the star wreath so it overlaps the top or bottom third of the glass, never the center — you want to see window, not just decor. On brick, skip suction cups entirely; they fail the first time the temperature drops below freezing. Use a brick clip or a hook that tucks under the top sash, and check the weight rating, because a lit wreath plus a wire star runs five to eight pounds. Position the star’s center near eye level, about five and a half feet off the ground.
4. White Box, Snow-Dusted Pinecones, Slim Red Berries
- White window box: $35–$90
- Long-needle and feathery evergreen branches: $40–$80, or free from tree trimmings
- Red berry stems: $12–$25
- Pinecones with snow spray: $10–$20
- Coir liner and potting soil: $15–$30
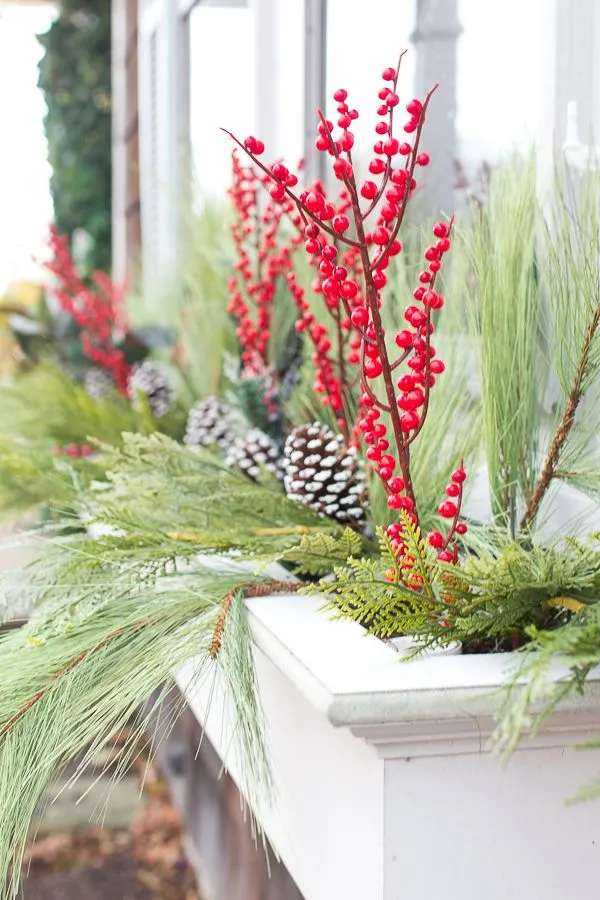
Total: $112–$245 for one window box. Budget alternative: spray-paint a plastic planter white ($12), ask your tree lot for cut-offs the afternoon of the 24th, and use dollar-store berry stems. You’ll land near $35 and it reads almost identically from the sidewalk. Prefer bows to pinecones? See Idea #13.
Two honest warnings. If you’re using real berries in a cold climate, expect them to freeze, drop, and stain whatever sits below — faux berry stems survive winter far better and passersby genuinely can’t tell. Second, that pretty snow-dusted pinecone finish is spray-on, and the first hard rain washes it into your soil. A white box also shows sap drips, mud splashes, and road salt fast. Light grey gives you the same bright look with about half the wiping.
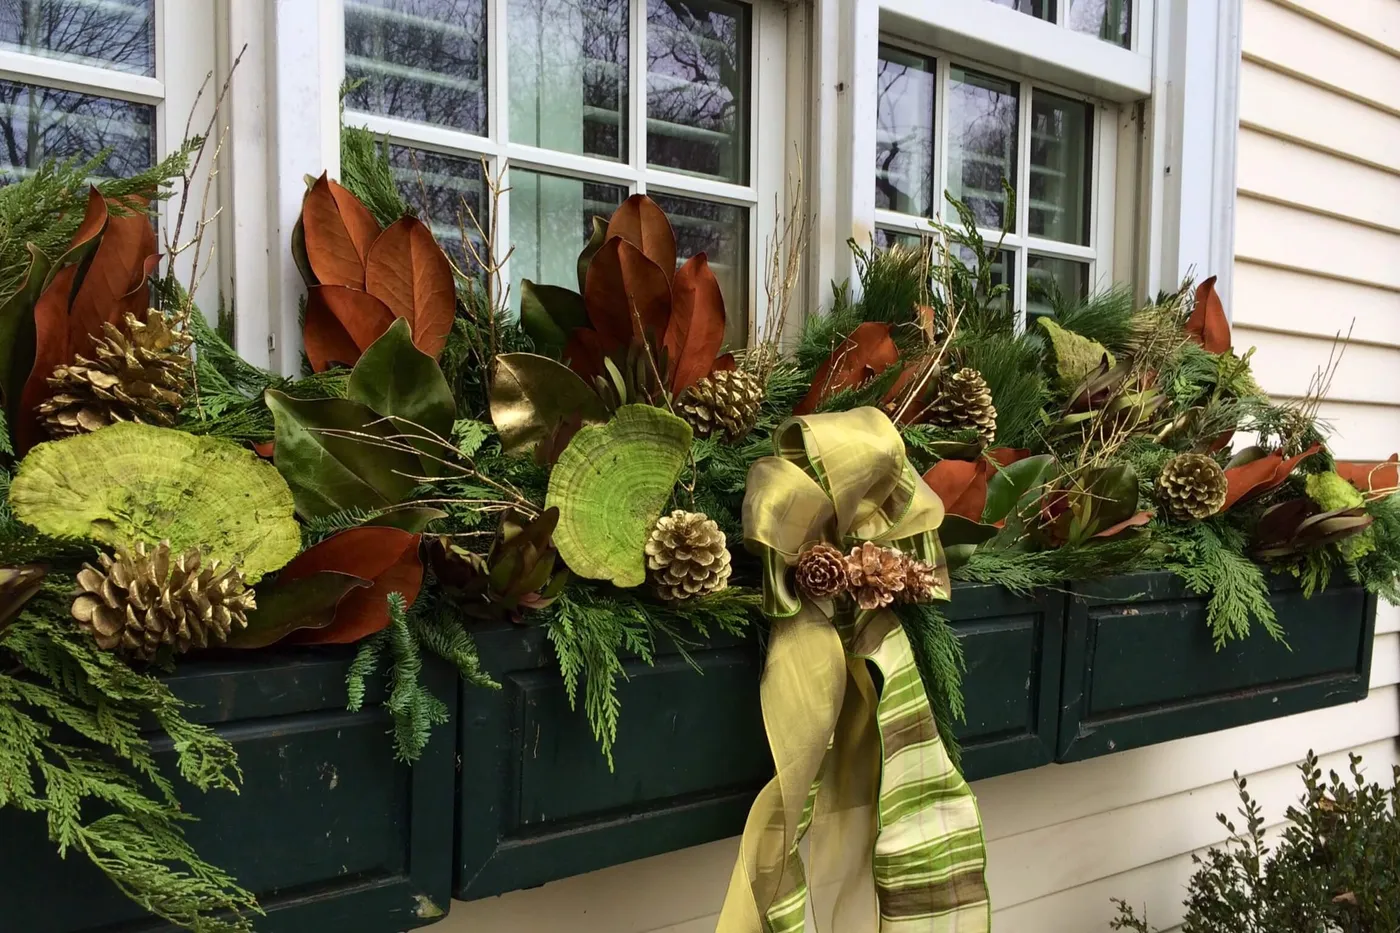
5. Magnolia Leaves, Gilded Pinecones, Striped Ribbon
Gilding pinecones takes about 40 minutes plus drying time, and costs under $15.
- Bake clean pinecones at 200°F for 30 minutes to kill anything living in them, then cool completely.
- Tie a loop of florist wire around the base of each cone so you have an anchor point.
- Spray a light coat of gold metallic paint from 10 inches away — one pass, not three.
- While wet, dust the tips with fine gold glitter over a paper plate so you can pour the excess back.
- Dry 24 hours, then tuck them in with the un-gilded side facing the street.
The olive-and-cream striped ribbon hanging from the center does more than any of the foliage. It’s the single element that tells your eye a person arranged this on purpose — the magnolia leaves and gilded cones, gorgeous as they are, read as “forest” without it. The ribbon also drops below the box edge, visually tying the planting to the siding instead of letting it float. Use a wide wired ribbon; cheap satin will be a wet string by January.
6. Galvanized Trough, Warm Lights, and a Metal Ring
Galvanized metal is the low-maintenance hero of this look — rust spots are part of the charm, so you can genuinely ignore them. What needs attention is the lighting. Check every connection after the first hard freeze, because contraction is what kills cheap strands; outdoor-rated LEDs with sealed plugs last three to five seasons, the two-dollar ones last one. Expect to re-wire once a year and replace any strand sitting in standing water. Empty the trough in late February so ice doesn’t bow the metal out of shape.
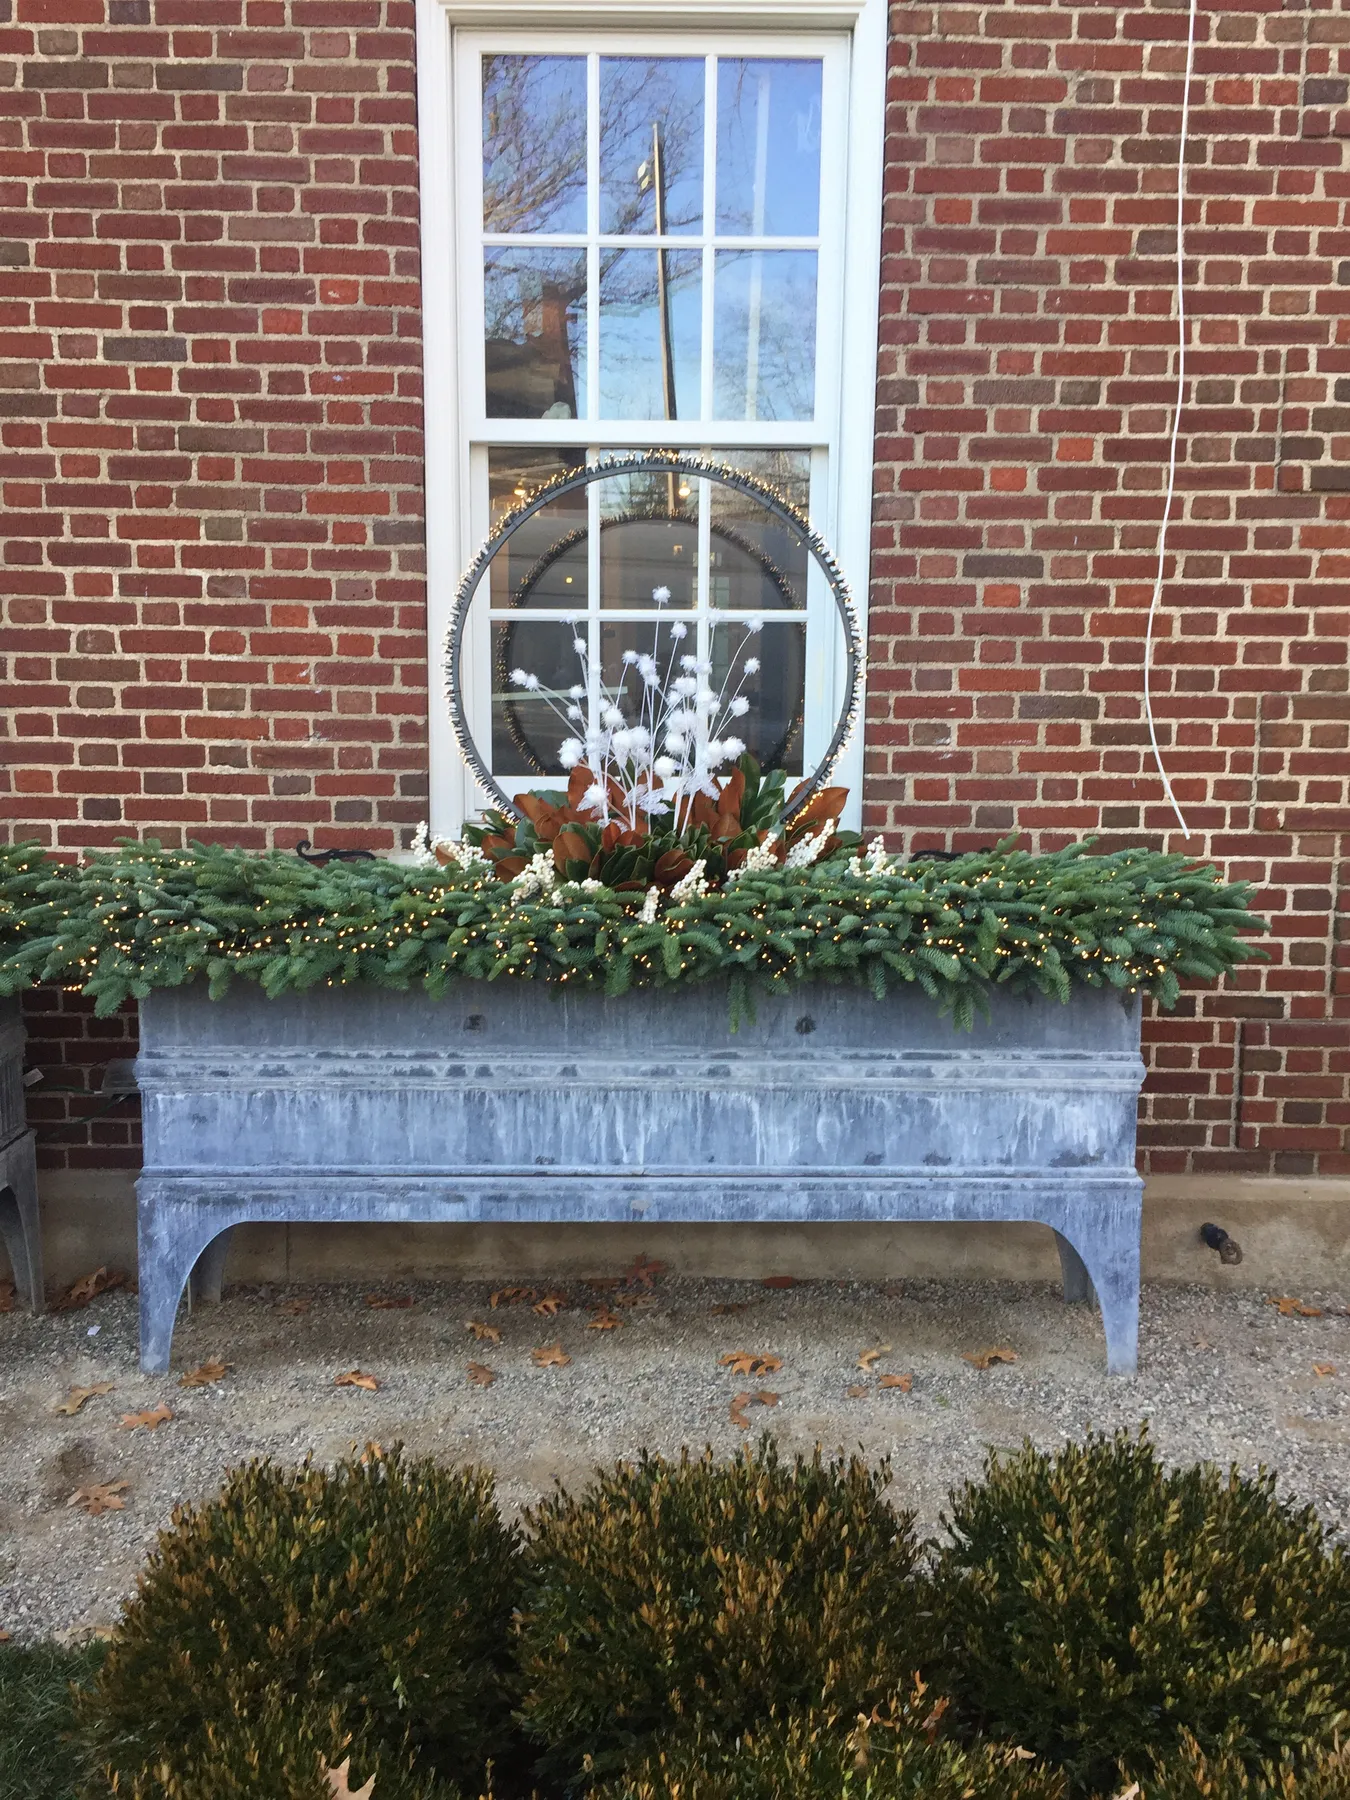
You don’t need a $180 galvanized trough. A farm supply store sells the same thing in the livestock aisle for $40–$70, and a big-box garden center version runs $30–$50. Warm-white LED strands are $8–$15 at Target or Walmart. That big circular light frame can be faked with a $12 hula hoop spray-painted matte black and wrapped in the same strand. Total for the whole look: around $90 instead of $300.
7. Coir Liner and Orange Berries on Dark Casements
Coir-lined boxes need at least 8 inches of depth and 10 inches of width to hold evergreens without looking like a plant squeezed into a shoe. This arrangement works best on windows 30 to 48 inches wide; anything under 24 inches should drop to three stems and one pinecone cluster or it will crowd the glass. Width matters more than people think — an 18-inch box with tall greens reads top-heavy from the sidewalk, while a 36-inch box with the same planting looks intentional. Check your sill overhang too; anything over 12 inches blocks light into the room.
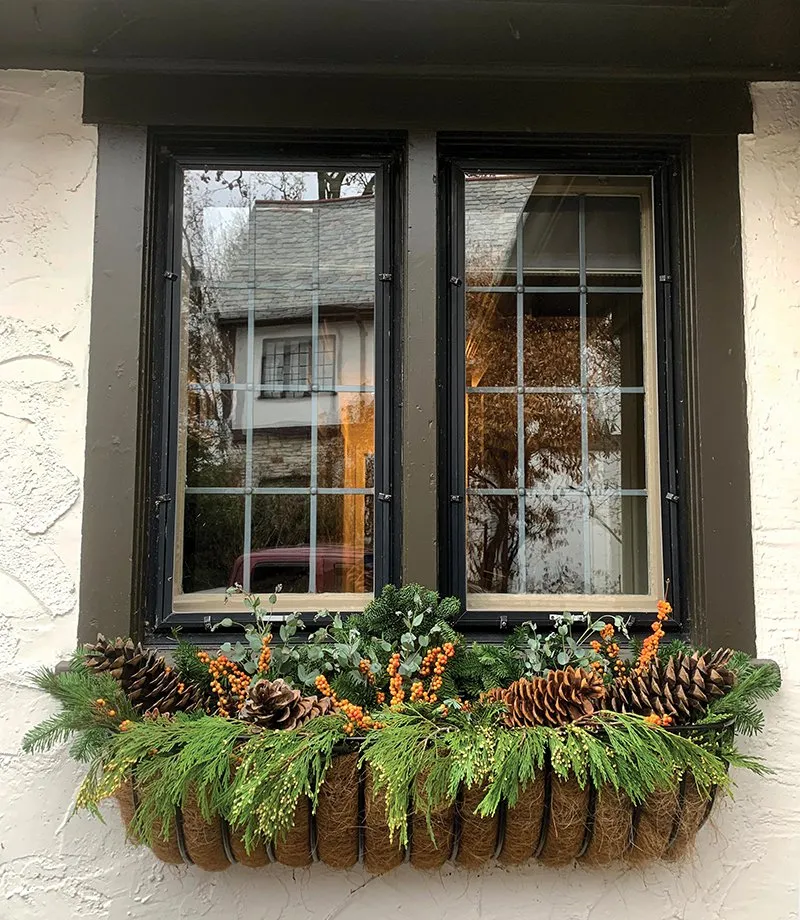
The orange berries are the quiet genius here. Swap them for red and this becomes a thousand other window boxes; orange against an off-white wall is slightly unexpected, and it picks up the warmth in the pinecones. The coir liner matters too — it hides the mechanics and adds a rough, natural texture that makes the whole thing read as grown rather than assembled. Then the large pinecones repeat at irregular intervals, giving the eye somewhere to land without feeling regimented.
8. Chartreuse Foliage and White Blooms in a Dark Box
This is a 60/25/15 formula: 60% chartreuse foliage, 25% white flowers, 15% deep green understory. The dark box isn’t a color in the mix — it’s the frame, and you should treat it the way you’d treat a black picture frame around a bright print. Swap chartreuse for silver-grey and the whole thing turns frosty and formal; swap the white blooms for soft pink and you get a spring-forward version that works from February through April. The proportions stay identical, which is the entire point of having a formula.
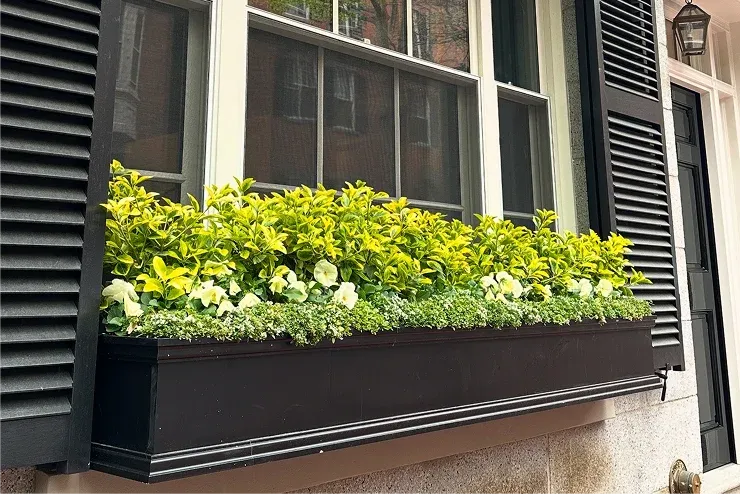
Chartreuse foliage is gorgeous and slightly high-maintenance, and it’s worth knowing that before you commit. Most plants in that bright yellow-green range — creeping jenny, golden oregano, heuchera — go dull or mushy once temperatures drop below about 25°F, so this is really a mild-winter or post-holiday look. In zone 5 and colder, plan on kale or wintercreeper for the same bright effect. Black boxes also heat up fast in direct southern sun, which dries shallow plantings faster than you’d expect.
9. Black Box, Magnolia Leaves, Green-Wire Lights
Green wire disappears inside green foliage — as long as you run it in the right order. Start at the back-left corner, run the strand along the rear edge first, then weave forward through the planting in a loose S. Budget one 100-bulb strand per three feet of window box; more and you’ll see wire, less and you’ll see dark gaps. Magnolia leaves dry out in about two to three weeks, so mist them lightly or go faux. If you’re buying real magnolia, ask for the brown-backed stems — that two-tone underside is the whole reason the leaves look expensive.
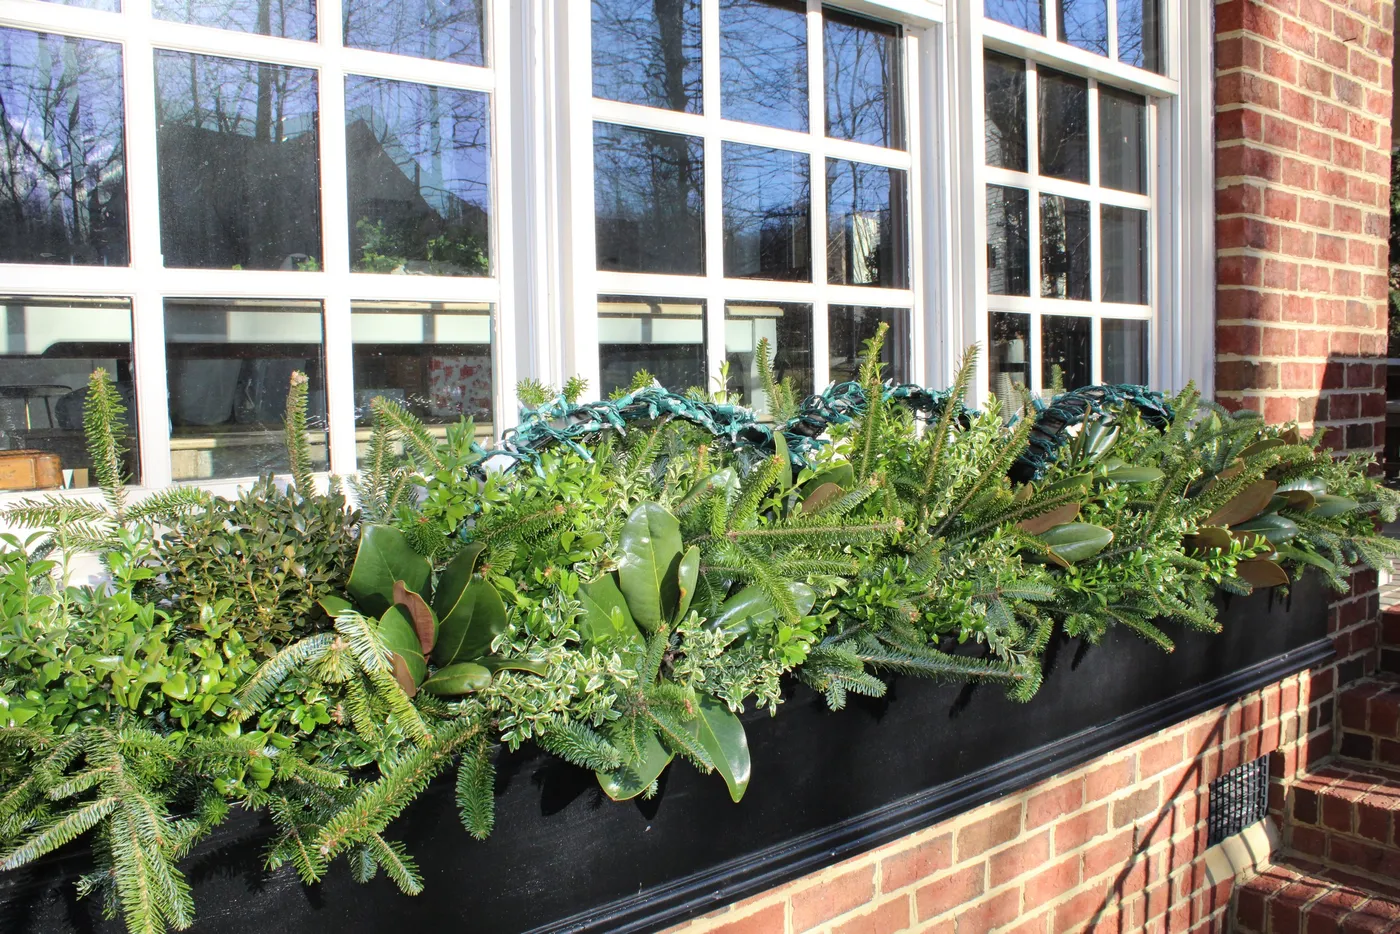
Real magnolia is the pricey part of this box, often $8 to $12 a stem. Buy three real stems for the front where people actually see them and fill the back with cheaper pine and fir. Faux magnolia sets run $10–$20 on Amazon or at Target and last for years. For the box itself, Facebook Marketplace is full of used window boxes in January for $15–$40. You can pull the full look for under $80 if you shop the week after New Year’s — compare with Idea #6, where a metal trough does the same job.
10. Sunlit Evergreens and Clear Bulbs in a Black Box
Quiet Christmas is the phrase designers keep reaching for in 2026, and this is what it looks like: no red, no glitter, no theme — just good greenery and warm light. Search interest in warm-white LED window box lighting has been climbing for three straight seasons, partly because of energy costs, partly because people are tired of storing bins of themed decor. The verdict on staying power: this one lasts, because it works inside any year’s color story. Change the ribbon next December and you’ve updated the entire display for four dollars.
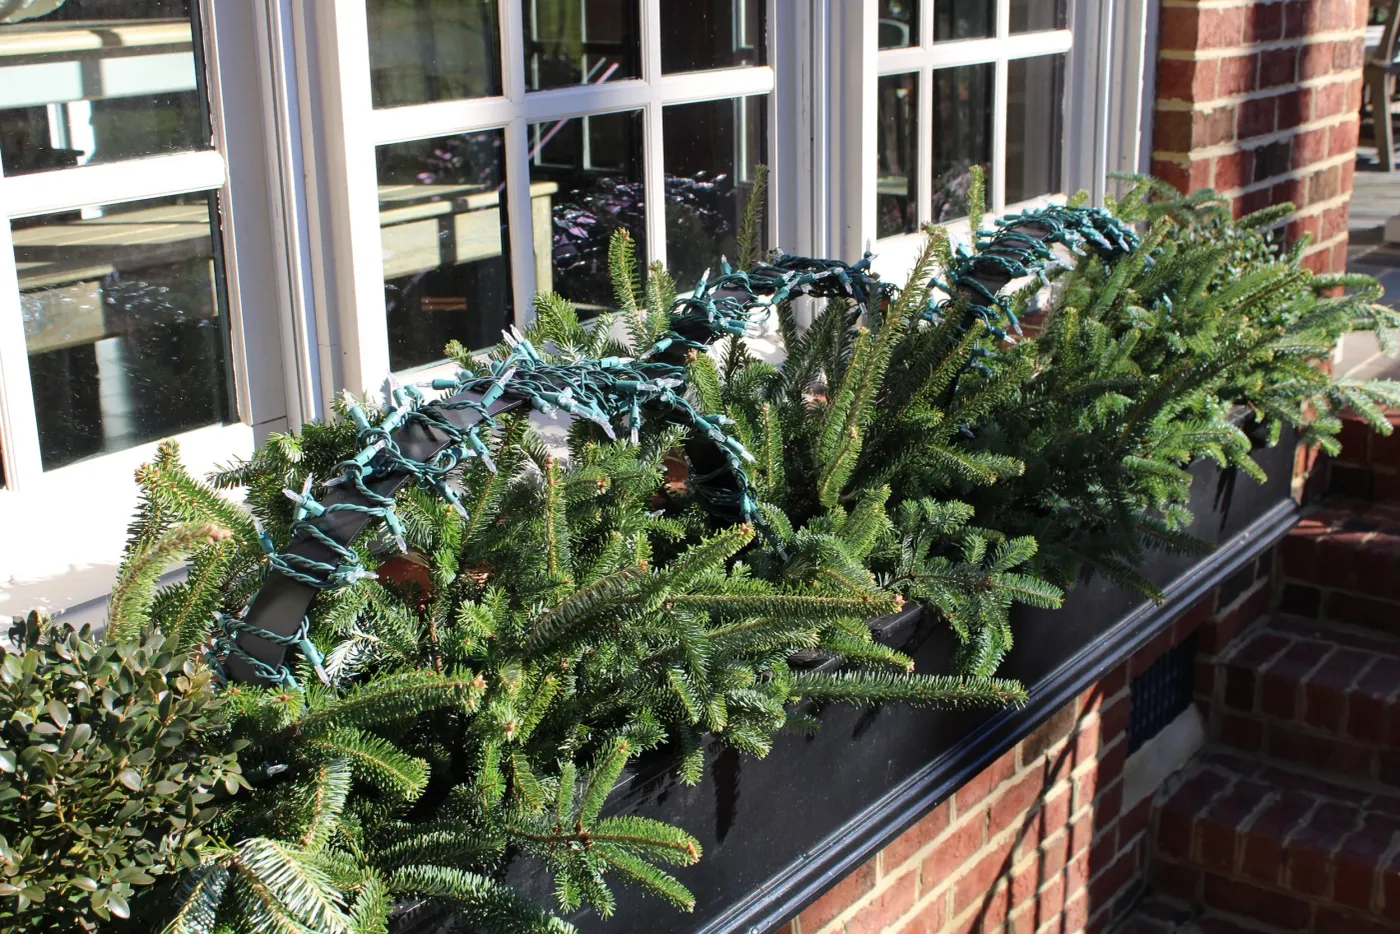
Clean light installation takes about 25 minutes per box.
- Drill a 3/8-inch hole in the box’s back panel just above the soil line, and thread the cord through it.
- Run the cord behind the box and down the wall, securing it with outdoor-rated clips every 12 inches.
- Weave the light strand from the back of the planting forward, so wire always stays behind foliage.
- Finish with a drip loop — a small downward loop of cord just before the plug — so water never runs into the socket.
11. Black Metal Arches and Clear Bulbs Before Planting
Check these before you buy a single stem:
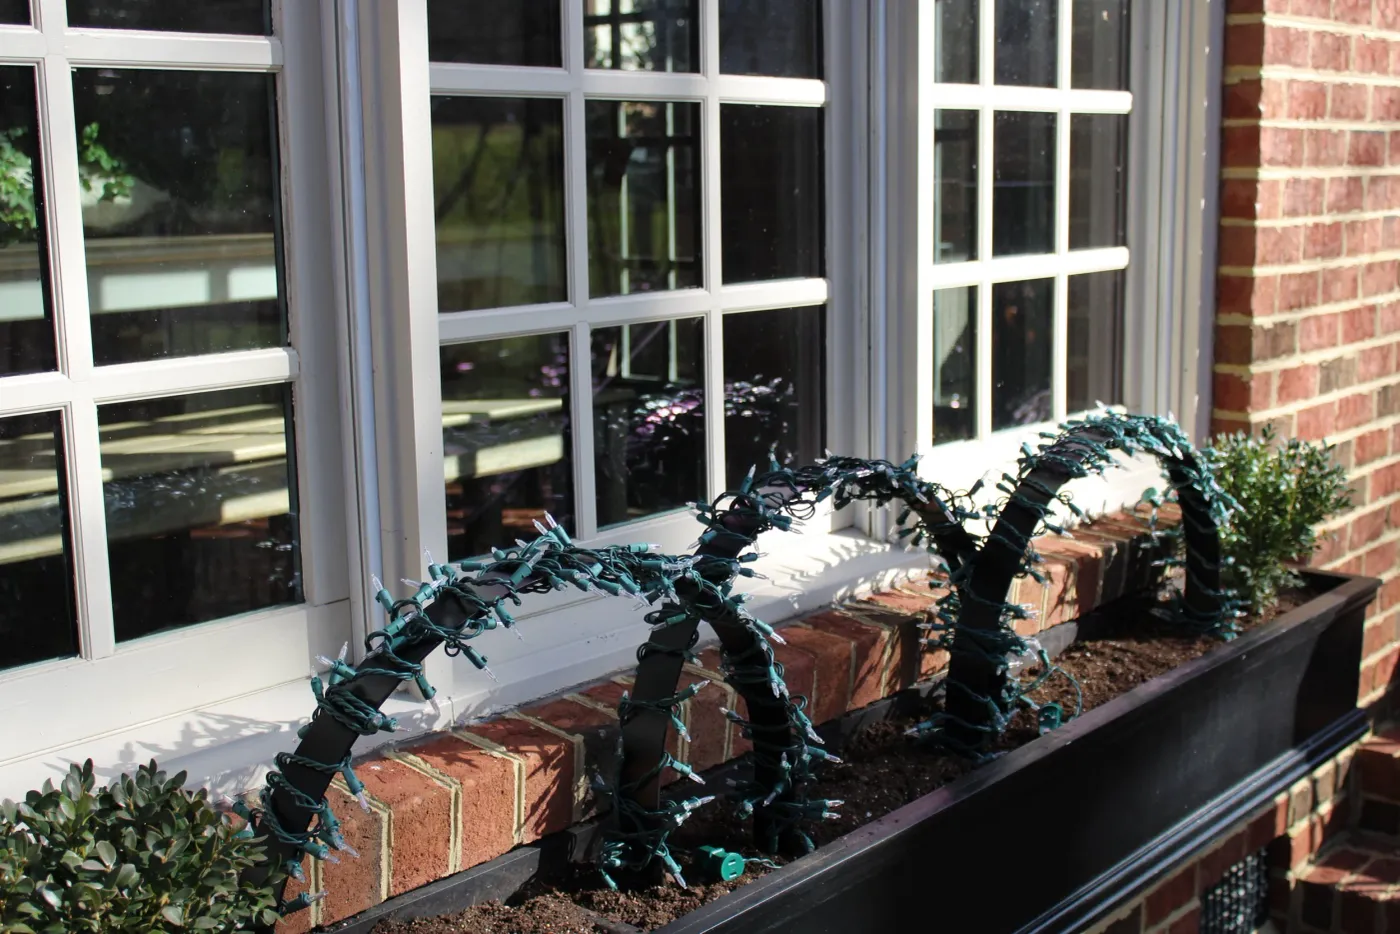
- Measure interior box depth — arch structures need 10 to 12 inches front to back, and most decorative arches run 12 to 18 inches tall.
- Confirm the box has drainage holes, or plan to drill them. Standing water plus freezing equals cracked metal.
- Find your nearest outdoor outlet and measure the cord run — allow three extra feet.
- Test the arches in the empty box to make sure they don’t block the lower half of the glass.
- Set a total budget before you shop; this look gets expensive fast when foliage and lighting land in the same cart.
The arch setup is the most forgiving shape in this whole roundup, which is why it works on almost any window. Minimum useful box width is 24 inches; three arches spaced evenly need about 8 inches of clearance each. It’s also the best option for deep sills, because the structure holds greenery away from the glass instead of pressing against it. Under 20 inches wide, drop to two arches. On ground-floor windows, keep arches under 14 inches so they don’t hide the glass from the street.
12. Glittery Red Bow and Glossy Ornaments in Pine
That oversized glittery red bow at the front is the entire personality of this box. Remove it and you have a very nice, very anonymous arrangement of pine needles and ornaments — the kind that photographs fine and reads as nothing from twenty feet away. The bow gives the eye one unmistakable focal point, and it introduces a texture (sparkle) that evergreens can’t provide on their own. Scale it so the bow spans roughly a third of the box’s width, then center it, or you’ll spend the whole season wishing you had.
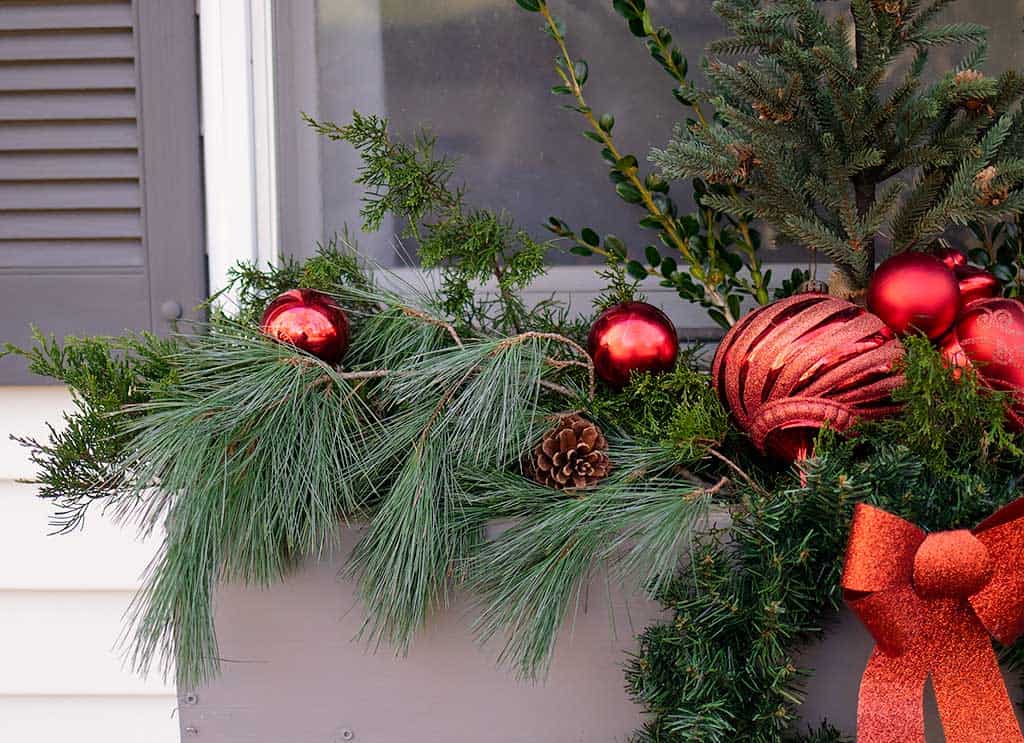
Two principles are at play. Finish contrast: glossy red ornaments against matte pine needles, plus one textured ornament for variation, keeps a single-color scheme from going flat. Distribution: the ornaments aren’t evenly spaced — they cluster in twos and threes, mimicking how berries actually grow, which reads as natural even though it’s arranged. The long pine needles help too, since they’re finer than fir or spruce, giving the red spheres a softer backdrop instead of competing with chunky branches. Like this? Idea #16 swaps the sparkle for X-patterned black wood.
13. Red Velvet Bows and Pinecones Against Tan Brick
Red velvet bows are the fastest way to make a box look traditional, and the fastest way to make it look sad by mid-January. Unsealed velvet wicks water, sags, and dries with a visible tide line; wire-edged outdoor ribbon holds up far better. If you’re set on real velvet, bring the bows inside during ice storms and re-fluff them with a steamer. Watch the pinecones too — natural ones shed scales after a hard freeze, which is fine in a mulch bed and not fine on a stone walkway.
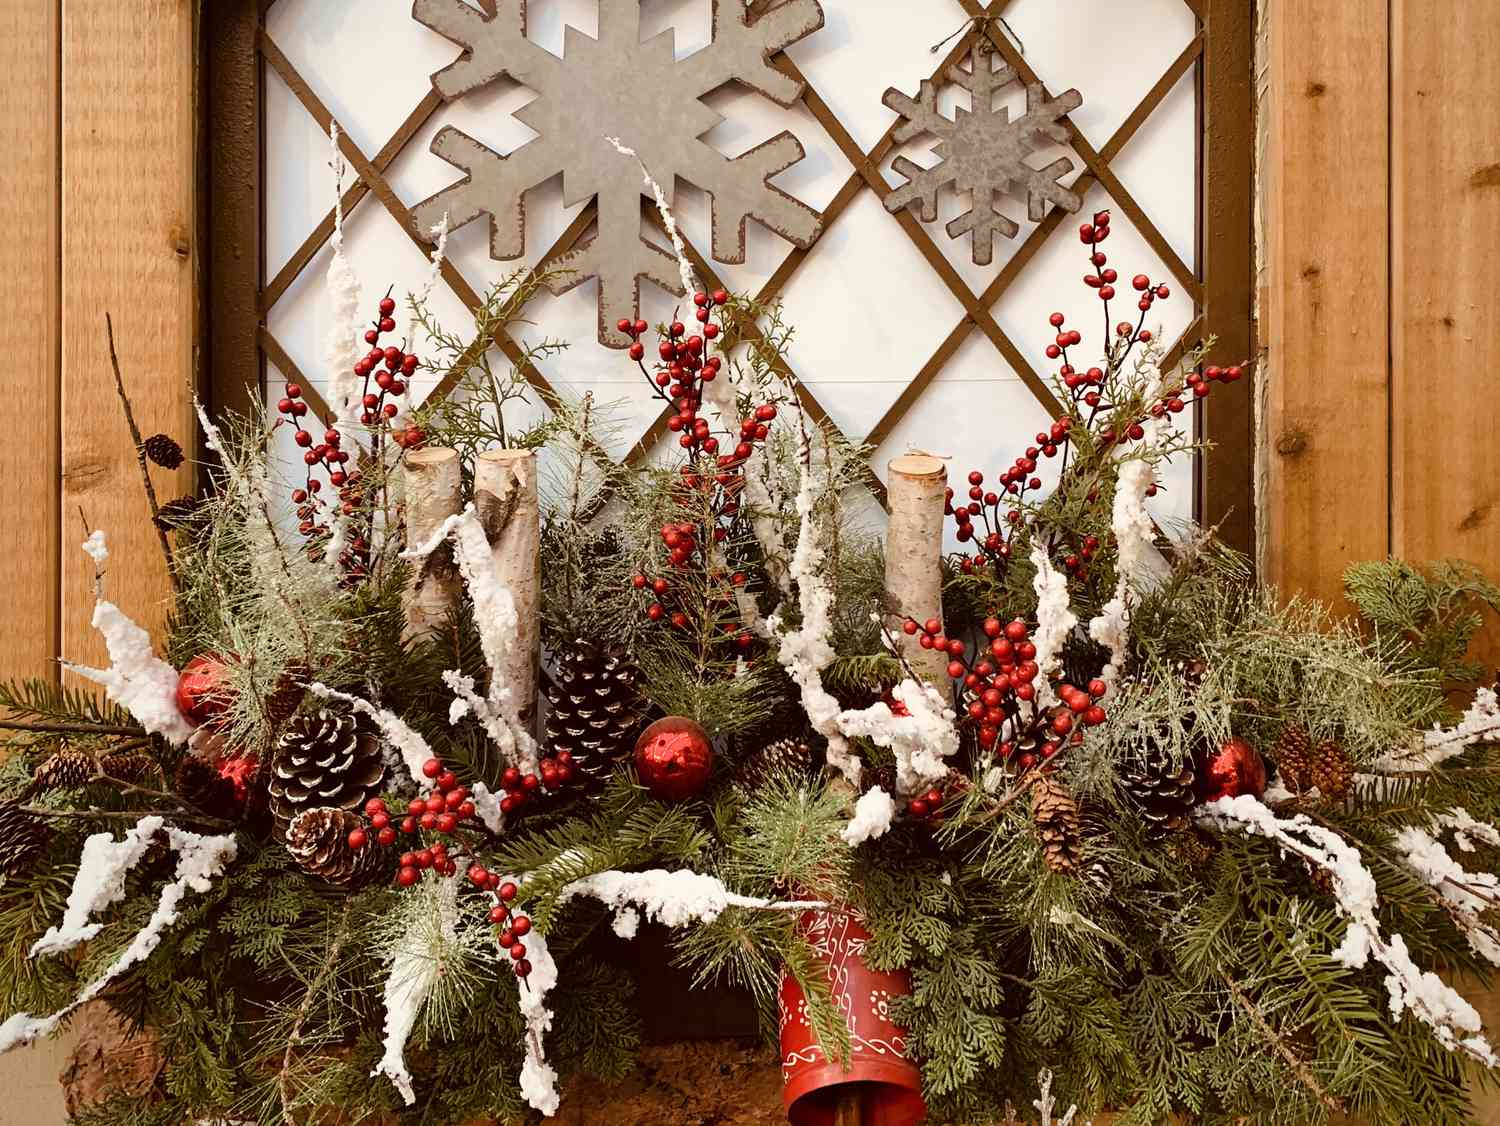
Bow placement is more technical than it sounds. Space them every 18 to 24 inches along the front face, sitting slightly below the top line of the foliage so they look tucked in rather than clipped on. Odd numbers always read better — three bows, five bows — and the middle one should sit a few inches off-center. Attach them with florist wire through the foliage rather than around the box, so wind can’t lever the whole thing loose. Leave the tails long: eight to twelve inches reads generous, two inches reads accidental.
14. Red and Gold Garland Over a Cafe Entrance
The trick to a storefront-style entrance on a house budget is doubling up on cheap elements and going light on expensive ones. Faux evergreen garlands run $12–$20 for nine feet at Walmart; buy three and layer them so the seams hide. A $10 bag of shatterproof ornaments plus zip ties makes any garland look dressed. Skip the stained glass lantern and use a plain black outdoor lantern ($25). Those potted cone trees? A pair of small artificial ones is about $30 each at Target and reusable for a decade. Whole entrance for around $150.
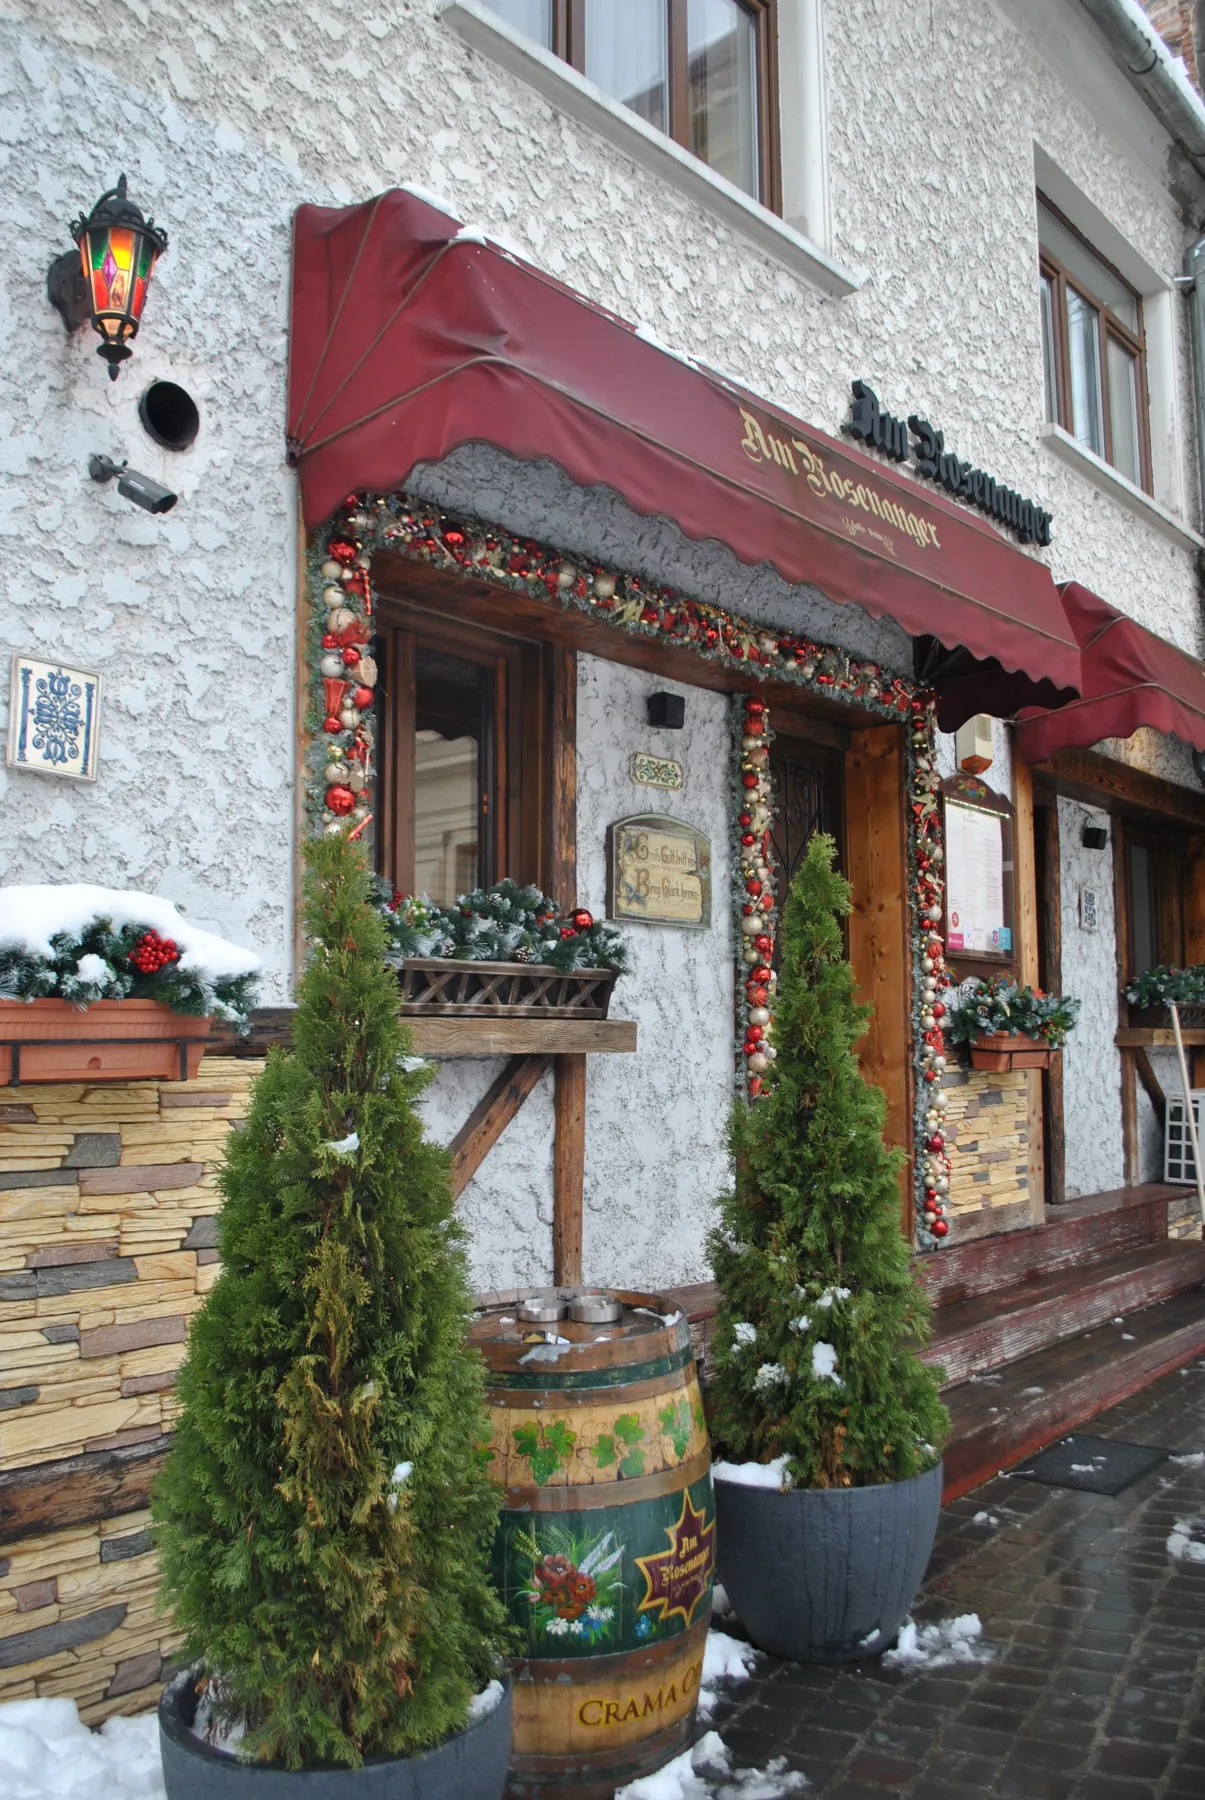
The palette is 50% forest green, 20% red, 20% gold, 10% white snow accents. Notice that red is a supporting player here, not the lead — that’s what keeps a red-and-green display from tipping into candy cane. Gold is doing the work of making red feel expensive instead of festive-cheap. To adapt: swap gold for copper and you get a warmer, more rustic read; swap red for cranberry and gold for antique brass and the whole thing goes Victorian. The white accents don’t change — snow is the constant.
15. Twin Galvanized Boxes with Snow-Dusted Branches
Snow-dusted anything is a maintenance commitment, not a one-time purchase. Flocked evergreens shed for the first week and again every time a delivery driver brushes past them; bare branches with lights need bulbs checked monthly, because a dead section in a tall bare branch is glaringly obvious. Galvanized boxes need their drainage checked after every thaw, and if you live in a salt-belt state, wipe the metal down in March or the finish will pit. Realistic annual upkeep: about two hours of fiddling in December, one hour in January, and a $20 replacement strand most years.
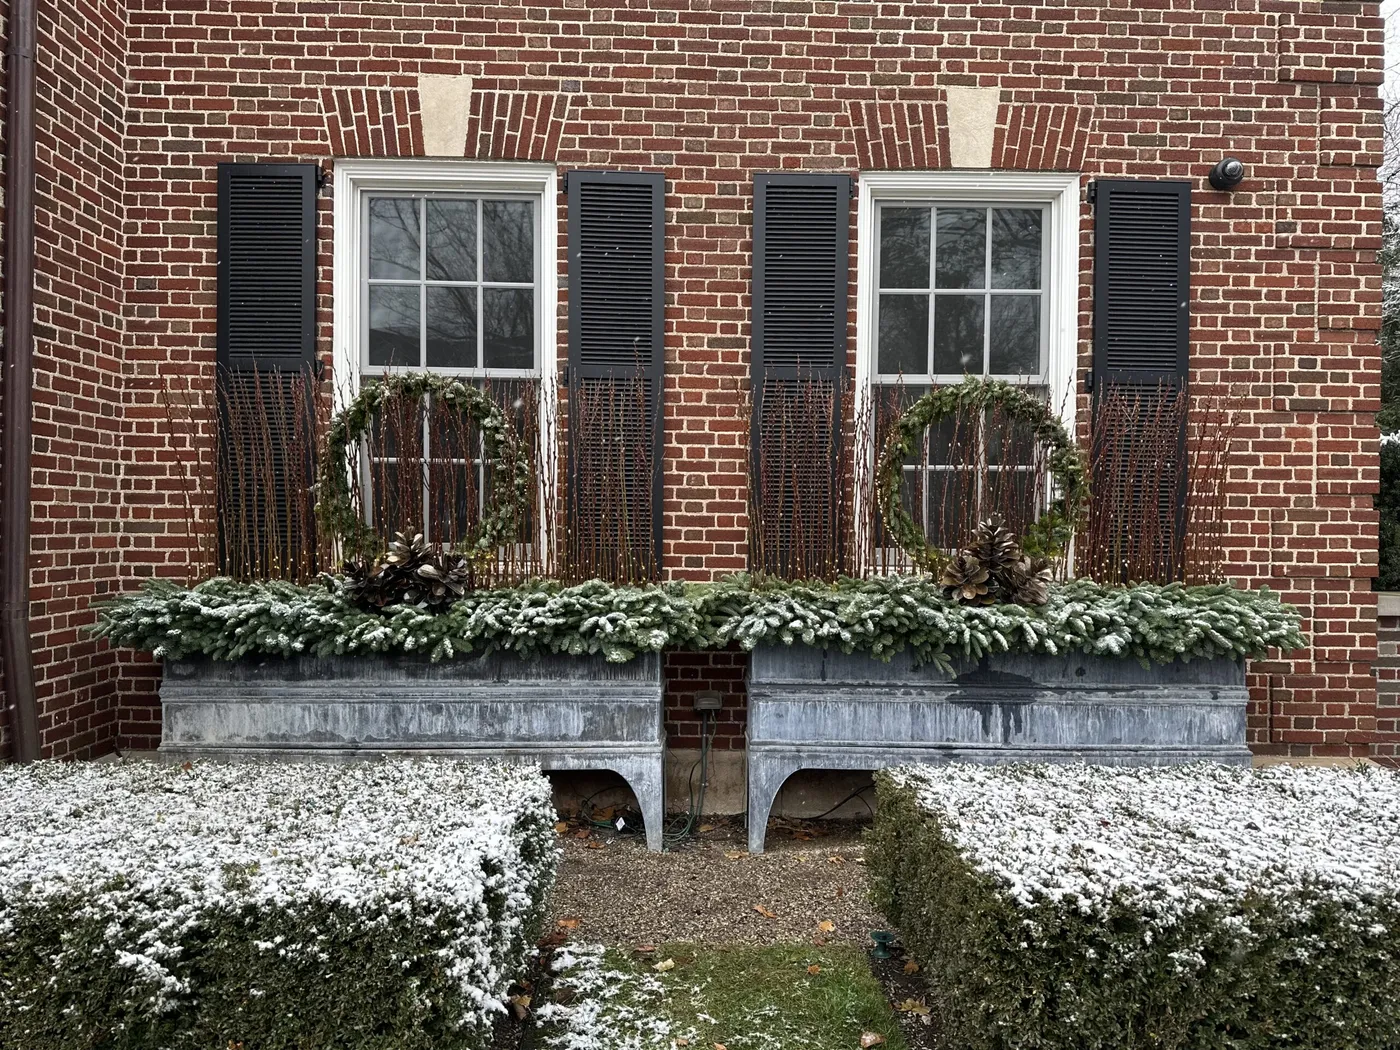
- Two galvanized window boxes: $70–$160
- Evergreen boughs, or free cuttings: $50–$120
- Bare branches: free from the yard
- Two outdoor-rated LED strands: $20–$40
- Flocking spray and pinecones: $20–$35
Total: $160–$355 for the full facade. Budget alternative: one galvanized tub split between two windows, cuttings from a neighbor’s pine, and a can of spray snow — roughly $60 for a convincing version. Buy in January and the boxes themselves drop by half.
16. X-Patterned Black Box with Berries and Pinecones
The X-panel detail looks best on boxes at least 10 inches tall — anything shorter and the pattern gets cropped into a squiggle. This arrangement wants a window 36 to 54 inches wide. On a narrow window, keep the box but cut back to three evergreen varieties and one berry cluster so the pattern stays legible. Check your sill height too: X-pattern boxes look best when the top edge sits four to six inches below the sill line, so the decorative panel reads as part of the architecture rather than a bucket hanging in space.
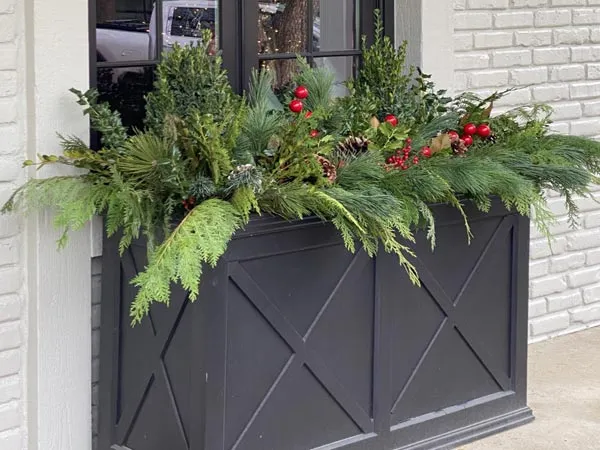
The X-pattern is a genuine architectural gesture on an object that’s usually just a container, and that’s what makes this one memorable. It also creates rhythm — geometry up top, loose chaos of evergreens and berries below — which keeps the eye moving. Then the color story is quietly smart: matte black frame, forest green mass, small hits of true red, with white brick behind it all doing the job of a gallery wall. Compare with Idea #13 — same palette, much softer frame.
17. Dried Grasses, Faux Apples, and Deep Purple Siding
Faux apples and dried botanicals look wonderful and behave badly in wet weather. Freeze-thaw cycles crack the coated finish on faux fruit, and dried grasses go limp and grey after two good rains. If your box sits under an overhang, or you live somewhere with a dry winter, go for it — it’s a beautiful, slightly eccentric look. If not, plan to replace the dried elements in January and treat the apples as a six-week decoration. One more thing: against deep purple siding, red reads darker than you expect, so test the arrangement in daylight first.
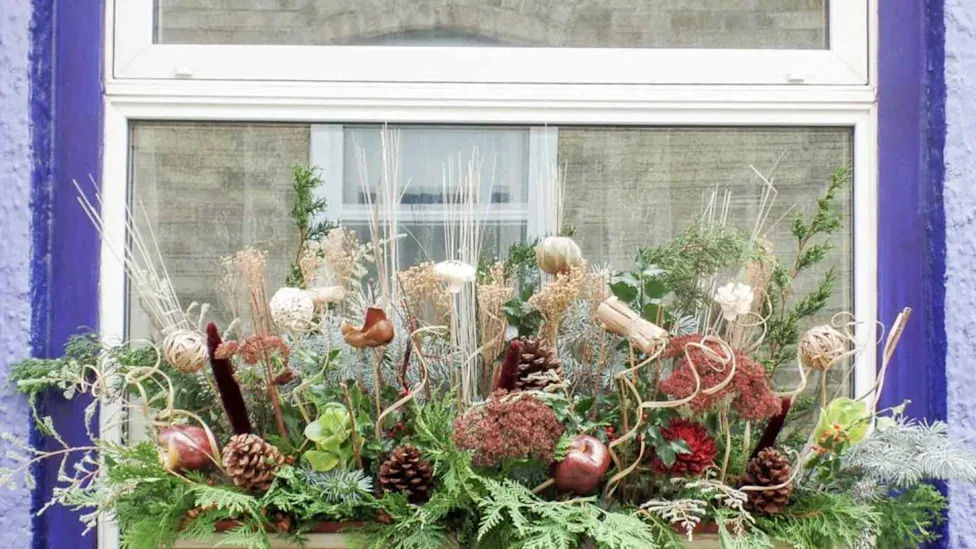
Those tall dried grasses and sticks are the reason this box has presence. Everything else — the pinecones, the berry clusters, the white decorative balls — sits at roughly the same height, which would make the whole thing read as a flat hedge without them. The grasses add vertical break and a delicate silhouette against the dark purple wall, and they throw small shadows behind the display, which softens its edge. Without them this is a nice box. With them, it’s a composition.
18. A Wooden Crate Full of Orange and Dried Citrus
If you’re planting in a wooden crate, line it before you plant it. A coco liner plus a sheet of plastic with half a dozen drainage holes punched through keeps wet soil off the wood and adds years to the box’s life. Elevate the crate about half an inch off the sill with two strips of wood or rubber feet — that gap is the difference between a crate that lasts five winters and one that rots at the base in two. Seal the outside with exterior-grade deck sealer every other fall.
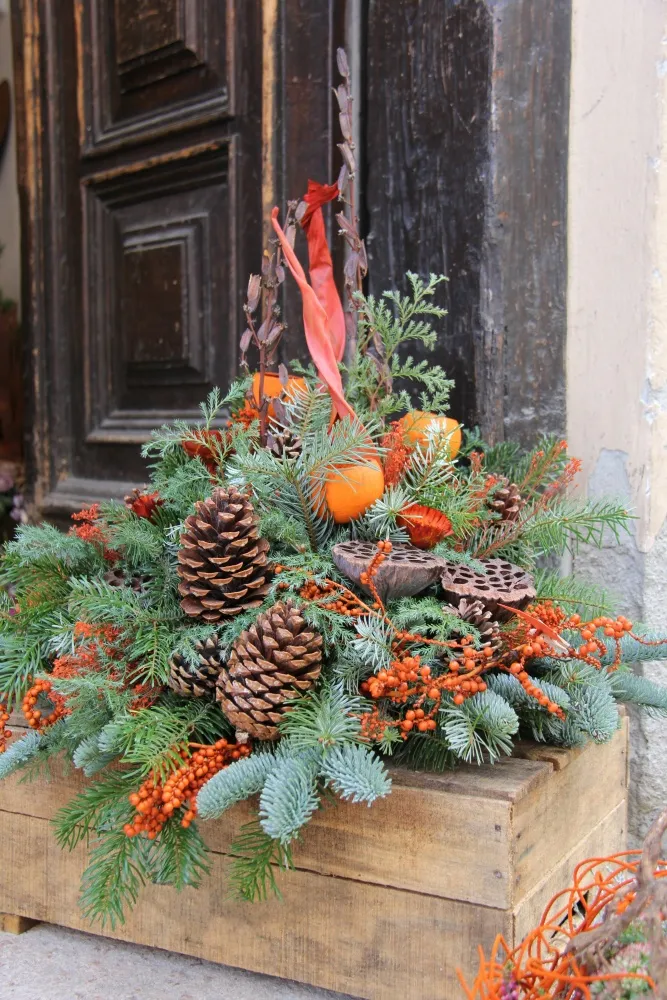
Dried orange slices cost about $4 and two hours of oven time.
- Slice oranges thin, about 1/8 inch, and blot both sides with a paper towel.
- Lay them in a single layer on a wire rack set over a baking sheet.
- Bake at 200°F for two to three hours, flipping once at the halfway mark.
- Cool completely — if the centers still feel soft, they’ll mold, so give them another 30 minutes.
- Seal both sides with a light coat of matte spray polyurethane if they’ll face the weather.
- Attach with florist wire, not glue; the slices crack easily.
19. Matching Wreaths and Garlands on a Stone Archway
Symmetry looks expensive, but it isn’t. Buy two identical plain evergreen wreaths for about $20 each at Walmart or Lowe’s and dress them yourself with one roll of gold-edged ribbon and a bag of pinecones. For the archway garland, skip the pre-lit version — a nine-foot plain garland is $18 and a strand of warm white LEDs is $10. That’s the whole facade for about $100. Search Facebook Marketplace in early December for wreaths people are clearing out; barely used ones go for $5 to $10. Compare with Idea #14, which does the same thing with more red.
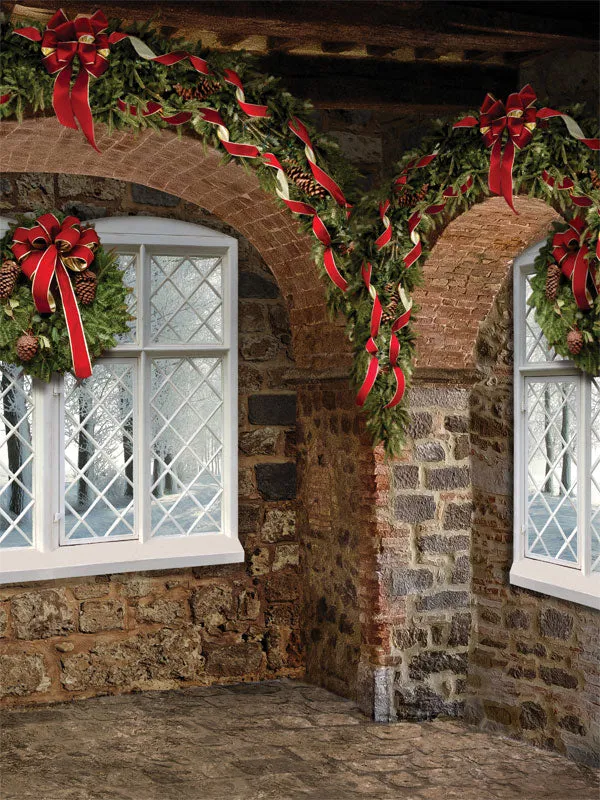
For a brick archway, you need roughly 1.5 feet of garland for every foot of span, plus 12 extra inches on each end for the swag. A six-foot arch takes about 11 feet; an eight-foot arch takes 14. Wreaths should be sized to the window, not the wall — about a third of the window’s width reads balanced, so a 30-inch window wants a 20-inch wreath. On stone, use masonry clips rather than adhesive hooks; adhesive fails below freezing, usually around 3 a.m. on the coldest night of the year.
20. A Light-Framed Window with Exterior Paper Lanterns
- Two strands of warm white LED lights: $20–$40
- Outdoor paper lanterns with LED inserts: $25–$60
- Beige or ivory window drapes: $30–$80
- Red ribbon, white baubles, and ornaments: $40–$90
- Extension cord and outdoor timer: $15–$30
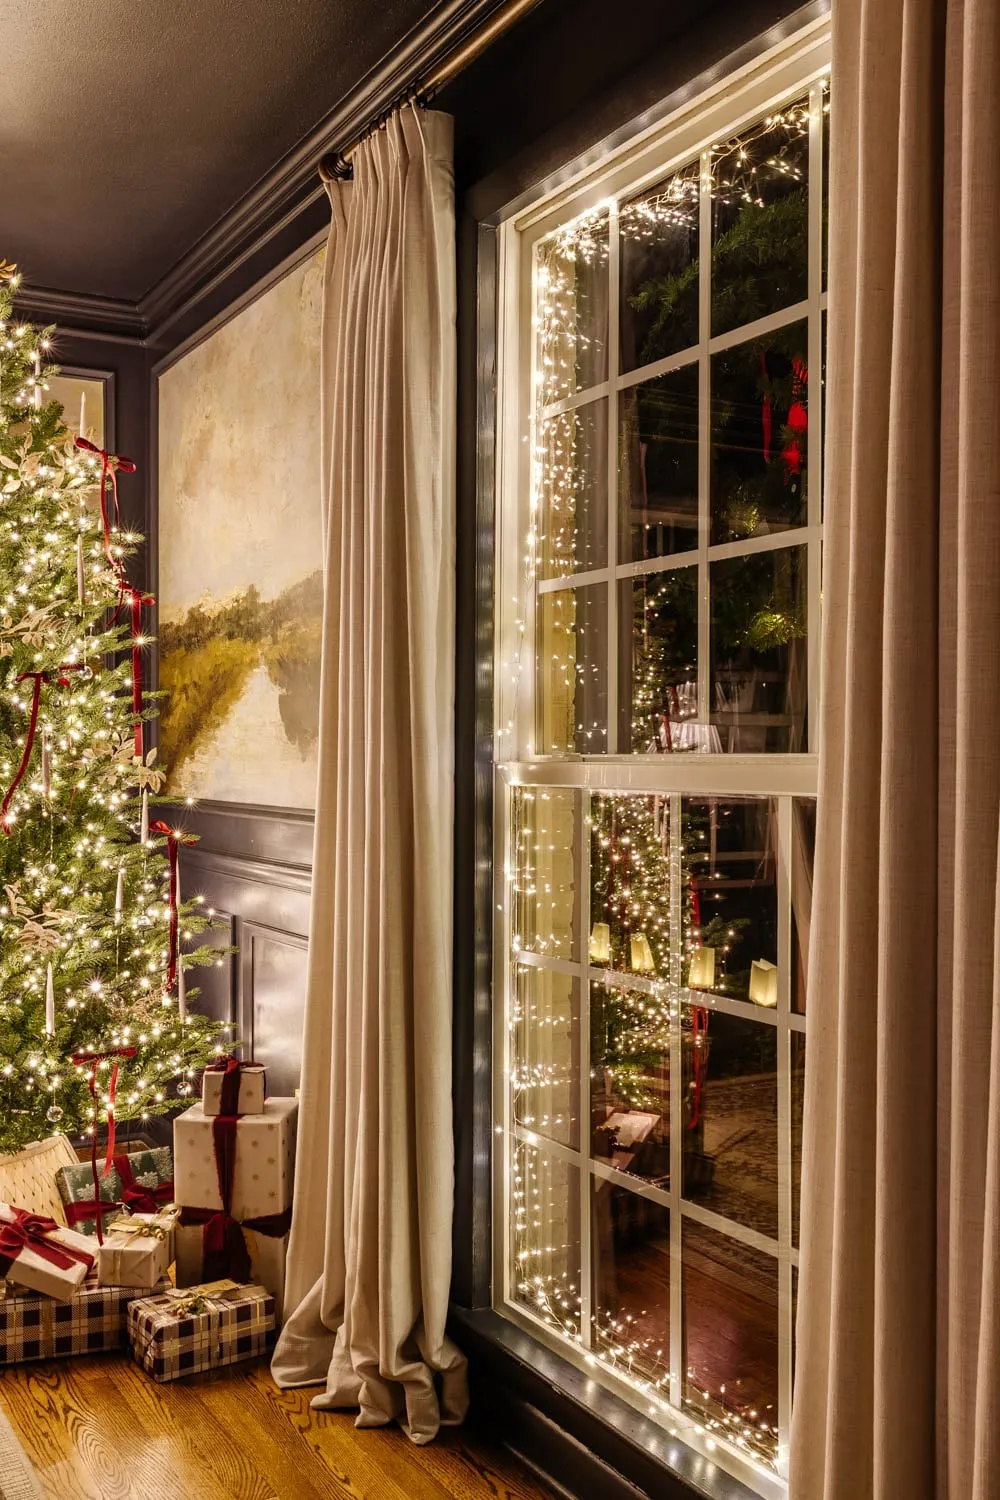
Total: $130–$300. Budget alternative: skip the paper lanterns and use three mason jars with battery fairy lights ($8 for six jars), buy ornaments after Christmas at 70% off for next year, and use a $12 mechanical timer instead of a smart plug. Under $60 is entirely doable, and nobody standing on the sidewalk can tell the difference.
The formula here is 70% warm white, 20% rich red, 10% neutral beige. It’s the most forgiving ratio in the whole roundup, because warm light does the emotional work and the red is only there to give the glow something to sit against. Swap red for soft gold and it turns elegant and a little formal. Swap the beige drapes for deep green and the same lights read cozy and woodland. Keep the light temperature consistent — mixing cool white and warm white in one window is the single most common lighting mistake.
21. Lit Wreaths and Red Swags in White Paned Windows
Run through this list before anything goes up:
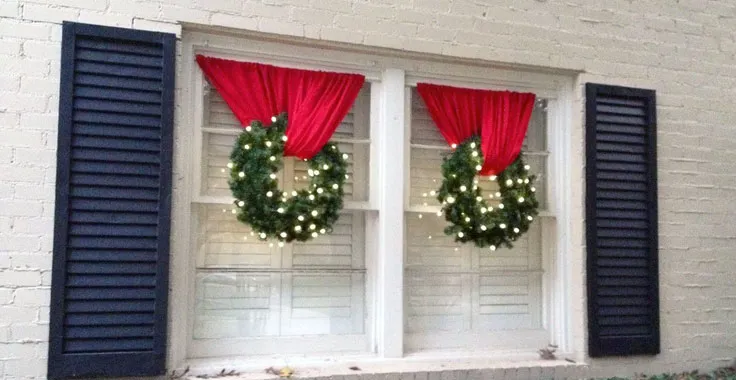
- Measure each pane — the wreath should cover about 70% of the visible glass, so a 24-inch pane wants a 16 to 18-inch wreath.
- Check how the window opens. If it tips inward, a wreath hung inside the frame gets crushed the first warm day.
- Test the light strand before hanging; one dead bulb in a wreath means an hour of redoing.
- Confirm you have an outdoor outlet, or a timer that fits inside the pane without pinching the sash.
- Choose the swag fabric before you buy wreaths — the two reds need to match, or they won’t.
Draping a fabric swag takes about 15 minutes per window.
- Cut your fabric into a 12-inch-wide strip, roughly twice the window width.
- Fold it in half lengthwise and press — the fold becomes your top edge.
- Drape it over the top of the opened lower sash, then close the window gently to hold it in place.
- Pull the two ends to different lengths so the swag has an off-center drape instead of a V.
- Pin the wreath over the fabric with a small adhesive hook on the glass or a clip on the sash.
For a cleaner version of the same idea, see Idea #3, which puts a wire star where this one puts fabric.
Pick One Window and Start There This Weekend
Twenty-one ideas is a lot to hold in your head, so choose the window strangers see first and start with the simplest build — a coir-lined box of foraged greenery beats a perfect plan you never actually execute. Match the palette to your siding and the materials to your climate, then let the rest go without guilt. 📌 Pin this guide now, so it’s waiting for you when the tree lot opens and the cuttings are free.